If you have multiple stores, with or without a warehouse location you are able to easily transfer inventory quantities between your stores as needed. This article will show you how to use the Transfers page to create and receive inventory transfers. Take a look!
Please Note: This feature is only necessary if you have more than one store in the system.
Using The Transfers Page
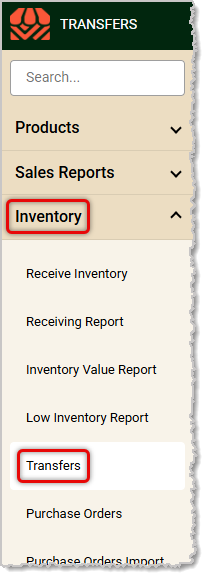
You can get to this part of the system by logging into the IT Retail Back End and in the main menu on the left, go to Inventory > Transfers.
On the Store Transfers page you are able to see stats about your Transfers, track the progress of Transfers, create new Transfers, and receive sent Transfers. Here is how to use this page:
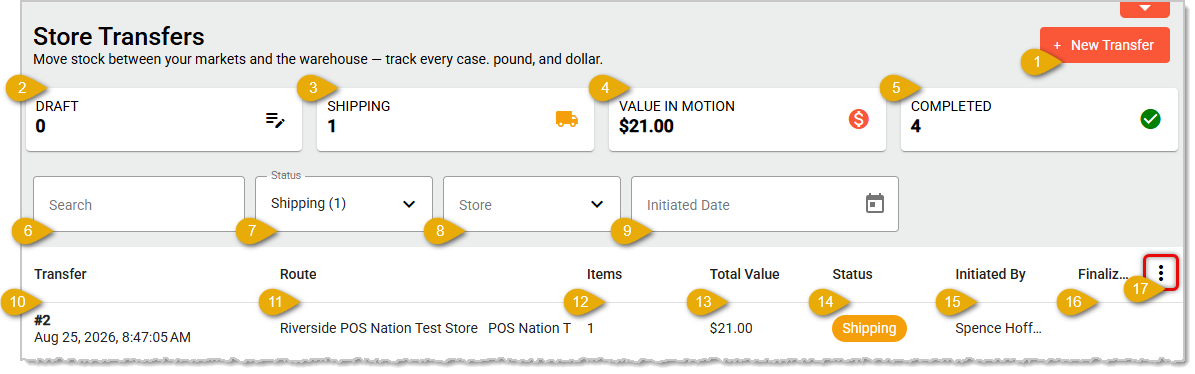
- Create Transfer — Click the +New Transfer button to create a new Transfer. The creation and completion process for Transfers is detailed in the section below.
- Transfer Drafts — This area displays the number of Transfers in a Draft Status.
- Shipping Transfers — This area displays the number of Transfers in a Shipping Status.
- Value in Motion — This area shows the total Dollar Value of the inventory currently in transit.
- Completed Transfers — This area displays the number of Transfers in a Completed Status.
- Search — Use the Search field to enter search terms to find the Transfer you want.
- Status Filter — Use the Status filter drop-list to narrow the Transfers that display down to those of the chosen Status. Statuses include Draft, Shipping, Completed, and Canceled.
- Store Filter — Use the Store filter drop-list to narrow the Transfers that display down to those that include the chosen Store.
- Initiated Date Filter — Click the Initiated Date filter to either type in a date or use the Date Picker (click the Calendar Icon) to filter the Transfers down to those that match your chosen date.
- Transfer — This columns displays the Transfer Number, and the Initiated Date and Time.
- Route — This columns displays the From Store and the To Store.
- Items — This column displays the total number of Items (unit count) in the Transfer.
- Total Value — This column displays the Total Dollar Value (Price, not Cost) of the inventory in the Transfer.
- Status — This column displays the current Status of the Transfer. Statuses include Draft, Shipping, Completed, and Canceled.
- Initiated By — This column shows the Employee Name of the person who created the Transfer.
- Finalized By — For Completed Transfers, this column shows the Employee Name of the person who completed the Transfer.
- Action Menu — Click the Three-Dot Stack button to open the Action Menu. You have the following action options:
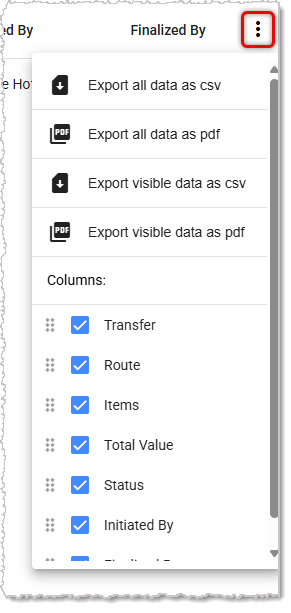
- Export All Data as a CSV — This will export all data for all Transfers across all pages.
- Export All Data as a PDF — This will export all data for all Transfers across all pages.
- Export Visible Data as a CSV — This will export all data for all Transfers on the current page.
- Export Visible Data as a PDF — This will export all data for all Transfers on the current page.
- Display Columns — You can un-check boxes for Columns you don't need. By default, all columns display.
Create and Complete a Transfer
To create or complete a Transfer, you need to be on the Transfers page of the Inventory menu. Here are the processes for creating and completing your Transfers:
Creating a Transfer
- Click the +New Transfer button in the upper right of the Transfers page to open the Create Transfer Page.
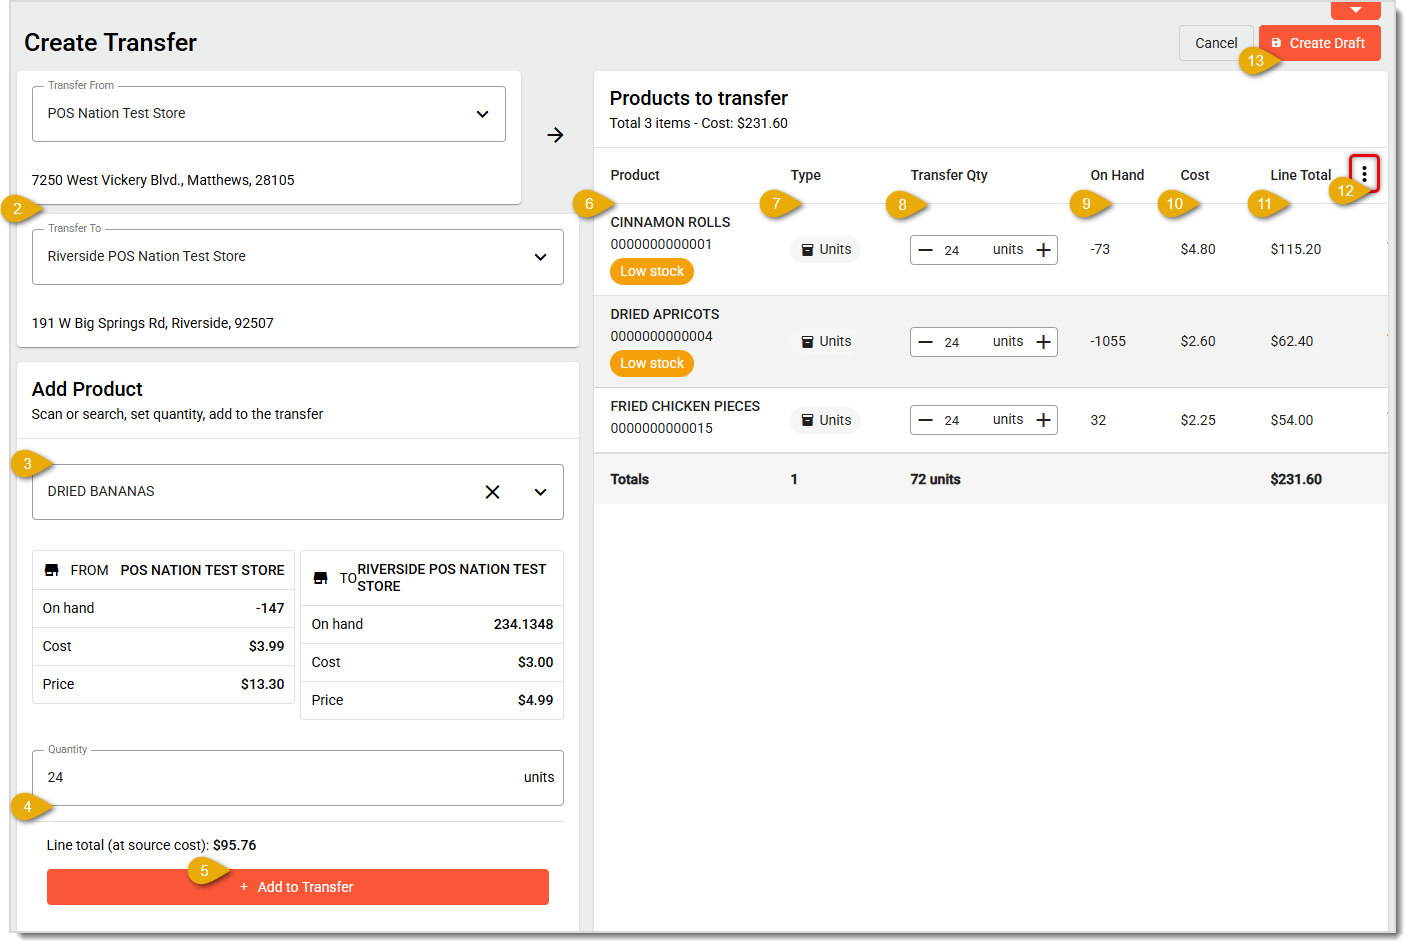
- Select the Transfer From Store and Transfer To Store from the drop-lists.
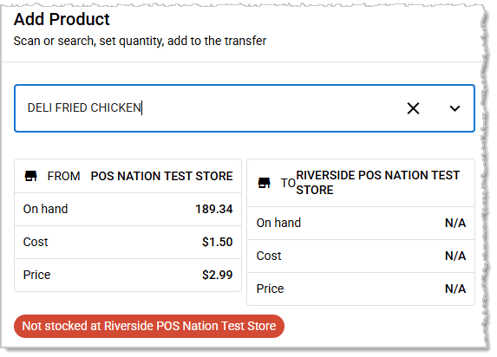
- Scan in or search for the products you want to add to the Transfer. You will see the Quantity on Hand, Cost, and Price of the item for both stores. Please note that if the product is not saved in both stores you will not be able to add it to the Transfer, as pictured below.
- Enter the Quantity you want to transfer. You'll see the Total Cost Value of the inventory.
- Click the +Add to Transfer button when you're ready. The item will populate in the Products to Transfer data table on the right. Repeat steps 3 - 5 until you have added all your Transfer items.
- You'll see the Item Name, UPC, and if the item is Low Stock from the source store in the Product column. The system will allow you to transfer inventory quantities you don't have saved in the system, but it is recommended that you update your inventory for accuracy. You can use the Quick Inventory page to adjust inventory quantities.
- You'll see the product type, either Unit, Case, or Scale for each item in the Type column.
- You can adjust the amount being transferred for each item in the Transfer Quantity column, if needed.
- You'll see the current Quantity On Hand in the From Store in the On Hand column.
- You'll see your cost per item for each product in the Cost column.
- You'll see the Total Cost of the inventory being transferred for each product in the Line Total column.
- You can click the Three-Dot Stack Icon to open the Action Menu, where you can un-check Columns you don't need. By default, all columns display.
- Click the Create Draft button in the upper right when you're ready to save the Transfer. You are able to edit a Draft at any time if you need to add more items or adjust quantities. You'll see a success confirmation pop up in the upper right letting you know the Draft is saved.
Shipping a Draft Transfer
-
On the Transfers page, you can find the Draft by using the Search and Filters (be sure the Status filter is either All or Draft), as pictured below.
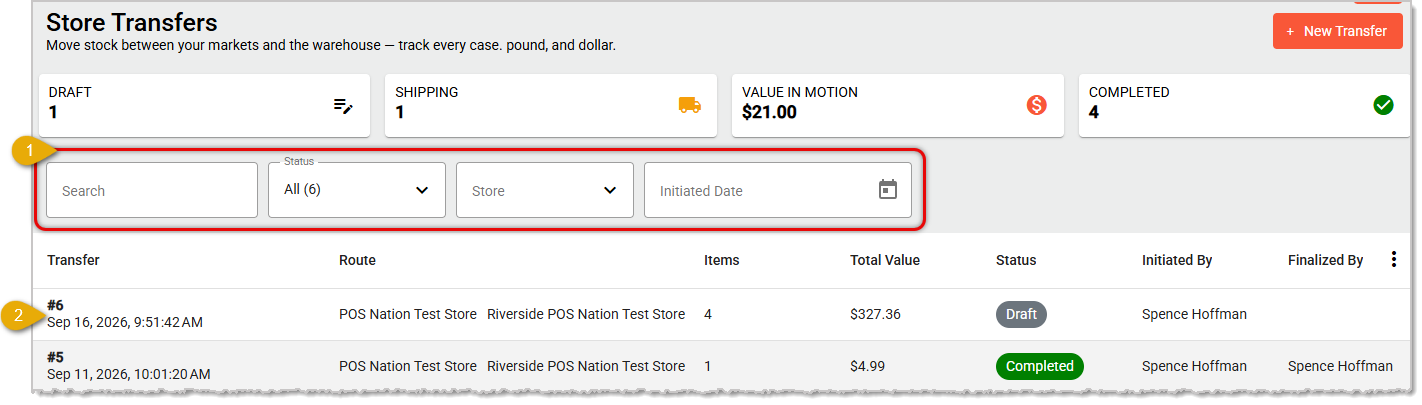
- For the Transfer you want, you can click anywhere on its line to open its details page.
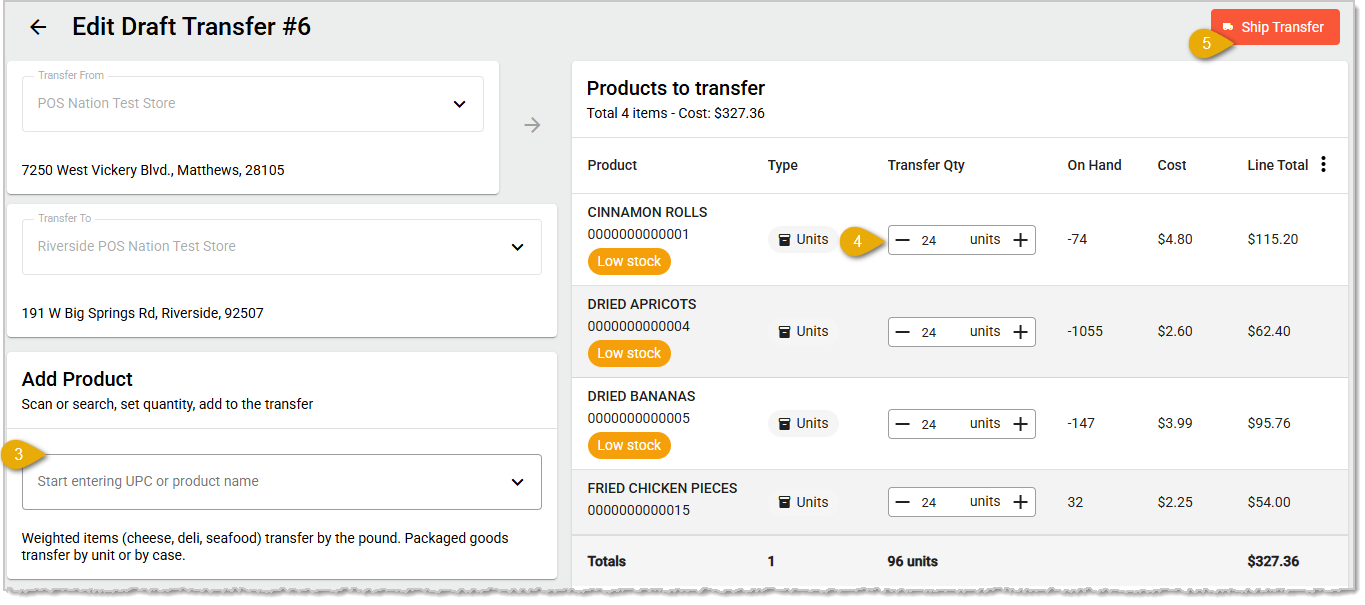
- You can Add Products to the Draft, if needed. Scan in the UPC or Search for what you want, set the Quantity to transfer, and click the Add to Transfer button.
- You can adjust Transfer Quantities for the items in the Transfer, if needed.
- Click the Ship Transfer button in the upper right to change the Transfer Status to Shipping. While in this status, the inventory in the From Store that is in the Transfer will no longer be available, and it will not yet be available in the To Store as well. For Transfers in a Shipping Status, you will no longer be able to adjust Quantities or to add products. You can open a Shipping Transfer at any time and either Cancel it, or complete it, as described below.
Complete a Shipping Transfer
- When the destination Store receives the shipment, you can go into Inventory > Transfers at that store to Complete it. On the Transfers page, you can find the Shipping Transfer by using the Search and Filters (be sure the Status filter is either All or Shipping), as pictured below.
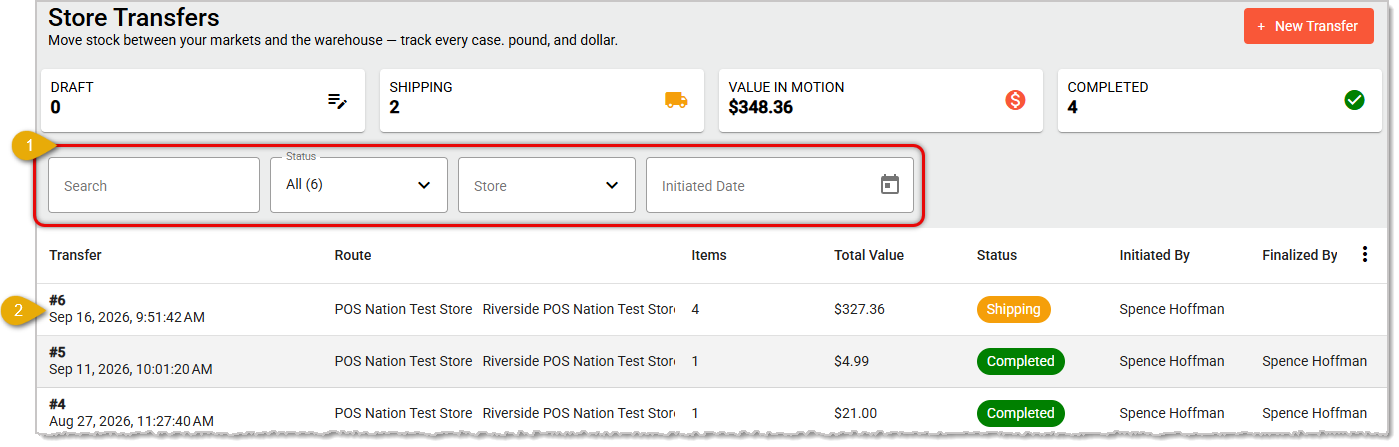
- For the Transfer you want, you can click anywhere on its line to open its details page.
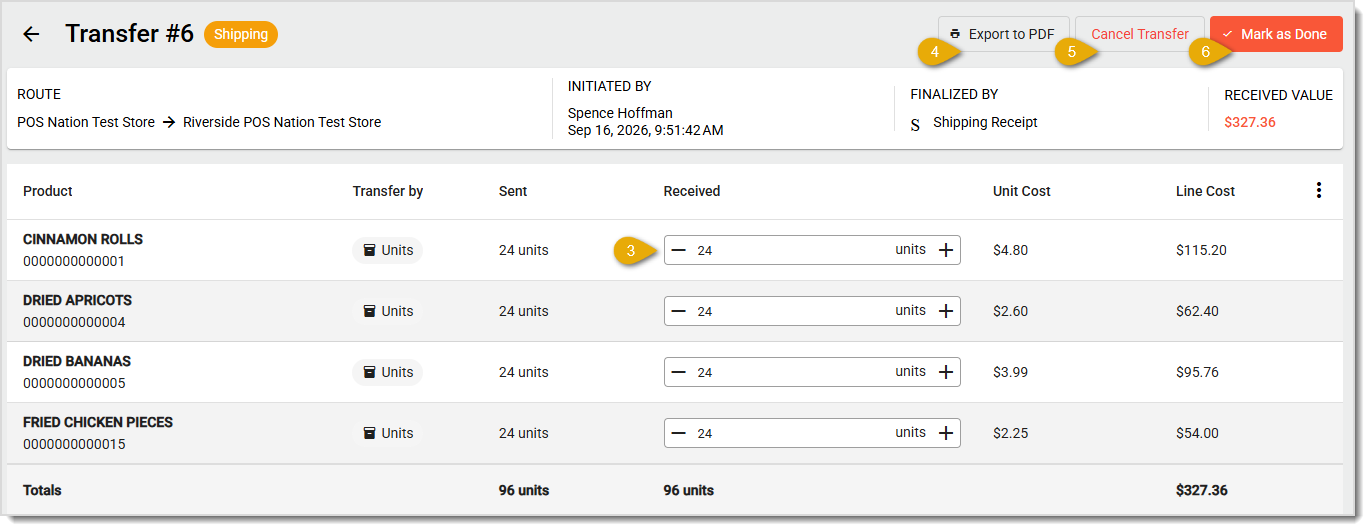
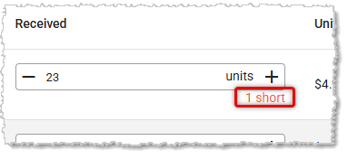
- You are able to adjust the Received quantity if the count was off and for adjusted items, the page will display the Short or Over count.
- You can Export to PDF if you need to save a copy of the Transfer.
- You can click to Cancel Transfer if you no longer need to transfer the inventory. Doing so will move the Transfer to a Canceled Status and will restore the active Inventory Quantities to the products in the From Store.
- You can click the Mark as Done button in the upper right to complete the Transfer. This will make the Inventory Quantities active in the To Store and will change the Transfer Status to Completed.
Related Articles
Quick Inventory
Multi-Store Setup
Frequently Asked Questions
Q: Where does the inventory "live" while a Transfer is in Shipping status?
A: Nowhere sellable. It's removed from the From Store's available inventory but isn't added to the To Store until the Transfer is completed.
Q: Why can't I add a certain product to a Transfer?
A: The product has to exist in both the From Store and the To Store. If it's only set up in one store's catalog, you won't be able to add it.
Q: What do Short and Over mean when completing a Transfer?
A: They compare what you received to what was shipped. Short means you received less than expected, and Over means you received more.
Q: What happens if I cancel a Transfer that's already Shipping?
A: The inventory quantities go back to the From Store, and the Transfer moves to Canceled status.
Q: Can I still edit a Transfer once it's in Draft status?
A: Yes. You can add items or adjust quantities on a Draft any time before you ship it. Once it's Shipping, those options lock.
Q: I have a question, but I can't find my answer here. How do I get more assistance?
A: If you need immediate assistance, the IT Retail team is available 24/7. Feel free to contact our support team at 877-752-0625. You can also email us at support@marktpos.com, and we will respond within 24 hours.








 September 16, 2026
Is this page helpful?
×Help us improve our articles