Receive Inventory

December 11, 2025
The Receive Inventory page allows you to easily receive product deliveries and to update quantities. Read on to see how you can receive inventory and update your stock quantities in the Back End.
Receive Inventory
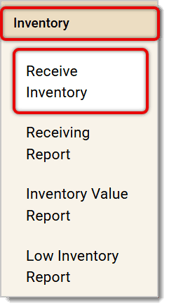
To receive inventory, go to Inventory > Receive Inventory.
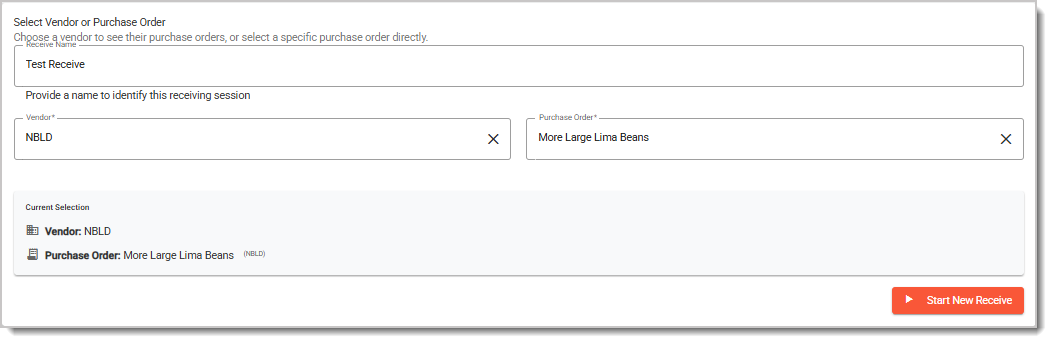
To start, enter a Receive Name so you can identify this session later. Then select a Vendor and a Purchase Order using their respective drop-lists. Selecting a Vendor first can help you narrow down down your Purchase Order selection. Once you've selected the Vendor and the Purchase Order, click on the Start New Receive button in the lower right.
On the Receive Product page, you can enter Product information to receive your inventory. Refer to the image below as we guide you through the functions on this page:
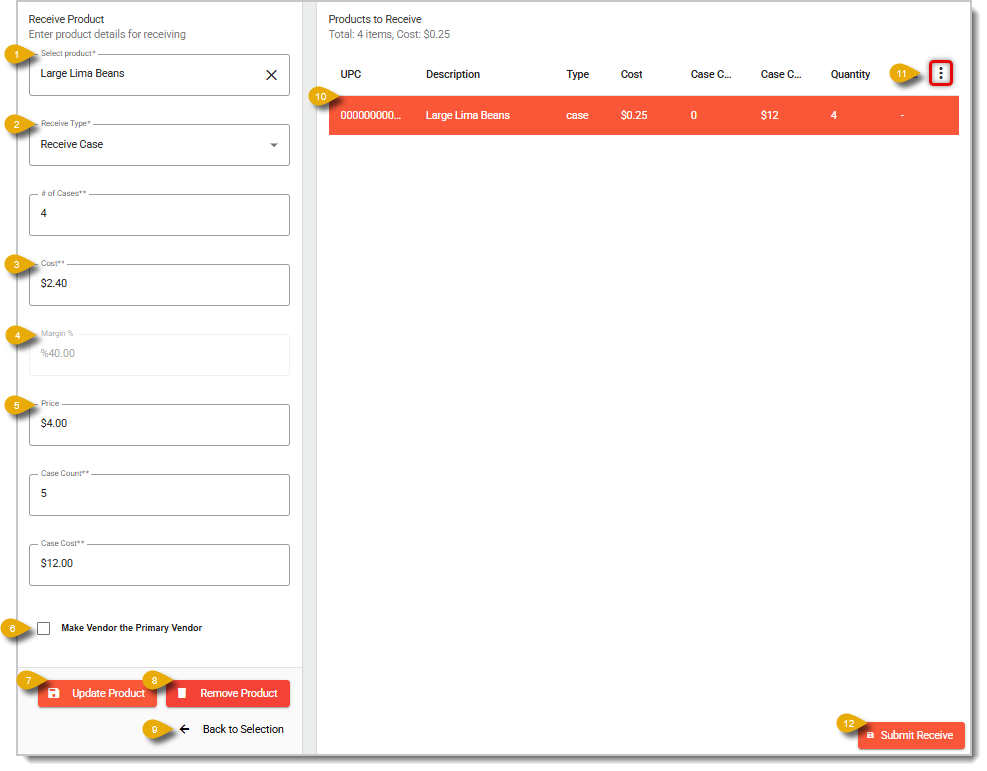
- Select Product* — Enter the product's UPC, Description, or Item Code and select it from the drop-list.
- Receive Type* — Choose either Receive Case or Receive Unit. Click on Receive Case if you're receiving the product in cases, and click on Receive Unit if you're receiving it as individual units.
- If you select Receive Case, which you can see an example of in the above image, fill out fields for Number Of Cases*, Case Cost*, and Case Count*. Case Count refers to how many units are in each case.
- If you select Receive Unit, fill out the Quantity* field (not shown in the image above).
- Cost* — Enter how much each unit costs for you to purchase from the vendor.
- Margin Percent — This field automatically calculates the profit margin percentage for the item as you enter Cost and Price.
- Price — Enter your selling price per item for the product.
- Make Vendor the Primary Vendor — Check this box to mark this as your store's Primary Vendor of this product.
- Update Product — If you edit the Cost, Price, or Case Cost of this Product here, you can click on this button to update its details in the system.
- Remove Product — Click on this button to just remove this Product from the Receiving list. A window will pop up, asking you to confirm the Product's removal. This action does NOT remove the item from the store's POS records, just from the receiving list.
- Back to Selection — Click here to go back to the Receive Inventory Selection page.
- Product Selection — Click on a Product's list item to select or unselect it. The selected Product will be highlighted, while an unselected item will be gray.
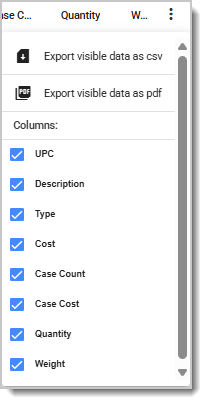
- Action Menu — Click on the Three-Dot Stack icon to export your data as a CSV file or PDF file. You are also able to select which columns you want to be visible or hidden.
- Submit Receive — When you're finished, click on the Submit Receive button in the lower right.
* Required Field
Related Articles
Receiving Report
Inventory Value Report
Low Inventory Report
Purchase Orders
Quick Inventory
Vendors
Frequently Asked Questions
Q: I have a question, but I can't find my answer here. How do I get more assistance?
A: If you need immediate assistance, the IT Retail team is available 24/7. Feel free to contact our support team at 877-752-0625. You can also email us at support@marktpos.com, and we will respond within 24 hours.
The IT Retail system makes it easy to add or update your products in the Back End. This article deta
The Inventory Value Report will show you the Quantity On Hand and dollar value of your products. Kee
You can easily create a Purchase Order for when you run low on items from a certain vendor you wish








Is this page helpful?
×Help us improve our articles