Purchase Orders

January 05, 2026
The IT Retail system has a robust Purchase Order builder you can use for your vendor inventory orders. This article will walk you through how to work with existing Purchase Orders and how to build new ones. Take a look at what you can do!
Working With Purchase Orders
From the Back End, open the Inventory menu and click on Purchase Orders.
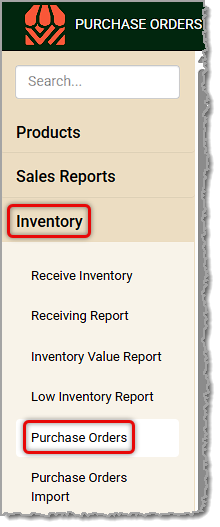
The Purchase Orders page will load with all created but unreceived Purchase Orders listed. You can find an existing Purchase Order to view or update it, or you can create new Purchase Orders.
Open and Update Existing Purchase Orders
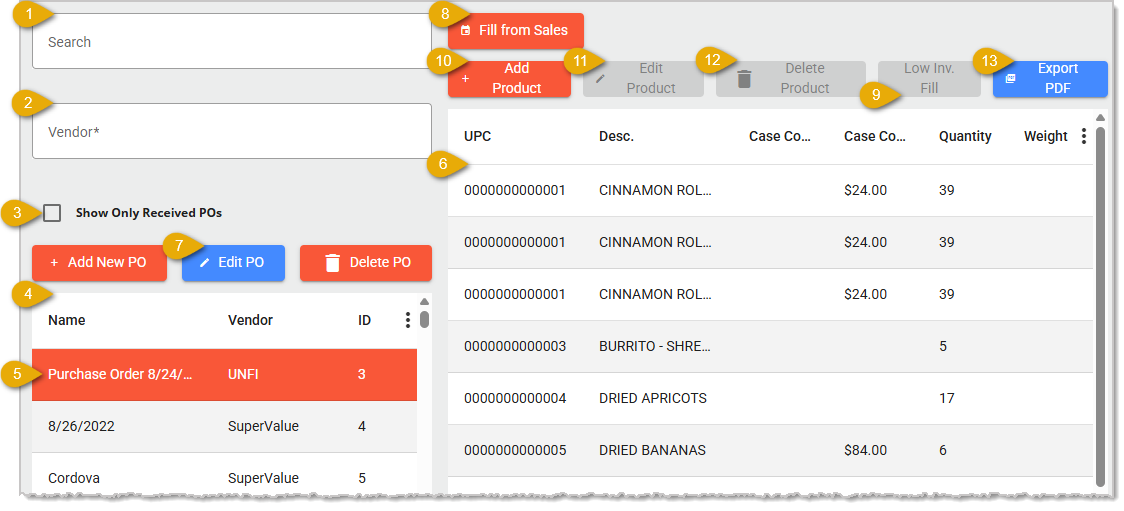
- Search — Enter keyword text to find a purchase order you need to view or edit.
- Vendor Filter — If you need to see purchase orders only from a specific Vendor, you can click this drop-list to select the one you want and only orders for that vendor will display.
- Received Filter — By default, the orders that have not been received will display, but if you need to see only orders that have been received you can check this box.
- Purchase Orders List — You'll see the Name, Vendor ID, and Purchase Order ID (an internal identifier assigned by the system to the Purchase Order) for each saved purchase order in your system, if any.
- Purchase Order Line Item — You can click on a Purchase Order to highlight it and its data will load on the right.
- Order Items — You'll see key information for each item in the order (full descriptions below in the section on creating a new purchase order).
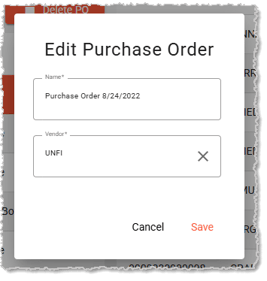
- Edit PO — If you need to adjust the PO Name or change the Vendor, you can click this button and a window will open that will allow you to adjust what you need and Save.
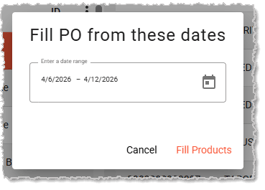
- Fill From Sales — If you've had sales for items from your chosen Vendor since the PO was created, click this button and you'll be able to choose the sales Date Range and automatically update items and quantities from the Vendor that had sales. Click the Fill Products link in the lower right when you have set your Date Range.
- Low Inventory Fill — If the item is at or below its Low Inventory Alert quantity, you can click this button to order up to the Reorder Amount for the item (please note this only works if you're receiving Units instead of Cases) and the system will add the appropriate quantity to get to your total Reorder Amount.
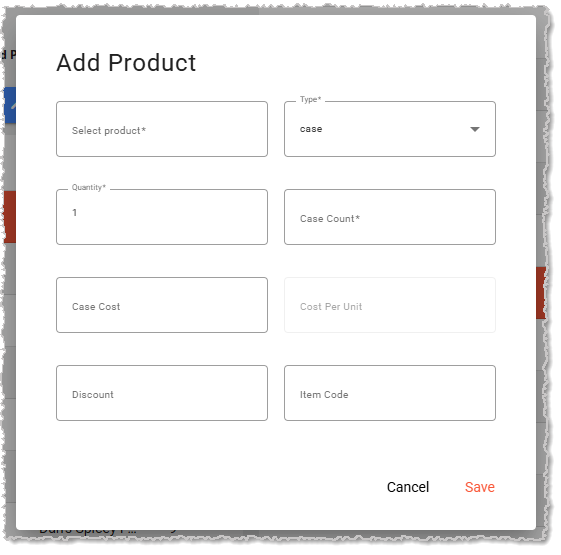
- Add Product — If you need to manually add products to the PO, click this button. The Add Product window will open and you can either search for the item you want or scan the UPC barcode into the Select Product field in the upper right. The information for the product you select will populate in the other fields and you can set the Quantity you need to order of the item. You can apply any Discount you might be getting for the item from the Vendor. If the Vendor has an Item Code for the product you need to use on POs you can enter it in that field. Click Save when you're finished and the item will be added to the PO.
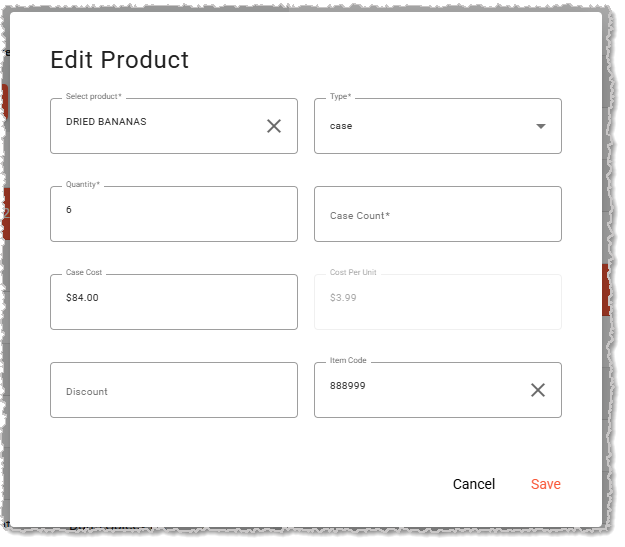
- Edit Product — If you need to adjust any of the information for an item in the PO, click the item in the list to highlight it, and then click the Edit Product button. The Edit Product window will open and you can adjust whatever is needed and then click Save at the bottom to update it.
- Delete Product — If you need to remove an item from the PO, click the item in the list to highlight it, and then click the Delete Product button. This does not delete the product from the database, it only removes it from the PO. A confirmation will pop up asking if you really want to remove the item, and once you click the Yes button, the item will be removed from the PO.
- Export PDF — Click this button to download a PDF file of the PO. Your web browser may also open it in a browser tab for your review.
Create a New Purchase Order
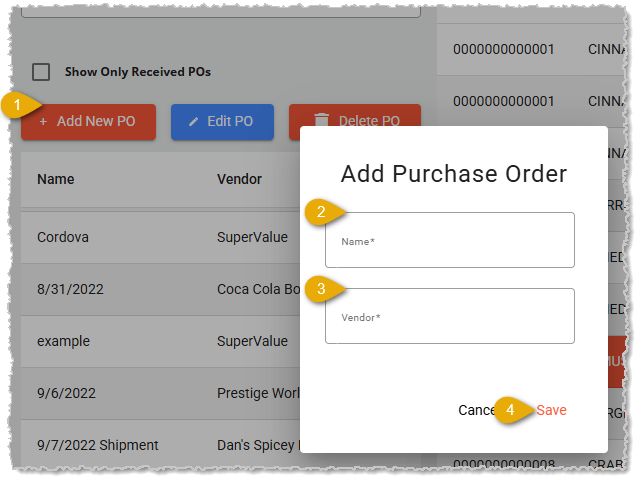
- +Add New PO — Click this button to open the Add Purchase Order window.
- New PO Name — Enter whatever name you like for your new order.
- New PO Vendor — Click to open the drop-list and select the vendor from whom you'll be ordering.
- Save — When you're ready, click the Save button to create the new order. At this point the order is saved and you may need to click on it at the top of the PO list to begin working with it.
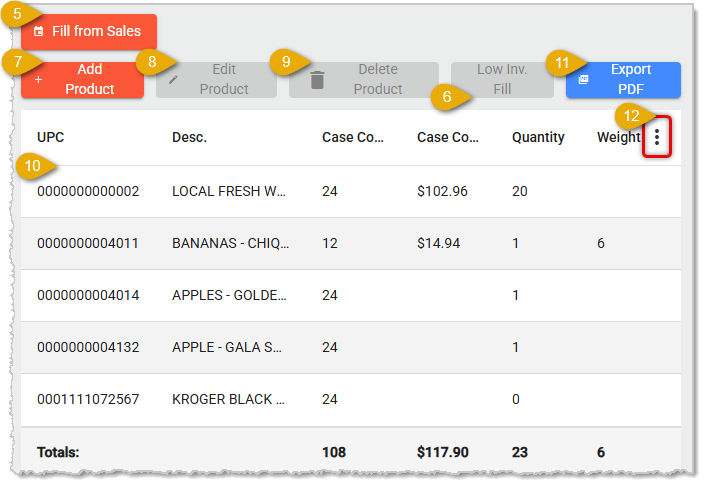
- Fill From Sales — If you've had sales for items from your chosen Vendor since the PO was created, click this button and you'll be able to choose the sales Date Range and automatically update items and quantities from the Vendor that had sales. Click the Fill Products link in the lower right when you have set your Date Range.
- Low Inventory Fill — If the item is at or below its Low Inventory Alert quantity, you can click this button to order up to the Reorder Amount for the item (please note this only works if you're receiving Units instead of Cases) and the system will add the appropriate quantity to get to your total Reorder Amount.
- Add Product — If you need to manually add products to the PO, click this button. The Add Product window will open and you can either search for the item you want or scan the UPC barcode into the Select Product field in the upper right. The information for the product you select will populate in the other fields and you can set the Quantity you need to order of the item. You can apply any Discount you might be getting for the item from the Vendor. If the Vendor has an Item Code for the product you need to use on POs you can enter it in that field. Click Save when you're finished and the item will be added to the PO.
- Edit Product — If you need to adjust any of the information for an item in the PO, click the item in the list to highlight it, and then click the Edit Product button. The Edit Product window will open and you can adjust whatever is needed and then click Save at the bottom to update it.
- Delete Product — If you need to remove an item from the PO, click the item in the list to highlight it, and then click the Delete Product button. This does not delete the product from the database, it only removes it from the PO. A confirmation will pop up asking if you really want to remove the item, and once you click the Yes button, the item will be removed from the PO.
- PO Products — As you add products to the PO, you'll see them appear in this table. By default each product will have its UPC, Description (Name), Case Count, Case Cost, Quantity, and Weight. You can adjust which columns display with the Action Menu in #12 below.
- Export PDF — Click this button to download a PDF file of the PO. Your web browser may also open it in a browser tab for your review.
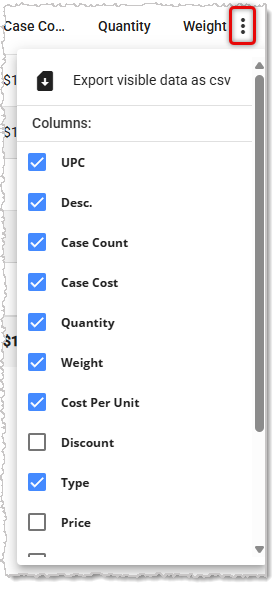
- Action Menu — Click the Three-Dot Stack button on the far right at the top of the table to Export a CSV file of the PO data. You can also display additional columns or hide ones you don't need in there. Additional columns include Cost Per Unit, Discount, Price, Item Code, Current Quantity, Low Inventory Alert, and Total Cost.
As you make changes and additions to your PO, the system will automatically save it with each update. You will be able to receive your saved Purchase Order whenever you're ready, a process that is described below in the Receive Inventory article.
Related Articles
Receive Inventory
Receiving Report
Inventory Value Report
Low Inventory Report
Purchase Orders Import
Quick Inventory
Frequently Asked Questions
Q: I have a question, but I can't find my answer here. How do I get more assistance?
A: If you need immediate assistance, the IT Retail team is available 24/7. Feel free to contact our support team at 877-752-0625. You can also email us at support@marktpos.com, and we will respond within 24 hours.
Welcome to IT Retail, we’re so glad you’ve chosen our POS for your store! This article will guide yo
We have worked hard to make our Front End as user-friendly as possible, but there are a lot of movin
There is a wealth of administrative functionality for you in the Manager Functions area of the Front








Is this page helpful?
×Help us improve our articles