Low Inventory Report

December 18, 2025
Periodically you'll want to take a look at items that are getting low in stock. For that you'll use the Low Inventory Report. This article shows you how to work with your Low Inventory Report to see what needs to be restocked. Take a look at what it can show you!
Working With Your Receiving Report
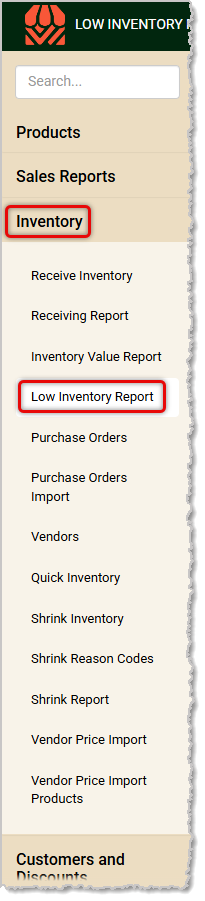
From the Back End, open the Inventory menu and click on Low Inventory Report.
Please note that there is no Date Range needed for this report because it always displays whatever inventory is currently below its Low Inventory Alert threshold. Here is how to work with your Low Inventory Report:
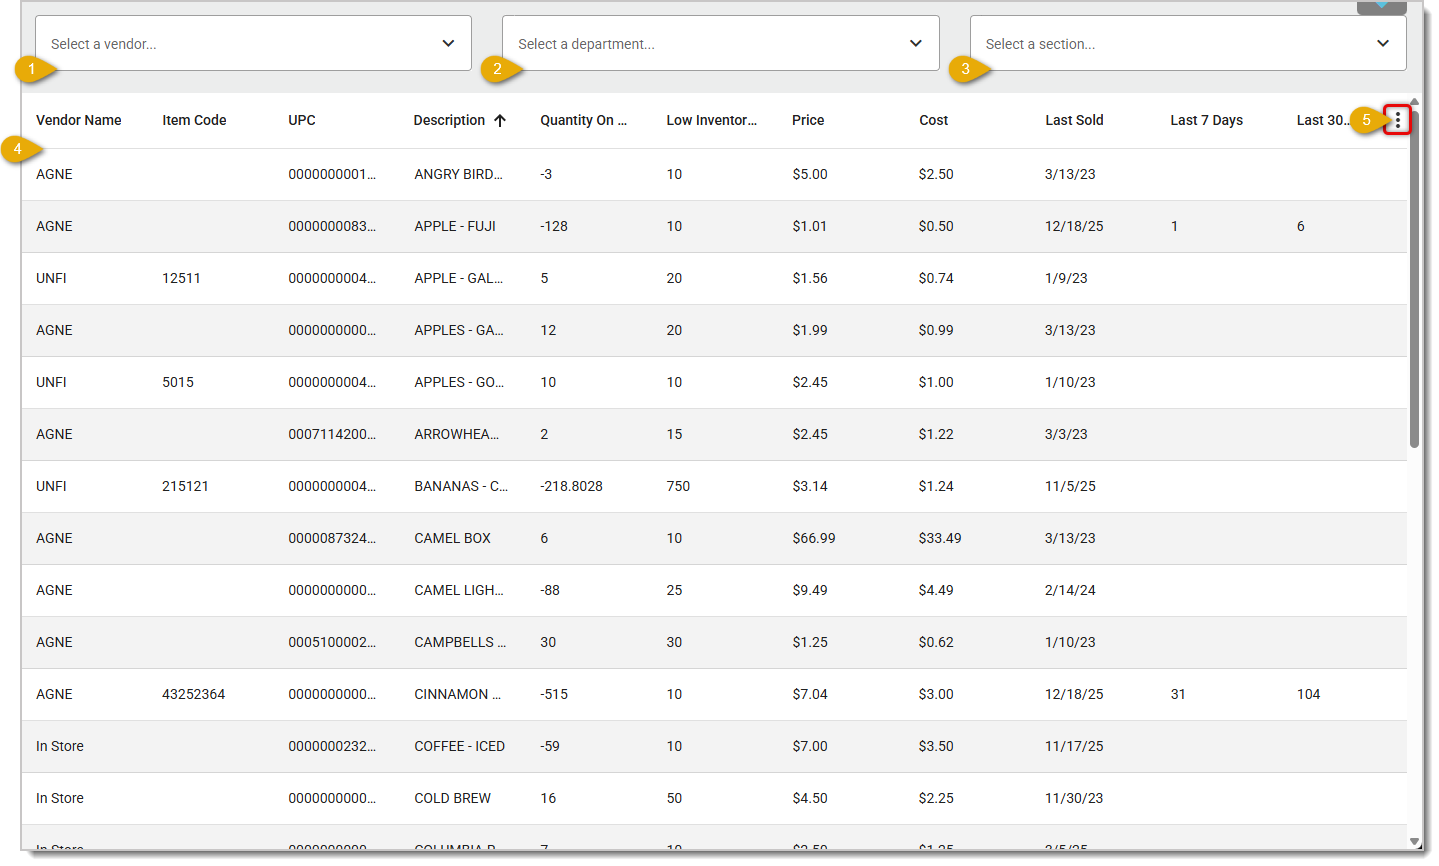
- Vendor Filter — If you need to see low inventory items only from a specific Vendor, you can click this drop-list to select the one you want.
- Department Filter — If you need to see low inventory items only from a specific Department, you can click this drop-list to select the one you want.
- Section Filter — If you need to see low inventory items only from a specific Section of a department, you can click this drop-list to select the one you want. All Sections are listed here so you don't have to select a department first.
- Data Table — For each item low in inventory the Data Table shows the Vendor Name, Item Code (code used for the item by the Vendor in purchase orders), UPC, Description, Quantity on Hand, Low Inventory Alert threshold quantity, Price, Cost, Last Sold date, the quantities sold in the Last 7 Days, and the quantities sold in the Last 30 Days. You can click the column header titles to sort the rows alphanumerically, and click again to reverse-sort. The system will provide an arrow to indicate how the report is sorted by that column.
- Action Menu — Click this 'Three-Dot Stack' button to open the Action Menu for the table. This area offers you export options and lets you choose data column visibility. Here are your options:
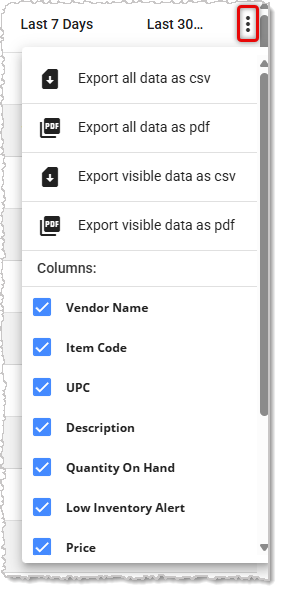
- Export All Data as a CSV — This will include all data columns for each low inventory product. CSV files can be universally used in all spreadsheet programs, such as Excel and Google Sheets.
- Export Visible Data as a CSV — This will include only the data for the active columns.
- Export All Data as a PDF — This will create a PDF file with all data columns for each low inventory product. Adobe Acrobat PDF files are the best means for documenting reports.
- Export Visible Data as a PDF — This will create a PDF file using only the data for the active columns.
- Columns — By default, all columns will be active (checkmarked), but you can also un-check any columns you don't need to see.
We recommend that you keep monthly exports of this report for your records.
Related Articles
Receive Inventory
Receiving Report
Inventory Value Report
Purchase Orders
Purchase Orders Import
Quick Inventory
Frequently Asked Questions
Q: I have a question, but I can't find my answer here. How do I get more assistance?
A: If you need immediate assistance, the IT Retail team is available 24/7. Feel free to contact our support team at 877-752-0625. You can also email us at support@marktpos.com, and we will respond within 24 hours.
The Receive Inventory page allows you to easily receive product deliveries and to update quantities.
The IT Retail system makes it easy to add or update your products in the Back End. This article deta
The Inventory Value Report will show you the Quantity On Hand and dollar value of your products. Kee








Is this page helpful?
×Help us improve our articles