Quick Inventory

January 06, 2026
Need to make a quick adjustment to the inventory for an item? The Quick Inventory tool makes it easy. This article will show you how to adjust, receive, or add new inventory to your store. Take a look at what we've got for you!
The Quick Inventory Tool
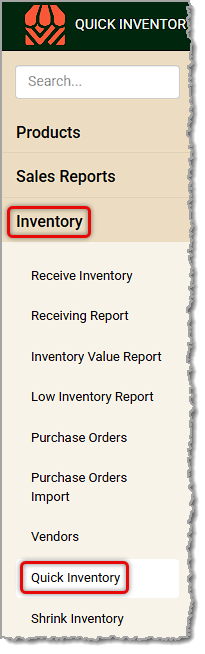
From the Back End open the Inventory menu and click on Quick Inventory.
The Quick Inventory page has three ways to work with your inventory, and all of them are fast. You can make simple inventory quantity Adjustments, Receive inventory quantity without the need of a purchase order, and Add New inventory to the system. We cover each of these applications below for you.
Adjust Existing Inventory
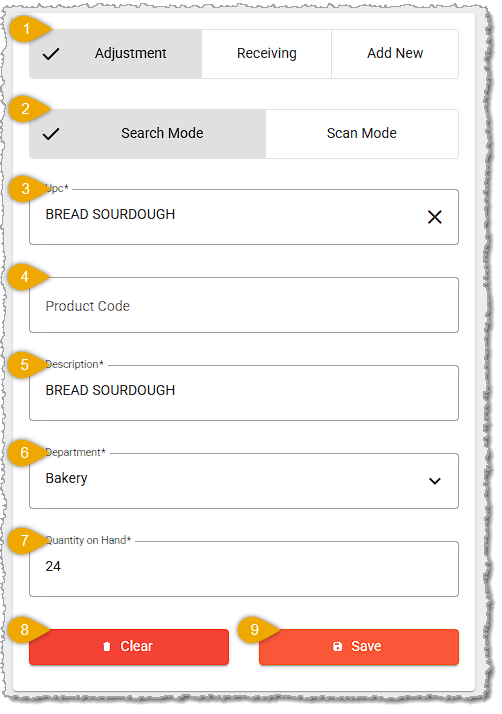
- Adjustment — If you just need to make a change to an inventory item, this tab is active by default for you.
- Mode — Use the Search Mode to enter a UPC manually, or you can use your barcode scanner with the Scan Mode. Click on the tab for the mode you choose.
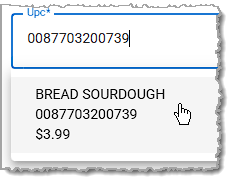
- UPC — After entering a UPC code, if the system finds a match you can click on it to load the item's information. If it doesn't find a match, the number may have been entered incorrectly, or you might need to use the Add New tab to add a new item. Once you click on the item, you will see its information populate as pictured above.
- Product Code — If you have entered a Product Code for the item, you'll see it here. If there isn't one and you want to add it, you can do so in this area.
- Description — This is like the name of the product, and you'll see whatever is saved for the item here.
- Department — The item's Department will display here. If you need to change the Department, you can do so by selecting the one you want from the drop-list.
- Quantity on Hand — If you need to adjust the Quantity of the item that you currently have in stock, you can change this number to whatever you currently have.
- Clear — Click this button if you need to clear the form and work with another product.
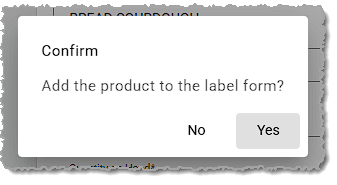
- Save — Click this button when you have finished entering your adjustments and you're ready to update the item. A confirmation will pop up asking you if you want the changes to be added to the Label form so your labels will print the updates. Click to confirm as you like, and the Quick Inventory form will clear for you and the save will be confirmed as well.
Receiving Existing Inventory
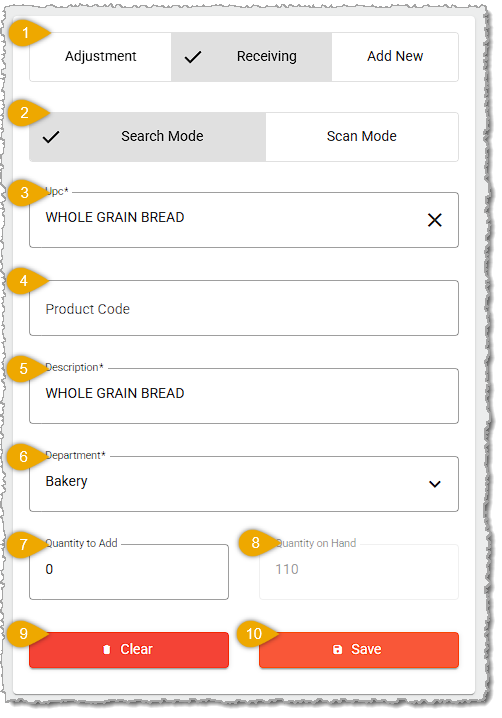
- Receiving — If you need to add a quantity of received inventory to an item, you can quickly do so with this tab. You do not need to have a purchase order to do this.
- Mode — Use the Search Mode to enter a UPC manually, or you can use your barcode scanner with the Scan Mode.
- UPC — After entering a UPC code, if the system finds a match you can click on it to load the item's information. If it doesn't find a match, the number may have been entered incorrectly, or you might need to use the Add New tab to add a new item. Once you click on the item, you will see its information populate as pictured above.
- Product Code — If you have entered a Product Code for the item, you'll see it here. If there isn't one and you want to add it, you can do so in this area.
- Description — This is like the name of the product, and you'll see whatever is saved for the item here.
- Department — The item's Department will display here. If you need to change the Department you can do so by selecting the one you want from the drop-list.
- Quantity to Add — You'll see what you have on hand at present to the right, but you can enter whatever quantity you are adding to the product here.
- Quantity on Hand — This area isn't editable, but when the item initially loads, you'll see whatever quantity you currently have in stock. When you enter a Quantity to Add, this number will automatically increase by that amount to show you what your final quantity will be.
- Clear — Click this button if you need to clear the form and work with another product.
- Save — Click this button when you have finished entering your Receive quantity and you're ready to update the item. A confirmation will pop up asking you if you want the changes to be added to the Label form so your labels will print the updates. Click to confirm as you like, and the Quick Inventory form will clear for you and the save will be confirmed as well.
Adding New Inventory
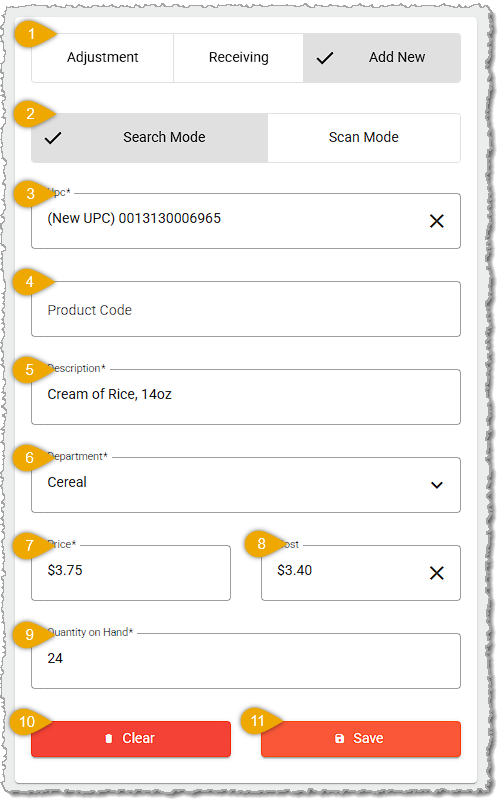
- Add New — If you need to quickly add a new item with only basic information, select this tab.
- Mode — Use the Search Mode to enter a UPC manually, or you can use your barcode scanner with the Scan Mode.
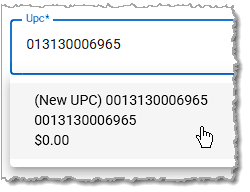
- UPC — After entering a UPC code, if the system finds a match you will not need to add it in the Add New tab. If it doesn't find a match, the UPC will display as a New UPC, as pictured here.
- Product Code — If you have entered a Product Code for the item, you can enter it here.
- Description — This is like the name of the product, and you'll want to add key information such as the size in ounces, as in this example.
- Department — You can add the item to the appropriate Department by selecting the one you want from the drop-list.
- Price — Enter your selling price per unit for the item here.
- Cost — Enter your per-unit Cost here so the system can track your profit margin.
- Quantity on Hand — Enter the quantity of the item you'll be starting with for your inventory.
- Clear — Click this button if you need to clear the form and work with another product.
- Save — Click this button when you have finished entering your Receive quantity and you're ready to update the item. A confirmation will pop up asking you if you want the changes to be added to the Label form so your labels will print the updates. Click to confirm as you like, and the Quick Inventory form will clear for you and the save will be confirmed as well.
Related Articles
Purchase Orders
Receive Inventory
Receiving Report
Inventory Value Report
Low Inventory Report
Purchase Orders Import
Frequently Asked Questions
Q: I have a question, but I can't find my answer here. How do I get more assistance?
A: If you need immediate assistance, the IT Retail team is available 24/7. Feel free to contact our support team at 877-752-0625. You can also email us at support@marktpos.com, and we will respond within 24 hours.
The Receive Inventory page allows you to easily receive product deliveries and to update quantities.
The IT Retail system makes it easy to add or update your products in the Back End. This article deta
The Inventory Value Report will show you the Quantity On Hand and dollar value of your products. Kee








Is this page helpful?
×Help us improve our articles