The IT Retail system makes it easy to add or update your products in the Back End. This article details how you can create new products or update existing ones in all areas of the system. Explore what is there for you!
You can use the links below to jump to the section you want:
Search and Primary Details
The Inventory Tab
The Special Pricing Tab
The Properties Tab
The Taxes Tab
The Fees Tab
The Modifiers Tab
The eCommerce Tab
The CAS Scale Tab
Using the Product Maintenance Page
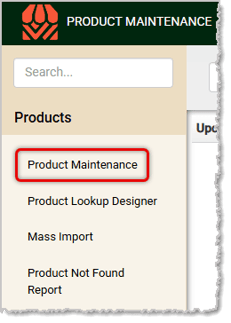
You will need to log into the Back End to begin working with a product in this area. Click on Products and in the Products menu, click on Product Maintenance.
Search and Primary Details
Here’s what you’ll find in the Search and primary product info area of the page:
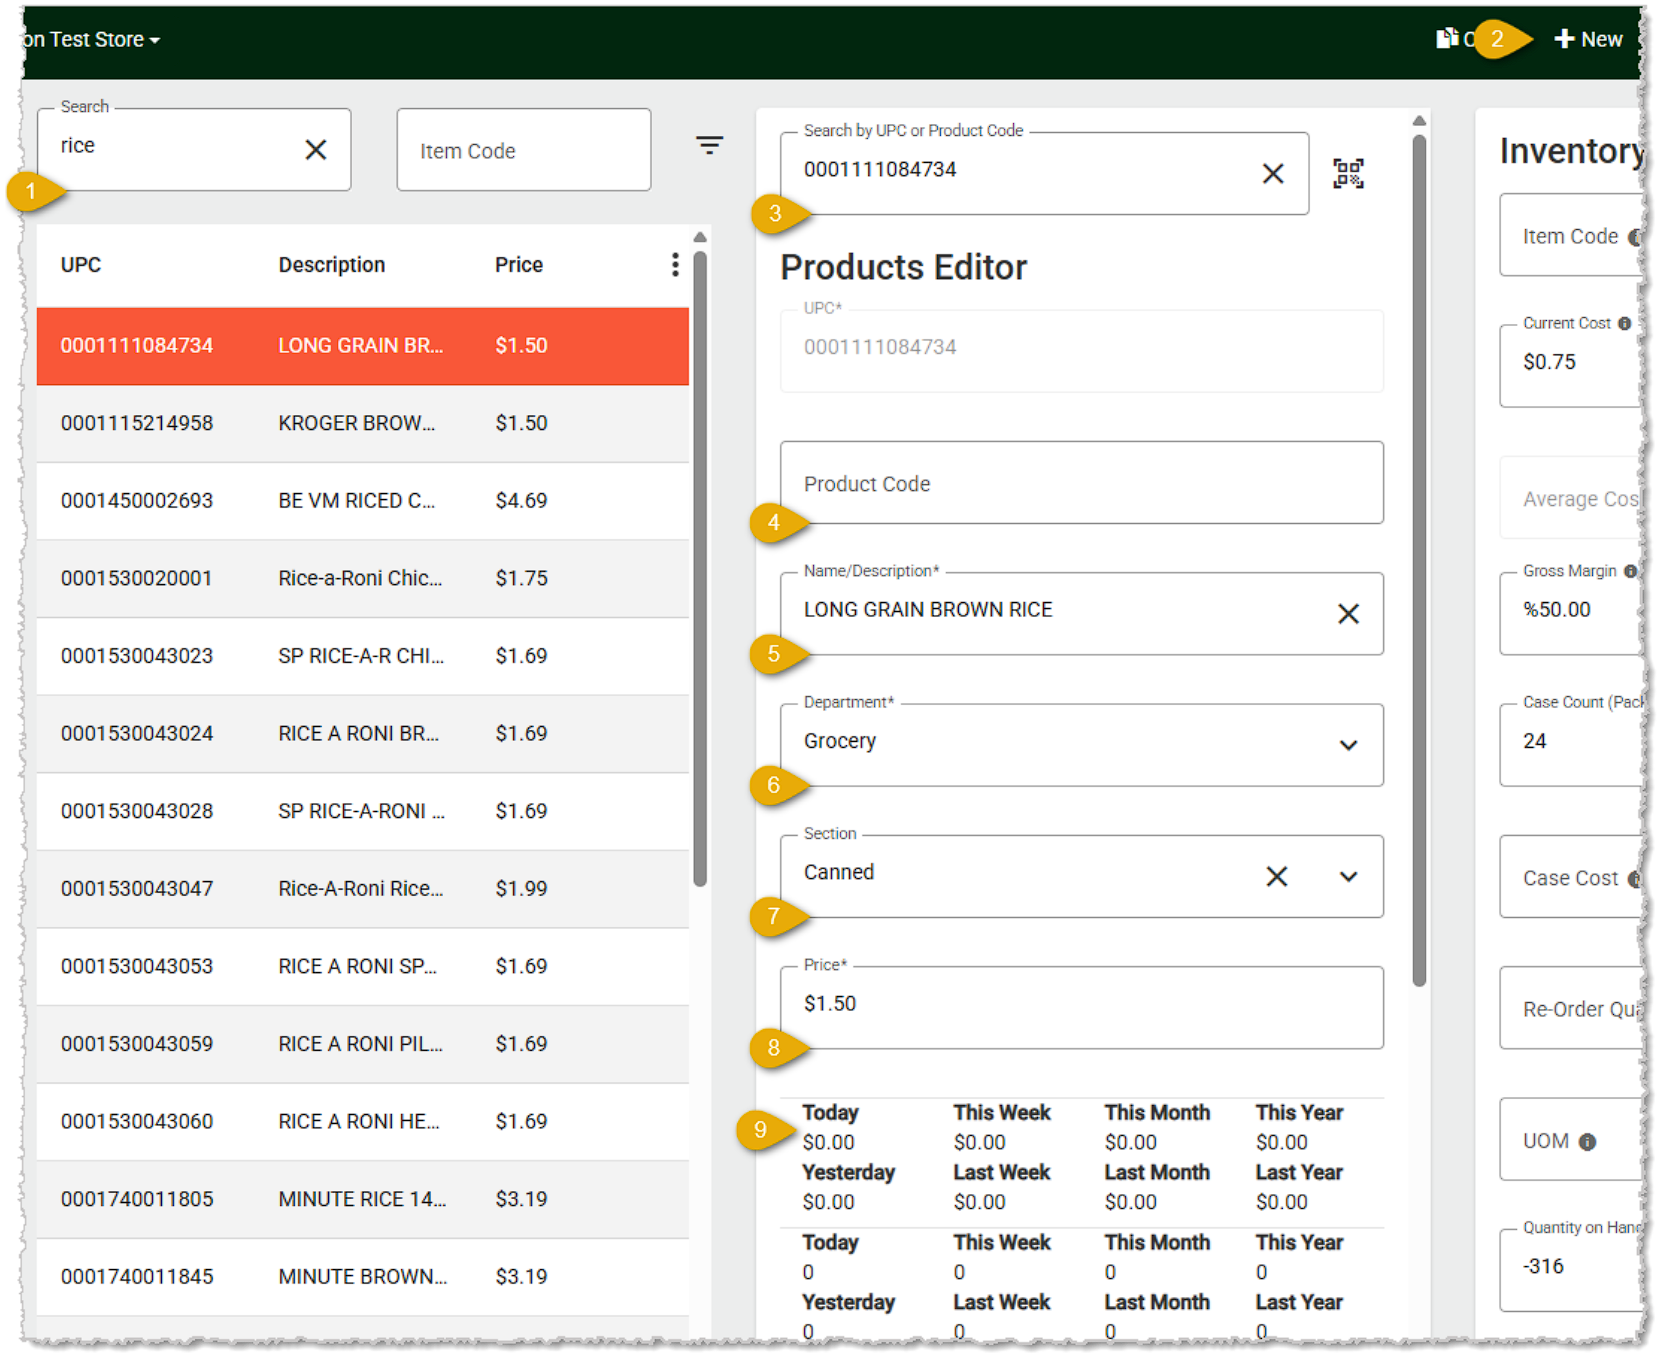
- Search — You can search for the item you want here by entering the UPC or keywords. Matching products will display in the column below and if you click on one, its results will display in the other panels of the page.
- New — If you're creating a new product, click the +New button to get started.
- UPC* — If you have a scanner connected to your device, you can scan in the UPC barcode. If you are using a device that has a camera, you can click the Camera button on the right to scan the code into a window that will pop up for you.
- Product Code — If you will be using an internal code of some kind for the product you can enter that here.
- Name* — Enter the full name of the product, as in the example above. This will appear as the Description for the item whenever it's viewed in the Front End.
- Department* — Click the drop-list to open it and select the Department for the item.
- Sections — If you have created sections for the chosen Department, they will appear in this drop-list and you can select the appropriate section for the item.
- Price* — Enter the regular Price you will use for the item.
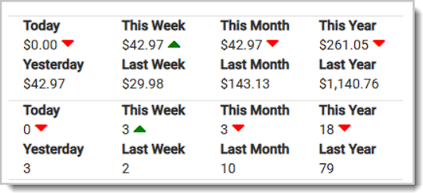
- Sales History — If you're editing an existing item, you'll see its comparative sales totals over time in these fields. You'll see this data in dollar amounts and quantity sales. The report compares at the Day level (Today vs. Yesterday), Week level (This Week vs. Last Week), Month level (This Month vs. Last Month), and Year level (This Year vs. Last Year), as in the image below. Each area also will display an up or down arrow to indicate if there was an increase or decrease, respectively, in the time periods. This can help you when planning sales events for the product.
*Items marked this way are required in order to save the product.
💡Pro Tip: It’s a good practice to periodically click Save in the upper right. You never know when something might happen with your computer!
The Inventory Tab
The Inventory Tab highlighted below will display a brief summary of how you have configured Inventory for the product. Click the tab to display your options in the far right panel of the page. Here are the areas you can configure for this tab:
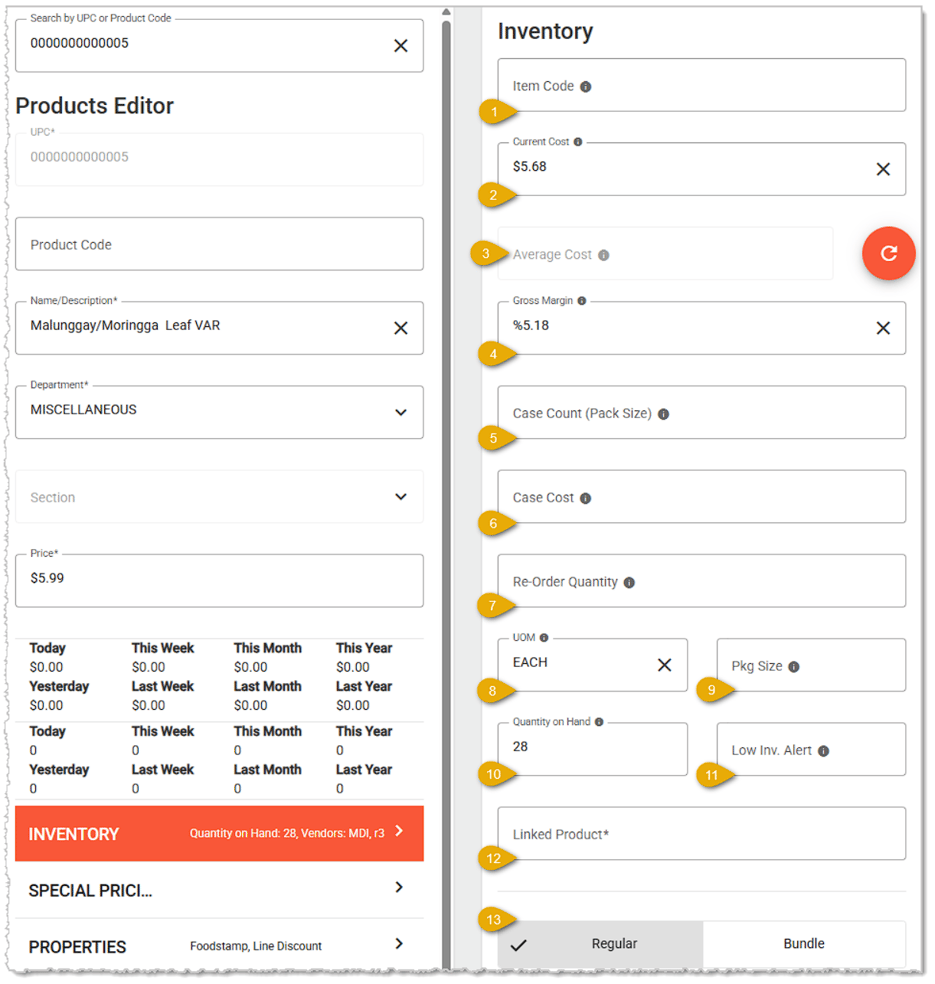
- Item Code — If the vendor has a code they need you to use when ordering the product, enter that code here.
- Current Cost — Enter the most recent Cost you paid per item for the product. When you do a Vendor order that includes this product, the system will update this field with the latest Cost you paid per item.
- Average Cost — If you have done multiple vendor orders for the item the Average Cost of those orders for the item will display here. Click the Refresh button to update this cost calculation.
- Gross Margin — If you have entered a Current Cost, the system will calculate your Gross Margin based on the Price of the product and will display that percentage here. Please note that most grocery stores operate within a 1%-3% profit margin on most items, while specialty stores might get away with 5%. Individual items might have higher margins, and in some cases, you might want to sell items at a loss to move inventory or bring in foot traffic.
- Case Count (Pack Size) — Enter the number of items the item has in a case shipped from the vendor. If the item is sold by weight, leave this area blank and you'll refer to the Unit of Measure below.
- Case Cost — If you have entered a Case Count and a Current Cost, the system will do the calculation for the case cost to you.
- Re-Order Quantity — Enter the quantity you order from the vendor. If you do not have a Case Count, enter the number of items you will order when restocking this item. If you have a Case Count, enter the number of cases you will order. Whatever you enter will be auto-populated in the Quantity area of the next Purchase Order you do with the vendor.
- UOM (Unit of Measure) — If the item is set as a Scale product (an option described in the section below about the Properties tab) this area will display 'lbs.' for pounds. Otherwise, it will be blank.
- Pkg. Size — Enter the Package Size of the item, usually a weight measurement (for example, 15oz).
- Quantity on Hand — If you're entering a new product, enter your starting quantity for the item. If you do an inventory count, you can update this number, but the system will adjust it based on sales of the item.
- Low Inventory Alert — You can set an 'alert' for the system to flag the item to be reordered in your next Purchase Order for the vendor by entering the quantity here. When the Quantity on Hand reaches this number, the item will be flagged to reorder. You can find items that have reached the alert level in the Low Inventory Report, linked below.
- Linked Products — This is used for an individual item pulled from some kind of pack. For example, you might have a 12-pack of Diet Pepsi cans that you sell as a package using the barcode on the box, or you might break up the box and sell individual cans from your cooler using the barcode on the can. The box barcode would be the main barcode for the product in the center panel of the Product Maintenance page, and in the Linked Products field, you would scan in or enter the barcode from an individual can. If you are using a device that has a camera, click the Camera button to open a window that will let you scan in the barcode. Increasing or decreasing a linked product’s quantity on hand will correspondingly increase or decrease whatever product it is linked to. For example, if I currently show 3 single cans if Diet Pepsi in stock, but in the linked 12-pack of Diet Pepsi I increase the quantity on hand to 3, the single product’s quantity will be changed to 36 (3 cases of 12).
- Individual / Bundle — If the product is sold as an individual item, leave the default selection here as Regular. If the item is sold as a bundle, e.g. a package of six items or eight items not intended for individual sale, select Bundle.
Product Vendors
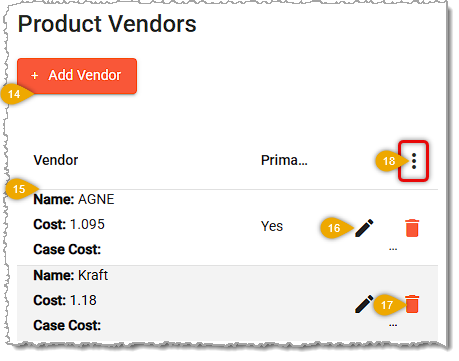
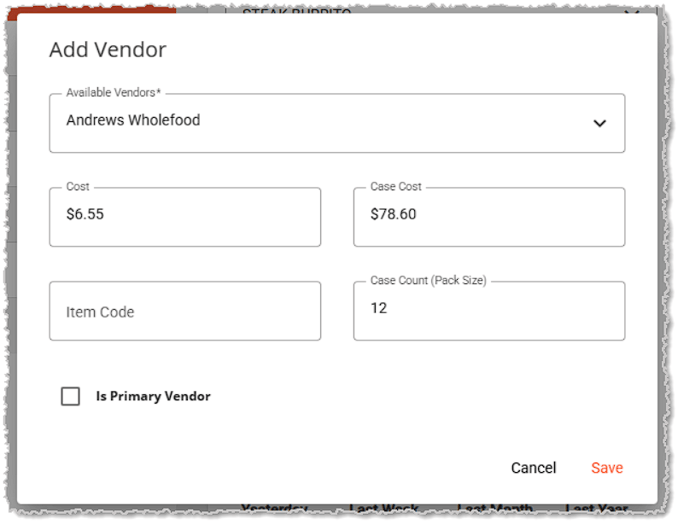
- Add Vendor — Click this button to view your list of saved vendors. You can click on one in the drop-list and a window will open that will let you set the Cost per item, Case Cost, Item Code, if any, and Case Count of the number of items per case for the item from the vendor. If you want the vendor you’re adding to be the main one from whom you order the item, check the box for Is Primary Vendor. When you’re finished, click Save in the lower right and the Vendor will be added to the product.
- Vendor — Each Vendor line item will show the Vendor’s Name, the item Cost you pay, and the Case Cost, if any. You will also see which Vendor in the list is the Primary one the system will list as the default when you reorder the item.
- Edit — Click the Pencil Icon to open the Edit Vendor window (exactly like the Add Vendor window above) and you can adjust the information or set the vendor as Primary, then Save your changes.
- Remove — If you click the Trashcan Icon for a vendor a confirmation will pop up asking if you are sure you want to remove the vendor from the product. This does not delete the vendor, it just removes the vendor’s association with the product. A success message will pop up in the upper right to let you know the removal was successful.
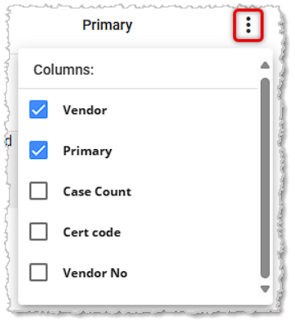
- Action Menu — You can use the Three-Dot Stack button on the right to work with the column visibility options for your list of vendors, as pictured below. By default, the Vendor and Primary columns are visible, but you can also show columns for Case Count, Certification Code, and the system Vendor Number, if needed. If you work with spreadsheet data for your purchase orders, having the Vendor Number is useful.
UPC Mapping
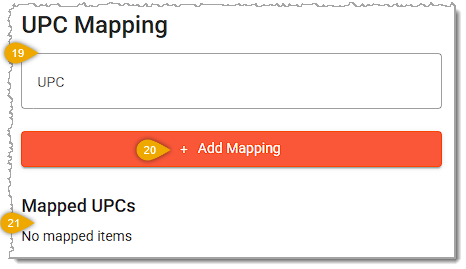
- UPC — Use this area if the product has more than one UPC. Its primary UPC is already in place in the main product information area. You can scan in an alternate UPC barcode here, or enter it manually.
- Add Mapping — After you've entered an alternate UPC, click the Add Mapping button to 'map' the new code to the product, so both the original and this new UPC will bring up the product. You can also click the Remove Mapping button if you need to do so (not pictured).
- Mapped UPC — Any mapped UPC codes will appear in this area after you've added them with the controls above. Click on the Trash Can button next to each UPC to remove it (not pictured).
The Special Pricing Tab
The Special Pricing Tab highlighted below will display a brief summary of your special price configurations for the product. Click the tab to display your options in the far right panel of the page. You can have up to two Special Pricing methods active for a product at one time.
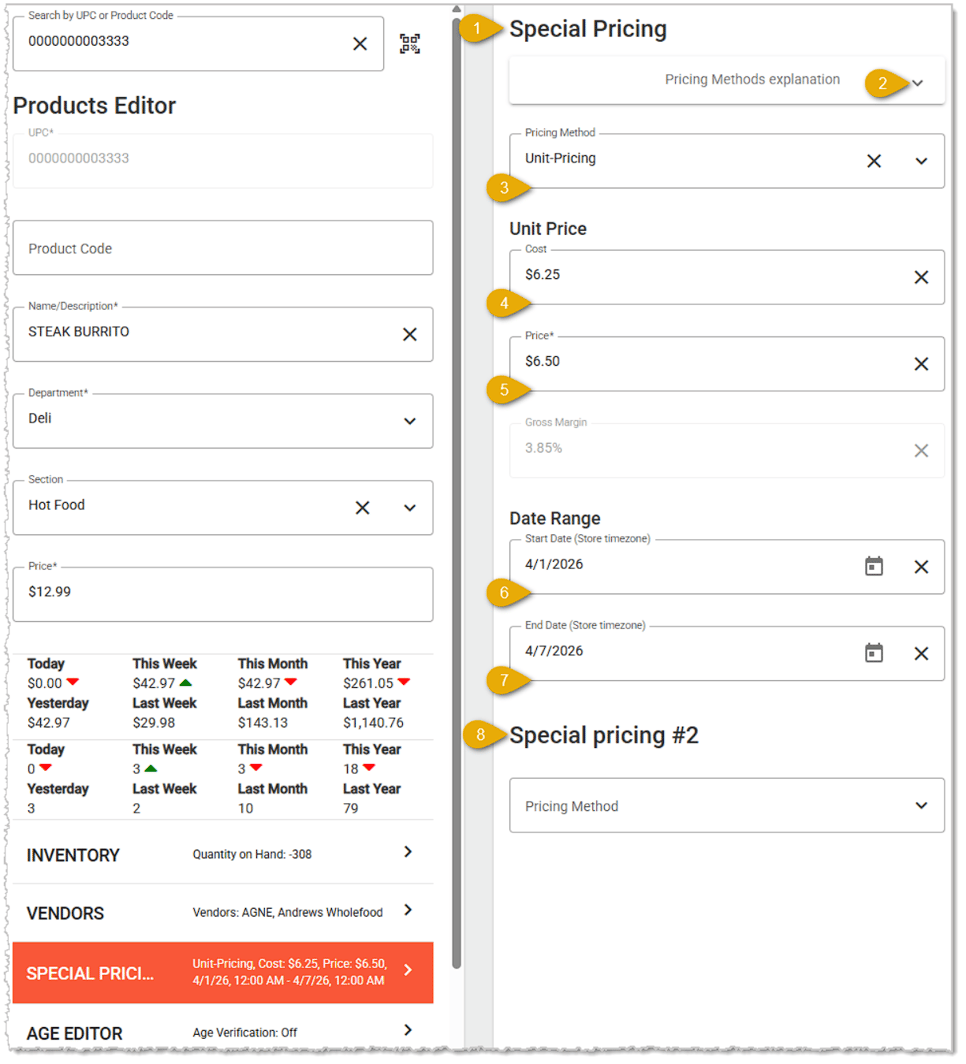
Here are the types of Special Pricing you can configure:
- Special Pricing Method — Configure your primary Special Pricing method for the product in this area.
- Pricing Methods Explanation — You can click the Chevron on the right to expand and view descriptions and examples of the special pricing methods.
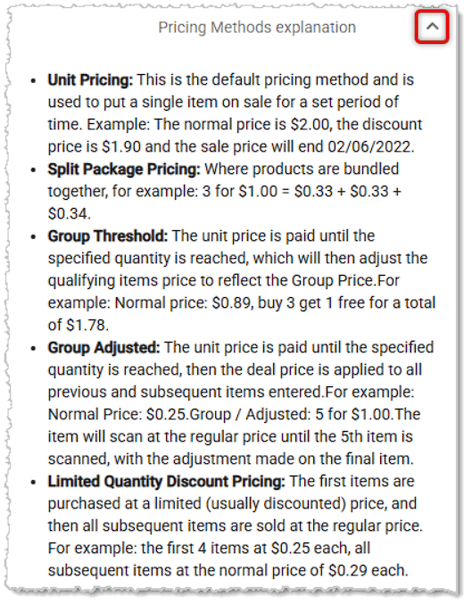
- Unit Pricing — This is the default Special Pricing method and is used to put the item on sale for a set period of time. Example: If the normal price is $6.95 and you set the Unit-Pricing Price at $6.50 you could set that sale price to run for whatever date range you enter.
- Cost — If you need it for reference, add the item’s current unit Cost here.
- Price* — Enter the discounted Price you want to use for the item for the date range you enter choose, if any.
- Gross Margin — Your gross profit margin on the item at the discounted price will display here if you have a Cost in place.
- Date Range — Enter the Start Date and End Date or use the calendar icons to click on the dates you want. The Price for the item you set in #5 above will be active from the beginning of the day on the start date through the end of the day on the end date. If you don't set dates here, the pricing will remain in place and will display as a sale price in the Front End.
- Special Pricing #2 — If you wish to apply another special pricing method to the product, you can select one from the drop-list and configure it.
*Required in order to save the Special Pricing for product.
Split Package Pricing — This method of Special Pricing is used to bundle items together on sale for a set period of time. Example: If the normal price is $6.95 you could set the Quantity to 2 and the Split-Package Price at $10.00, making it $5 per item if the customer buys 2. You can set that sale price to run throughout whatever date range you enter.
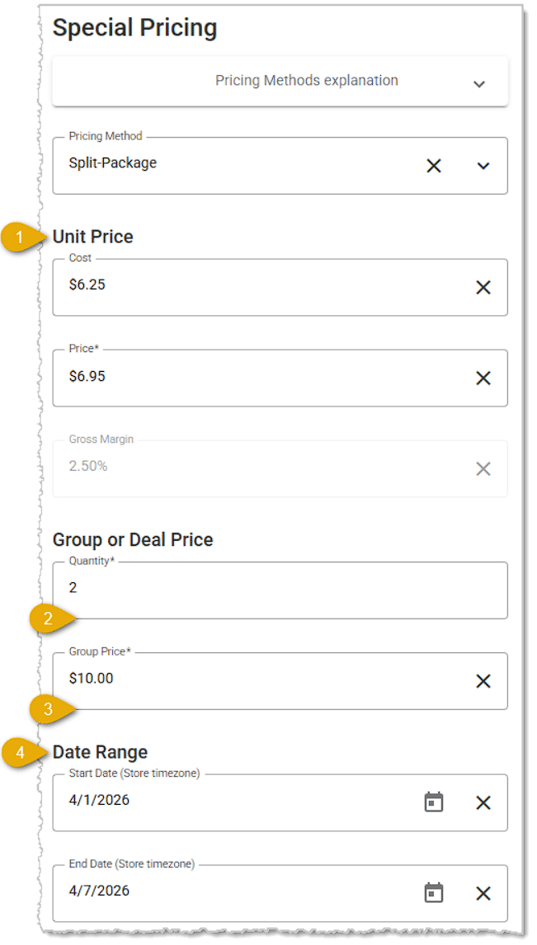
- Unit Price — The item's Current Cost, regular Price, and Gross Margin will display for you here for your reference.
- Quantity* — Enter the Quantity of the product a customer needs to buy to get the special Group Price.
- Group Price* — Enter the discounted Group Price you want to use for the deal throughout whatever date range you enter below, if any.
- Date Range — Enter the Start Date and End Date or use the calendar icons to click on the dates you want. The Price for the item you set above in #3 will be active from the beginning of the day on the start date through the end of the day on the end date. If you don't set dates here, the pricing will remain in place and will display as a sale price on the Front End.
*Required in order to save the Special Pricing for the product.
Group Threshold Pricing — This method of Special Pricing has customers purchase a certain quantity of items to get a total discounted price. You could set this at a price to buy 4 items for the price of 3. Example: If the normal price is $6.95 you could set the Quantity to 4 and the Group Price at $20.85 (the total price for 3 of them), making the fourth one free. You could set that sale price to run throughout whatever date range you enter.
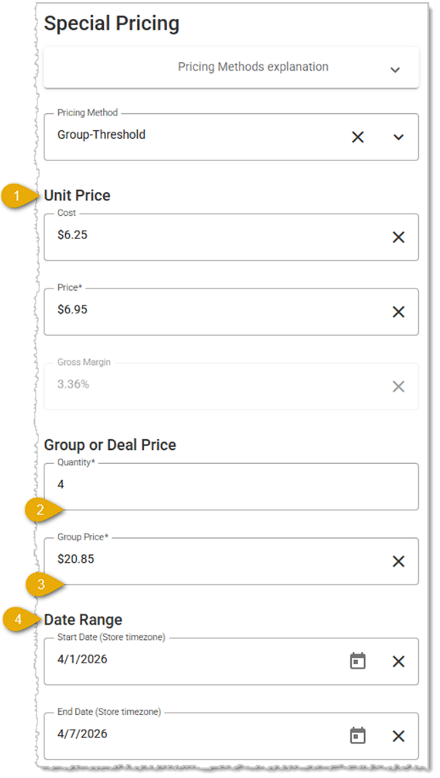
- Unit Price — The item's Current Cost, regular Price, and Gross Margin will display for you here for your reference.
- Quantity* — Enter the Quantity of the product a customer needs to buy to get the special Group Price.
- Group Price* — Enter the discounted Group Price you want to use for the deal throughout whatever date range you enter below, if any.
- Date Range — Enter the Start Date and End Date or use the calendar icons to click on the dates you want. The Price for the item you set in #3 above will be active from the beginning of the day on the start date until the end of the day on the end date. If you don't set dates here, the pricing will remain in place and will display as a sale price in the Front End.
*Required in order to save the Special Pricing for the product.
Group Adjusted Pricing — This method of Special Pricing has customers purchase a certain quantity of items at the normal price until they reach the target quantity. Then the discounted price is applied to all previous and subsequent items, allowing the customer to purchase larger quantities at the sale price. Example: If the normal price is $6.95 you could set the Quantity to 3 and the Group Price at $18.00 making them $6 each. This applies even if more are added. You can set the sale price to run for whatever date range you enter.
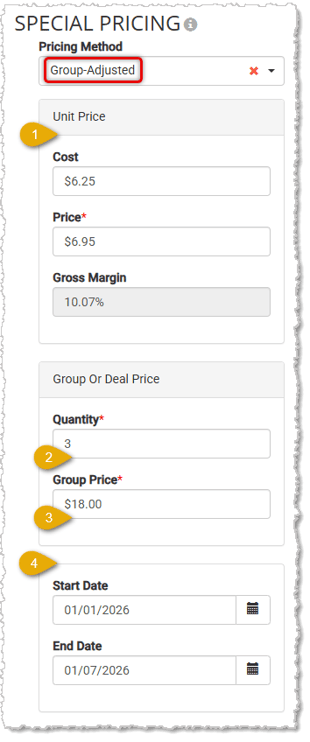
- Unit Price — The item's Current Cost, regular Price, and Gross Margin will display for you here for your reference.
- Quantity* — Enter the Quantity of the product a customer needs to buy to get the special Group Price.
- Group Price* — Enter the discounted Group Price you want to use for the deal throughout whatever date range you enter below, if any.
- Date Range — Enter the Start Date and End Date or use the calendar icons to click on the dates you want. The Price for the item you set in #3 above will be active from the beginning of the day on the start date until the end of the day on the end date. If you don't set dates here, the pricing will remain in place and will display as a sale price on the Front End.
*Required in order to save the Special Pricing for the product.
Limited Pricing — This method of Special Pricing discounts the first few items the customer purchases, then any subsequent items will be at regular price. Example: If the normal price is $6.95 you could set the Quantity to 2 and the Limited Price at $12.00, making it $6 per item for the first 2 items, and then regular price after that. You could set that sale price to run throughout whatever date range you enter.
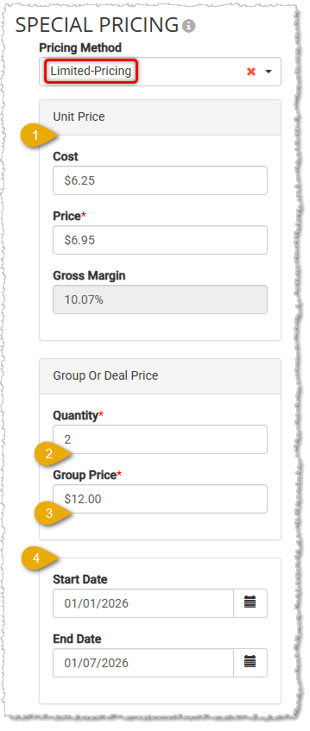
- Unit Price — The item's Current Cost, regular Price, and Gross Margin will display for you here for your reference.
- Quantity* — Enter the Quantity of the product a customer needs to buy to get the special Group Price.
- Group Price* — Enter the discounted Group Price you want to use for the deal throughout whatever date range you enter below, if any.
- Date Range — Enter the Start Date and End Date or use the calendar icons to click on the dates you want. The Price for the item you set in #3 above will be active from the beginning of the day on the start date until the end of the day on the end date. If you don't set dates here, the pricing will remain in place and will display as a sale price on the Front End.
*Required in order to save the Special Pricing for the product.
The Properties Tab
The Properties Tab highlighted below will display a brief summary of your product configurations. Click the Properties Tab to display your options in the far right panel of the page. Here are your options for this tab:
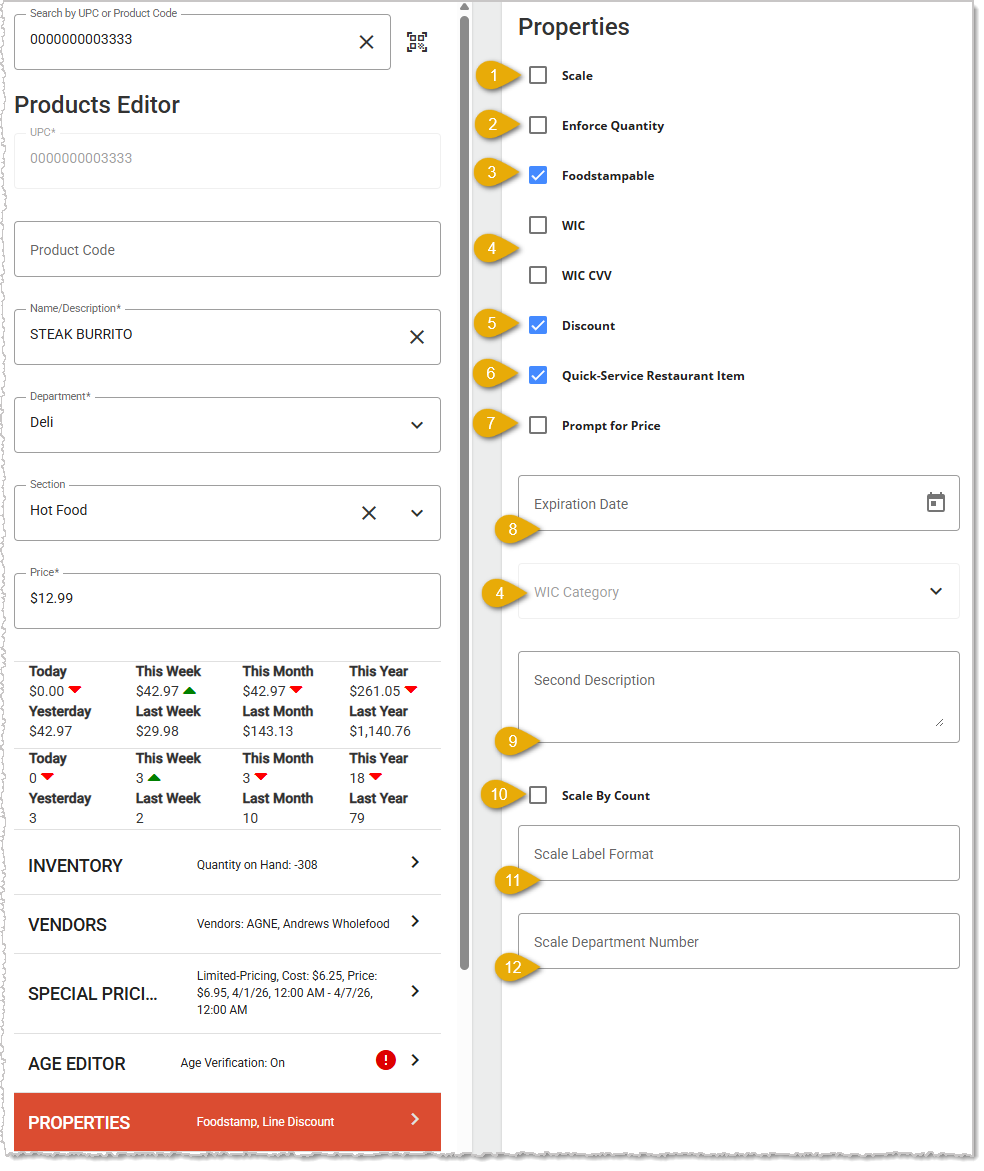
- Scale — If the item is sold based on weight, check this box so it will use the scale.
- Enforce Quantity — Check this box if the item is frequently purchased in multiples, such as with avocados or limes. With this box checked, in the Front End, whenever the product is added to a transaction the Quantity window will open allowing the cashier enter the quantity.
- Foodstampable — Check this box if the item is eligible to be paid for using EBT / EBT Cash / SNAP (Food Stamps).
- WIC — Please Note: In the future we hope to support the Women, Infants, and Children (WIC) payment method, but for now we do not.
- Discount — Check this box if you want to be able to reduce the price of the item using discounts for which it is eligible.
- Quick-Service Restaurant Item — If the item is offered as fresh-made with optional ingredients, check this box. Whenever the product is added to a transaction on the Front End a window will pop up for the cashier to add optional ingredients to the item. These ingredients are pulled from the list of Modifiers. You can define which are available for this item in the Modifiers Tab. An additional small receipt will also be printed for the kitchen showing the order number and any extra items. For details on how to create your product modifiers, please see the linked article on Product Modifiers in the Related Topics area near the bottom of this article.
- Prompt for Price — Check this box if you want the Price window to pop up for the item whenever it's added to a transaction in the Front End. Use this for items that have prices that fluctuate frequently.
- Expiration Date — If you want to be able to look up the item's expiration date in the system, enter it here for your reference.
- Second Description — The main product Name / Description area has limited space, so if you need further description for the item you can enter paragraph text here.
Please Note: The following Scale settings are for our ePlum integration. If you aren’t using that integration, you won’t need to do anything in this area.
- Scale By Count — Check this box if you will be ignoring item weight and using the item count for your scale label printing.
- Scale Label Format — Enter the label format as in this example: UPC-A. The ePlum system Supports UPC-A, EAN13, EAN13+5, I2of5, Code128, Code93, and the Codabar barcode formats.
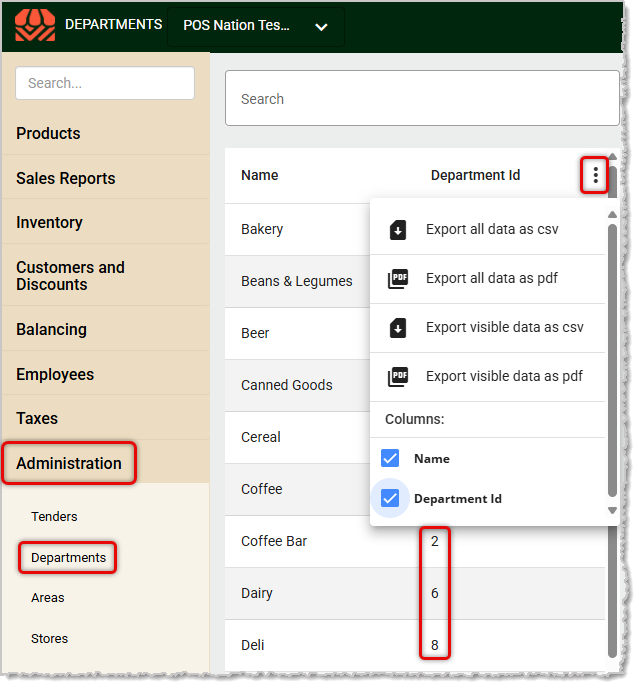
- Scale Department Number — Enter the Department ID Number this product will use when syncing to the scale in the ePlum integration. You can find the ID under Administration > Departments.
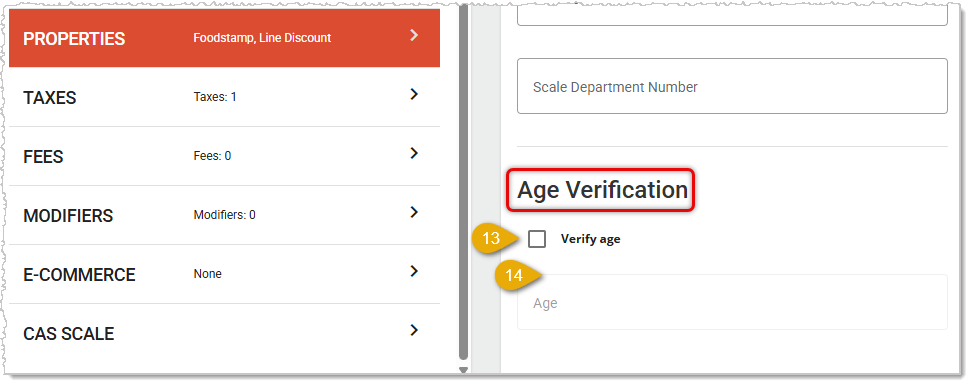
- Verify Age — If the product is age-restricted, such as for alcohol, tobacco, or vape items, check this box to make Age Verification active in the Front End for the item.
- Age Threshold — Enter the minimum age the customer has to be in order to buy the product.
The Taxes Tab
The Taxes Tab highlighted below allows you to configure the Taxes the product will use, if any. It will display the number of taxes currently set for the product. Click the Taxes Tab to display your options in the far right panel of the page. Here are your options for this tab:
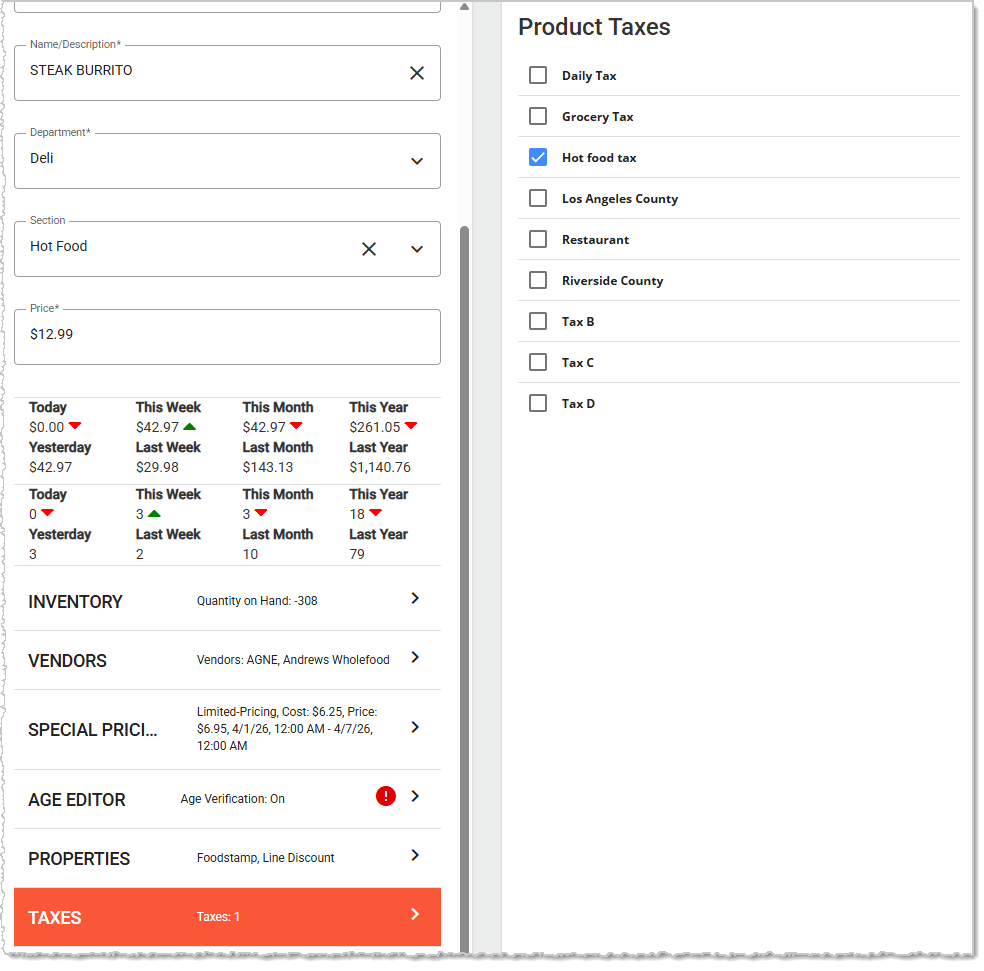
Product Taxes — In this area, all of the Taxes you've created in the system (under Taxes > Taxes) will be listed and you can check the boxes for whichever ones apply to this product.
The Fees Tab
The Fees Tab highlighted below displays the number of fees that currently apply to the product. Click the Fees Tab to display your options in the far right panel of the page. Here are your options for this tab:
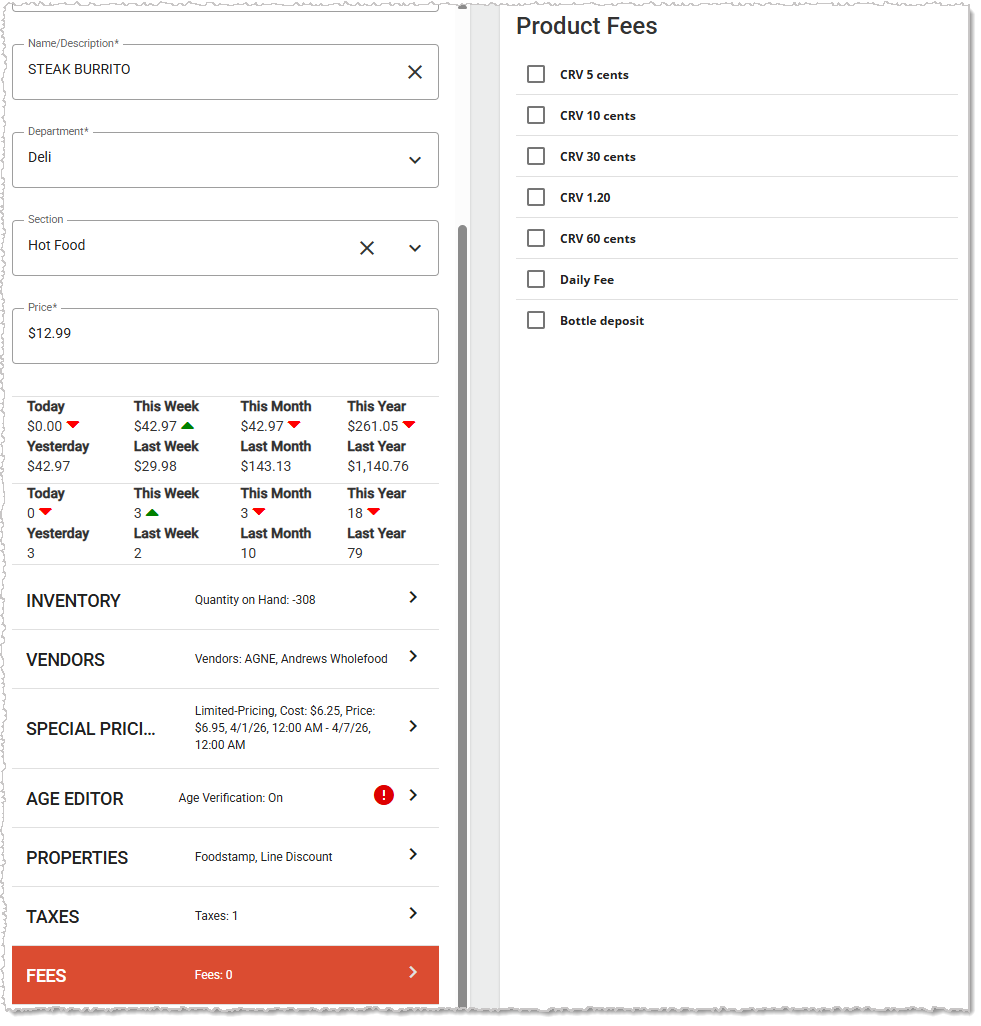
Fees — In this area, all of the Fees you've created in the system (under Taxes > Fees) are listed. Check the boxes for whichever ones apply to the product, if any.
The Modifiers Tab
The Modifiers Tab highlighted below displays the number of Modifiers that currently apply to the product. Click the Modifiers Tab to display all of your saved Modifier options in the far right panel of the page. Here are your options for this tab:
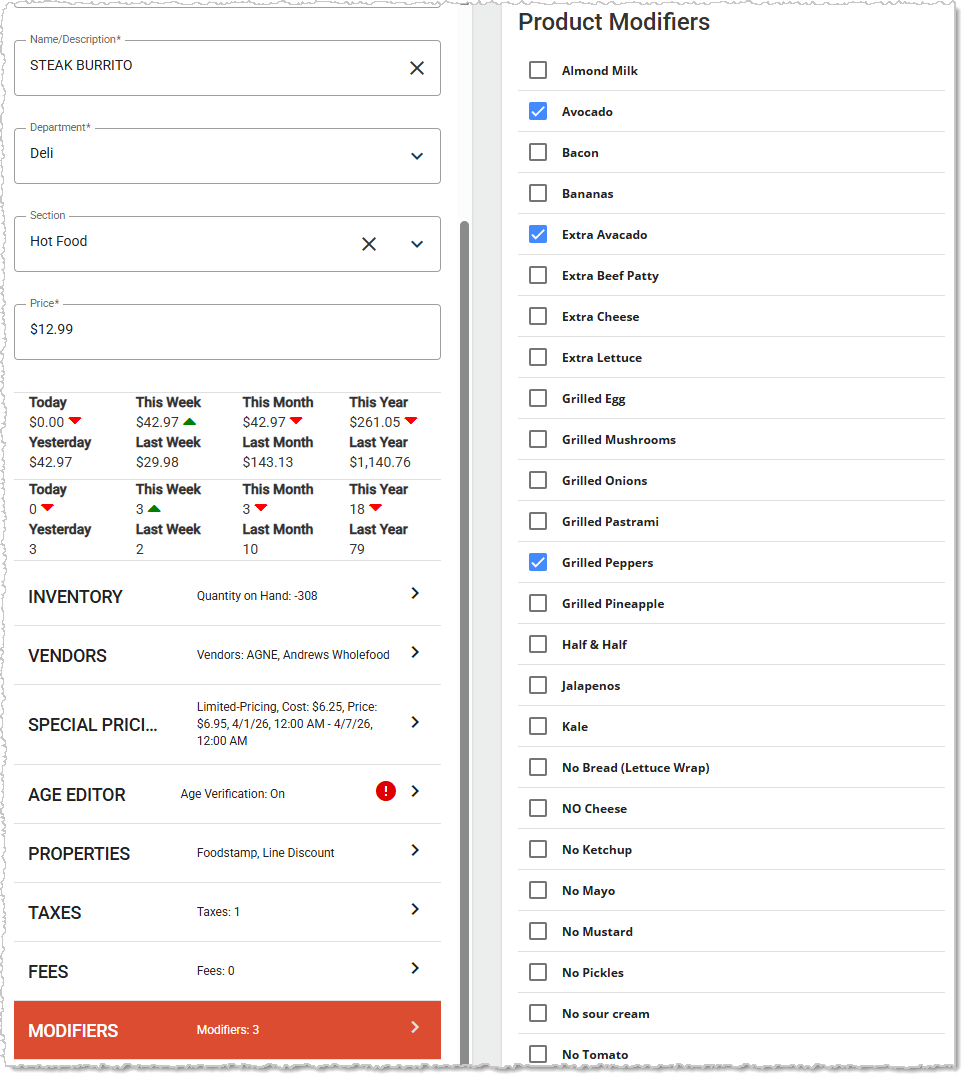
Product Modifiers — You can select the available options from the list of all of your saved Modifiers that will be offered for possible use with this product when it's added to a transaction in the Front End.
The eCommerce Tab
The eCommerce Tab highlighted below will display a brief summary of eCommerce elements you might have configured for the item. The majority of the configuration options here are for the eCommerce integration with GrazeCart. Click the tab to display your options in the far right panel of the page. Here are your options for this tab:
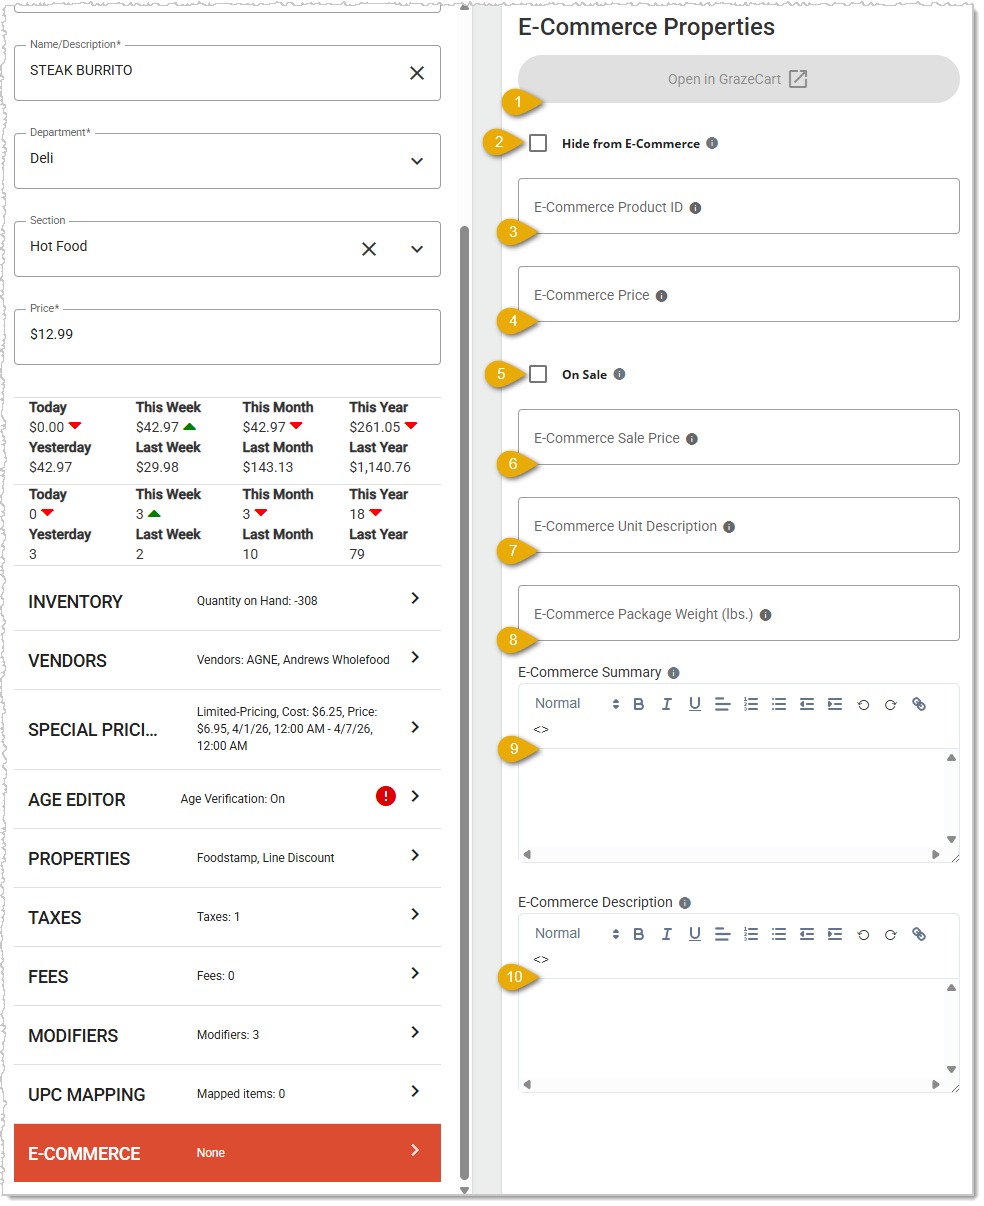
Please Note: The Name/Description field will sync to the product listing in Grazecart for the eCommerce version of the product. After that initial sync, changes made here to that field will not push to Grazecart, so you will need to make any further updates in that area.
- Open in GrazeCart — Click this button to open this item and work with it in the Grazecart interface. For full details on how to work in that area, please see the article linked below in the Related Topics area on Set Up Products for eCommerce with GrazeCart. The areas below are also important for your eCommerce integration.
- Hide From eCommerce — Check this box if you don't want this product to display in your web store.
- eCommerce Product ID — This field will automatically populate with the Product ID for Grazecart and will create the product on the Grazecart side if the setting to Hide From eCommerce (above) is not checked. That code in the IT Retail system is linked to the product in Grazecart. For example on Grazecart if we have a product with a product ID of 12345 and the field auto-populates the 12345 code here, changes made to this product will sync over to Grazecart product ID 12345.
- eCommerce Price — Enter a price for the item to use exclusively online if you will be pricing it differently from its standard price.
- On Sale — Toggle this on by checking the box to make the sale price in #6 below active until you un-check this again.
- eCommerce Sale Price — Enter a sale price for the item for its sale exclusively online. This price will only be active if the checkbox in #5 above is checked.
- eCommerce Unit Description — If you need to list any information about the item, such as its dimensions or weight in kg/grams, you can enter those details here.
- eCommerce Package Weight — For items sold in Grazecart by weight, those values will populate here for this product through the integration. If they are adjusted in Grazecart they will update here.
- eCommerce Summary — Enter a short description of the item for the page that lists the item with other items in its category and on search result pages. Be sure to include the most important item details, and keep it brief (one or two sentences). Please note that this field and the one below will sync their information during the initial product sync to Grazecart, and then will disappear from this tab and you will manage them in the Grazecart interface.
- eCommerce Description — Enter the full item description including all details you want for the product on its web page. As noted above, this field and the one above will disappear after the product initially syncs to Grazecart and you can manage this information in that interface.
Inventory Calculations in the Grazecart Integration
The way inventory is calculated between the IT Retail system and Grazecart is the Quantity on Hand is divided by the E-Commerce Package Weight, and the result syncs to the Online Store Inventory field in Grazecart. This means if you have a product that has a Quantity on Hand of 40 on IT Retail with an E-Commerce Package Weight of 5, then the Online Store Inventory field on Grazecart will be 8.
Additionally, the E-Commerce Package Weight field in the IT Retail system is pulled from the Weight field in Grazecart. Once a sale is made on the Grazecart side, the Weight is automatically sent over to IT Retail to update the E-Commerce Package Weight field.
The CAS Scale Tab
The CAS Scale tab allows you to configure the CAS Scale integration for the product if it is enabled. Your input below will sync over to your deli scales automatically after the Front End syncs. Here are your options:
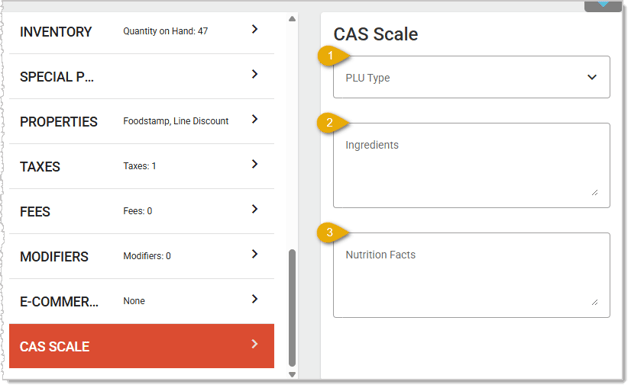
- PLU Type — This is the type of product for this item you are selling from your deli scale. There are three types:
- By Count — If you’re not selling this item by its weight but instead by how many of the items are on the scale, use this type. For example, you might have a tray with seasoned tilapia fillets and you sell them based on how many fillets the customer wants. When you enter the PLU for the item, the scale will ask you what the count and after you enter it, the system will print the label.
- By Weight — If you sell the item by the total weight of it added to the scale, use this option. For example, if this item was a large block of uncured ham that you slice on request, you would configure this item to be sold By Weight.
- Non-Weight — If you sell this item as a standalone item for a fixed price, you would use this type. For example, if this was a twelve-inch roast beef sub sandwich that you make in your deli, you would use this type.
- Ingredients — This links directly to the Direct Ingredient field on the scale. The Direct Ingredient prints out on the label if you have a CAS scale and labels that support ingredients.
- Nutrition Facts — This links to the Nutrition No field on the scale. You can have certain Nutrition presets set to a code in the scale’s system, and you’ll do that setup in the CL Works application. Set which code this product will use for Nutrition Facts in this area. This only works for CL5500 scales with a label format that supports Nutrition Facts.
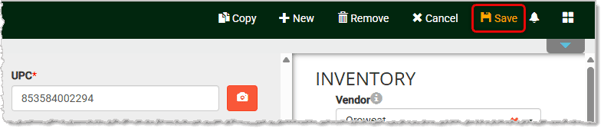
When you have finished configuring your product, click the Save button in the upper right and the system will add or update the product.
Related Topics
Purchase Orders
Low Inventory Report
Taxes
Fees
Product Modifiers
Set Up Products for eCommerce With GrazeCart
Frequently Asked Questions
Q: I created a new product from Product Maintenance, why can't I see it in the Front End?
A: New products or changes made to existing products won't sync over immediately to the Front End. To get the data in the Front End, click or tap on Manager Functions > Synchronize. If you don't use this method, the data will update the next time you refresh your login to the Front End.
Q: I have a question, but I can't find my answer here. How do I get more assistance?
A: If you need immediate assistance, the IT Retail team is available 24/7. Feel free to contact our support team at: 877-752-0625. You can also email us at support@marktpos.com and we will respond within 24-hours.








 December 11, 2025
Is this page helpful?
×Help us improve our articles