Welcome to IT Retail, we’re so glad you’ve chosen our POS for your store! This article will guide you through the basics of using our Front End, the POS Register itself. Take a look at how easy ringing up a transaction can be!
Here is what you'll learn:
Signing Into IT Retail
When you click to log into the POS, the initial load screen will show you your progress, and then you'll see the login screen, as pictured below. If you are starting a new shift, you can click the Clock In / Out button and a window will allow you clock in with your Cashier ID. If you are an administrator, enter your login PIN and either click the Sign In button or hit your Enter key.
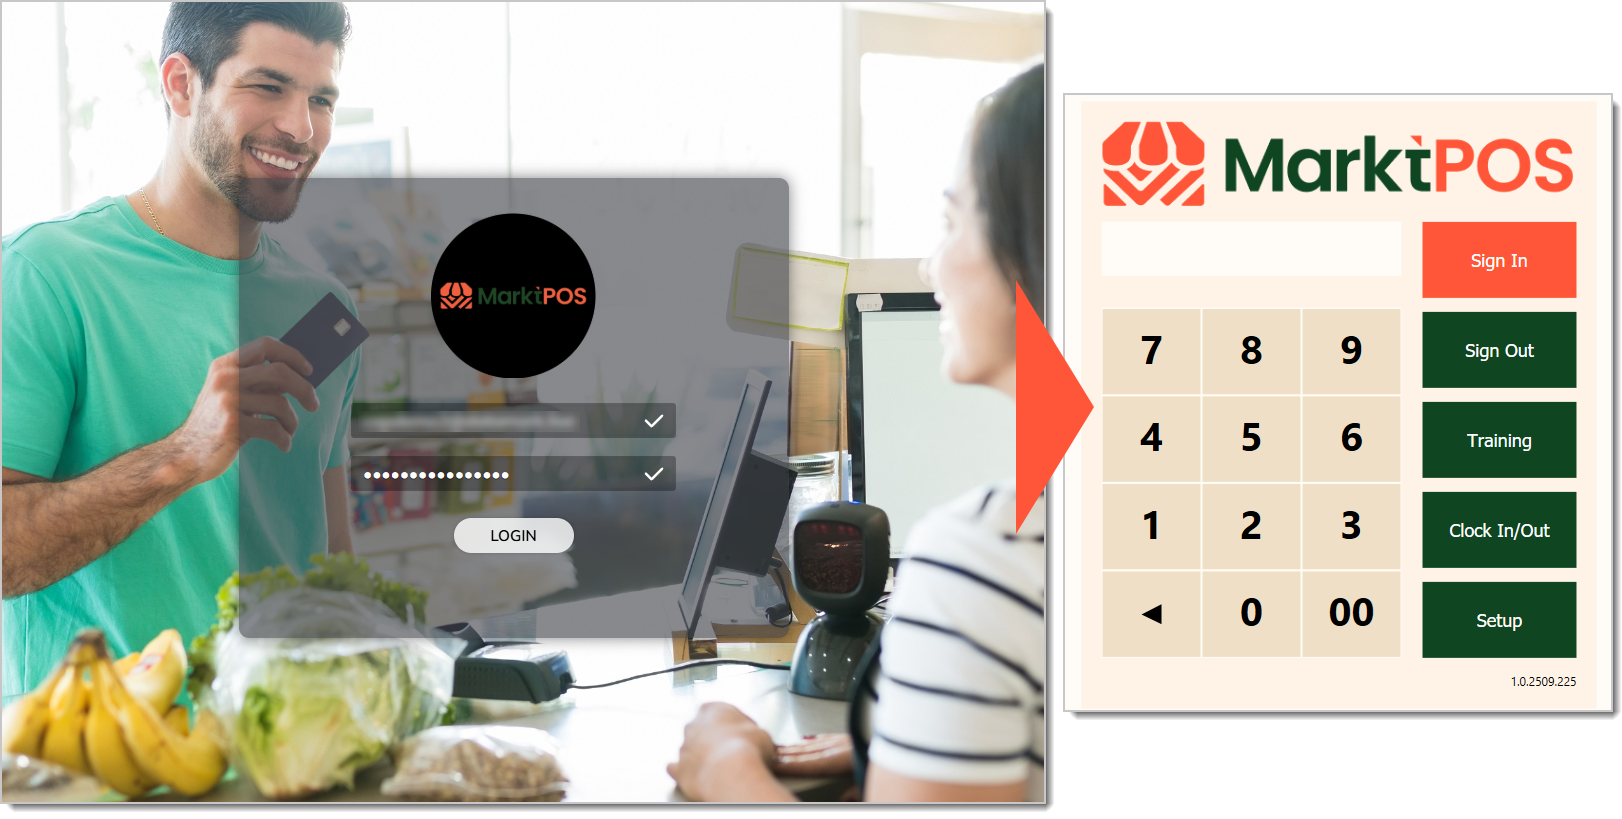
Congratulations! You're ready to ring up products and complete transactions for customers.
Scanning Products
Your initial system view looks like this:
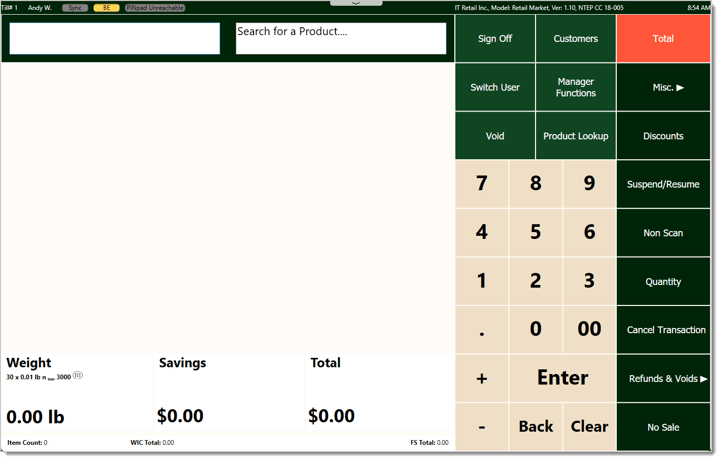
In order to run transactions, you'll need to scan products into the Front End. Use your handheld scanner or integrated scanner / scale to scan the product's barcode. Items you scan will appear on your screen as you go, and each will have a line item in the register area. If there is special deal pricing based on the quantity of an item, the system will automatically apply it as soon as as soon as you have added the quantity threshold to the Register.
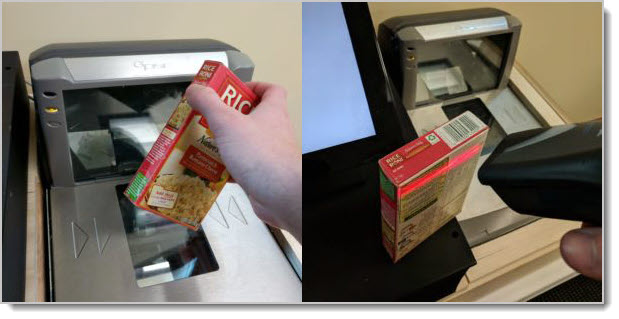
Once you scan, if the item is in the system, it will appear as a new line item in your register screen:
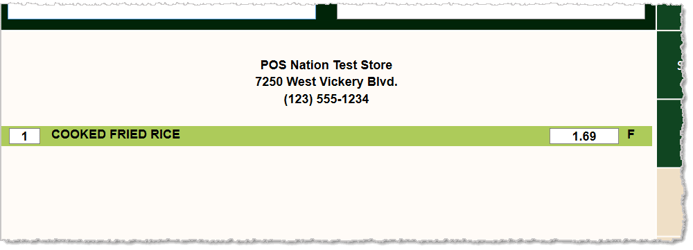
If the item is not in the system, it won't scan. There are two ways to move forward to add the item to the sale:
Method One: Non Scan
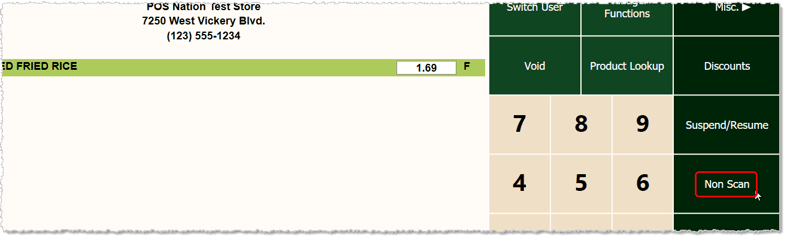
Non Scan — You can enter the item's price (as you enter the price, you'll see it in the blank field in the upper left of the POS window), then click or tap the Non Scan button on the far right of your screen, as pictured below.
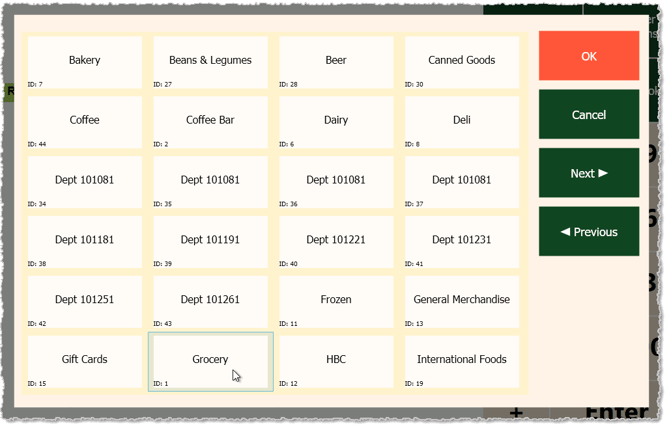
The Department window will open and you can click on the appropriate Department for the item. Departments must be set to be eligible to have non-scan items in order to be selected here. You can use the Next and Previous buttons to navigate if you have multiple pages of departments.
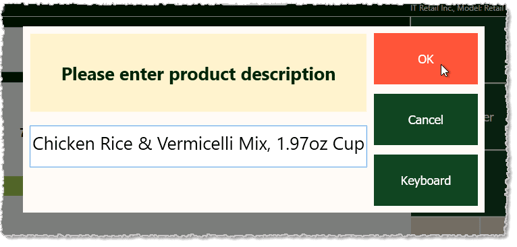
Once you select the department, you'll be prompted to enter a product description if the Department has been set to be Open in the Back End. You can only enter products this way into an Open Department. Enter the name of the product as in the example below, then click or tap the OK button. If you need an on-screen keyboard, tap the Keyboard button.
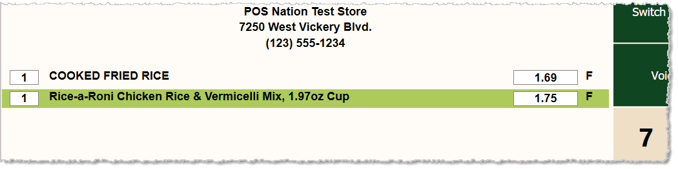
Once you have entered your Non Scan item, its line item will appear in the transaction, as pictured here.
Method Two: Add Product (Manager Functions)
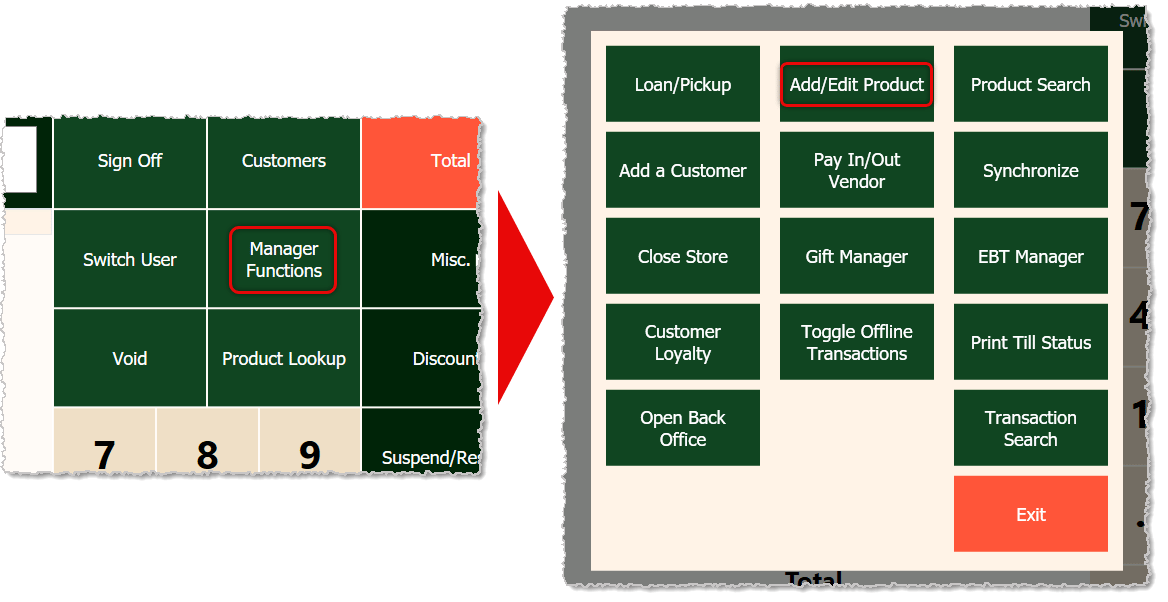
Add Product — If you have Manager permissions, you can click or tap the Manager Functions button and a window will pop up with your options. Click or tap the Add / Edit Product button, as pictured above. You are able to enter the following information:
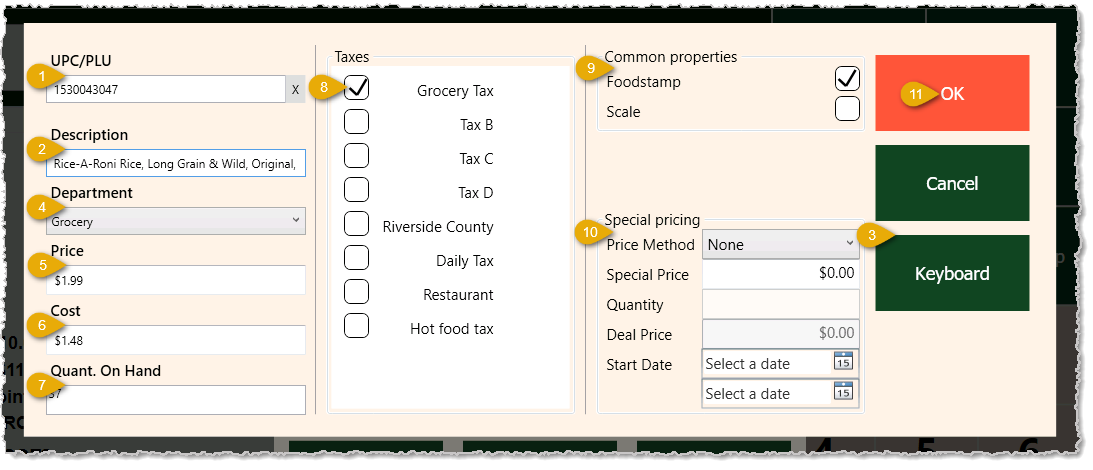
- UPC/PLU — You can scan the product's UPC barcode from the package or from its PLU label into this field. You will use this as the primary product identifier when scanning.
- Description — If the system finds the item by its code, the Description and other fields will fill in automatically. If not, you can enter the full title of the product and include its size, for example 3.25oz or 125ml, if applicable.
- Keyboard — If you're using a touch-screen device, tap this button to open the on-screen keyboard to enter the Description and other information. When entering dollar-amount information, you don't need to worry about the dollar sign or decimal point. Just tap in the field to get the cursor flashing and enter the numbers for the amount and the system will format it for you.
- Department — Select the Department for the item from the list.
- Price — Enter the regular price of the item.
- Cost — If you know the per-unit Cost the store pays for the item, you can either enter it or leave this blank and enter it later.
- Quantity on Hand — Enter the quantity you currently have of the item if you know the count.
- Taxes — This area shows the Taxes that are set up for your Front End. Check the box for the appropriate Tax for the item.
- Common Properties — You may have different options in this area than are shown in the image above, but common ones are Foodstamp (EBT) eligibility and whether or not the item is sold by weight, which would require the Scale option. Check the boxes for all properties that apply to the item.
- Special Pricing — You can configure special pricing for the item, if needed, in this area.
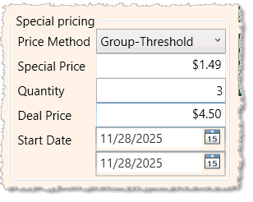
- For the Price Method, you can select from:
- None — This is the default.
- Unit-Pricing — Standard item pricing.
- Split-Package — Individual items broken out from a combined package, like cans from a 6-pack.
- Group-Threshold — Standard unit price is paid until a set number of items is reached, and then you get an additional item free. For example, if you buy four items at their normal price of $1.25 each, the fifth one is free for that total of $5.
- Group-Adjusted — Standard unit price is paid but if you buy a set quantity or more, the per-unit price is reduced to the Group-Adjusted price. For example, if you buy three or fewer of an item, they are the standard price of $1.25, but if you buy 4 or more, they are each $1.
- Limited Pricing — You set a number of items that will have limited pricing and any additional items are standard price. For example, the first four items are $1 each, then each additional item would be the standard $1.25.
- If needed, you can enter a Special Price for the item.
- If you are using price methods other than Unit Pricing, you can set the Quantity and the Deal Price for buying that quantity of items. For example, the item is normally $1.99, but if a customer buys 3, they get them for $4.50 instead, which is only $1.50 each.
- You can set a Start Date and End Date for the Deal Price or Special Pricing and the system will clear it when the date has passed.
- OK — Click or tap this button once you have entered all of the item's information to save it in the system.
Voiding Items
From time to time you will need to Void items out of the transaction. Sometimes the customer will decide they don't need it, or there might have been an error on your part. Please note that once you void an item, you can't undo that action. If you need the item back in the transaction, you will need to add it to the Register again. You can void an item using the following steps:
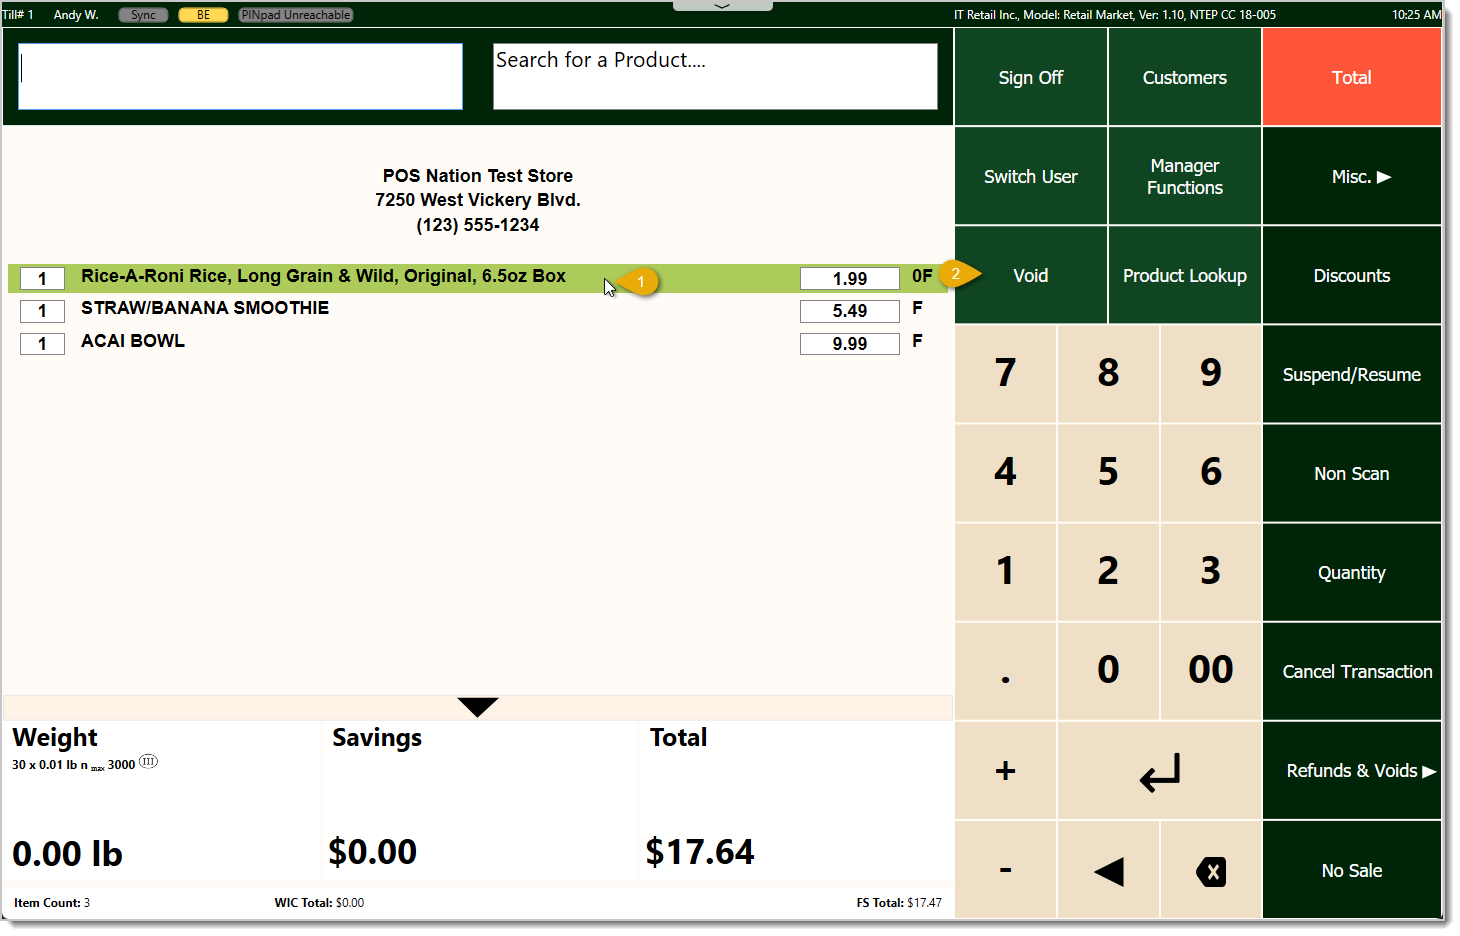
- Select the Item — Click or tap the line item you want to void out and it will become highlighted in green.
- Void — Click or tap the Void button.
- Voided Line Item — The original line item will remain for reference but will not be active in the sale. The void line item is in red and shows the amount that was reduced from the original total.

Canceling a Transaction
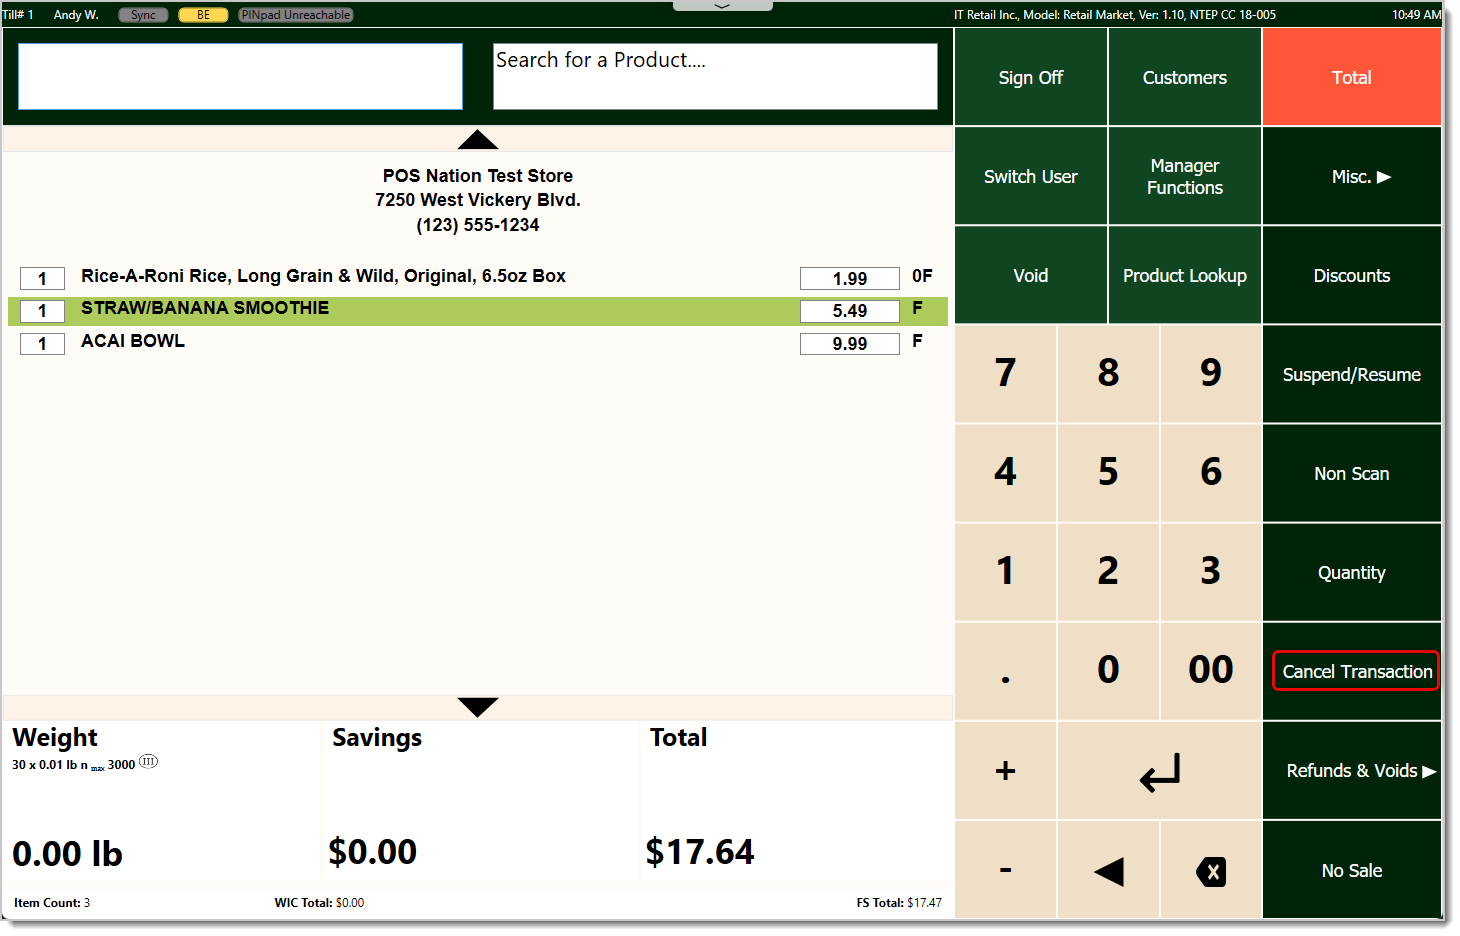
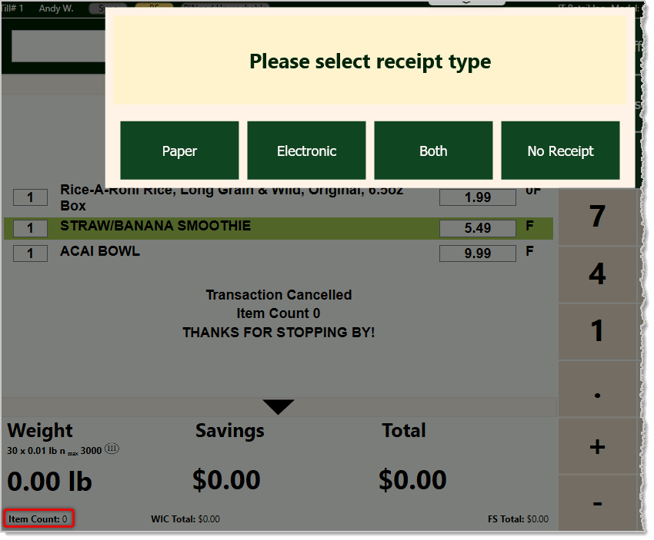
If you need to cancel a transaction for whatever reason, click or tap the Cancel Transaction button on the right, as pictured above. If you accidentally click or tap this button, you will need to restart the transaction again. Once you click or tap the button, you will still see the transaction line items for reference, but the Item Count in the lower left will become zero. You'll be offered receipt options as pictured below. Those options are described below in the section on Completing a Transaction.
Completing a Transaction
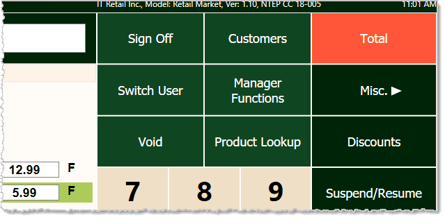
Once you have entered all of the items for a sale, you can proceed to the payment step. Start by clicking or tapping the Total button in the upper right.
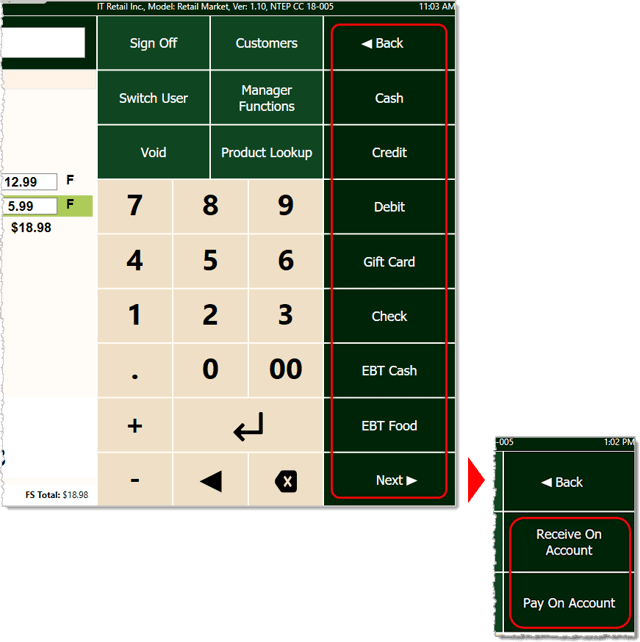
On the right side of the Front End, you'll see payment methods the customer can use for the transaction. Depending on the size of your display, you might need to use the Next button in the lower right to see other options. The customer can pay with multiple methods if the first method doesn't cover the total for the transaction. Click or tap on the first method they want to use. In our example, the customer will pay partially by cash and partially by card, but descriptions for all payment types are listed below.
After we click or tap on the Cash button a window will open with single-click cash amounts on the left side that are appropriate for the transaction, including exact change. In this case, we will manually enter ten dollars since the customer is paying a partial amount. Then we can click or tap the Enter or OK buttons.
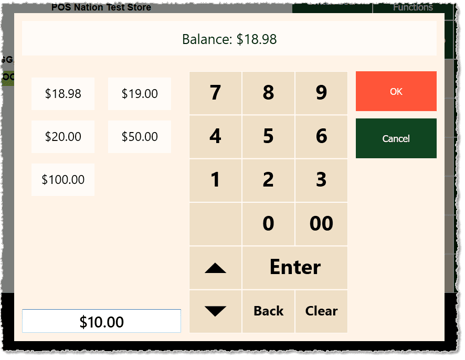
You'll be taken back to the transaction, and the system will have updated it with the payment.
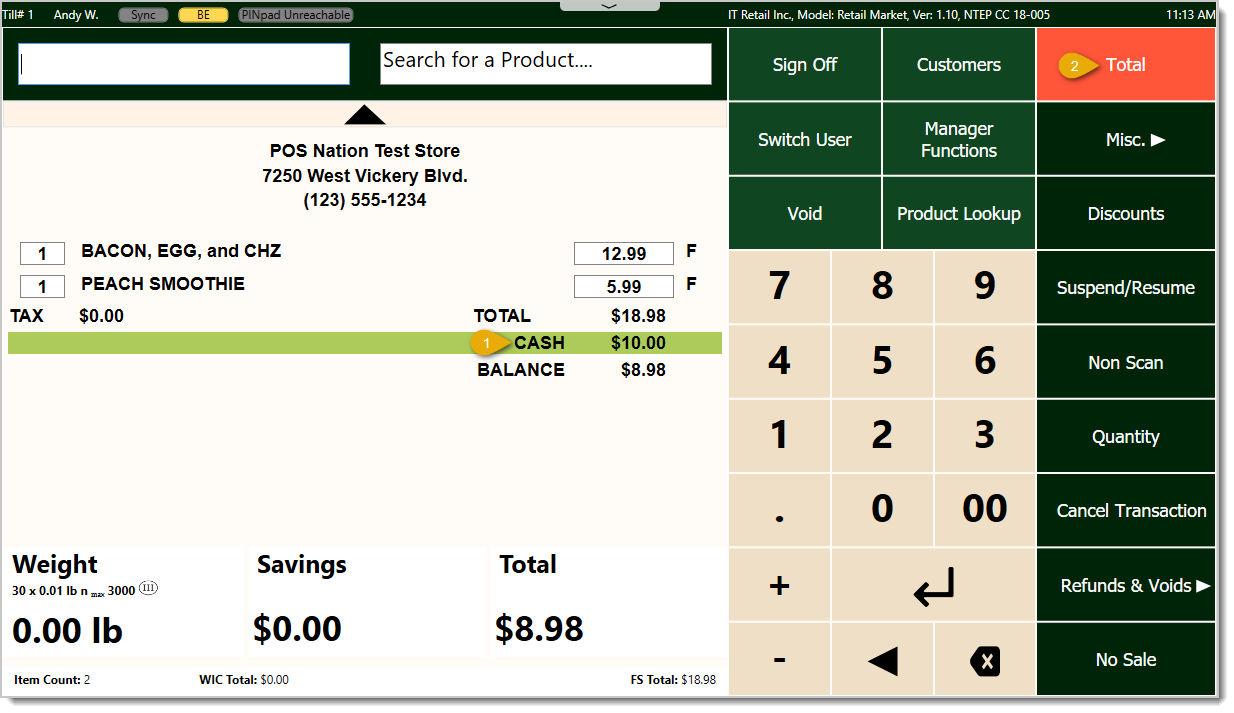
- You'll see a line for the Cash amount in the transaction and the Total at the bottom will be reduced by that amount.
- Once again, you can click the Total button in the upper right to take the next payment.
For the next payment, the customer will use their debit card, so we click or tap the Debit button on the right. The system will assume that you're charging the full remaining total for the transaction, so it will open a window showing the remaining amount. If the customer is paying the full remaining amount with the card, as in this example, click Yes. If the customer is paying a partial amount with the card, click No, and you'll be able to set the amount (not pictured, but just like the cash amount entry window above).
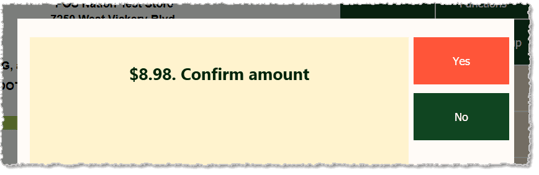
- If you are using Markt Payments integrated processing, you'll see a Please Wait message and the customer will be prompted to use the processing terminal to make the payment by inserting, swiping, or tapping their card.
- If you are using a non-integrated card-processing terminal, you'll be asked if the charge went through correctly, as pictured below.
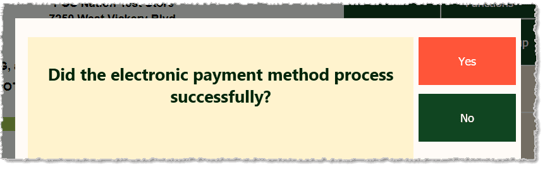
If you click or tap the Yes button, you'll see a Change Due notification ($0 in our example). Once you click or tap to confirm you'll be offered the following Receipt options:
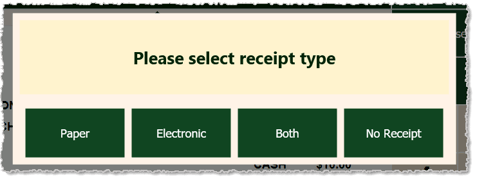
- Paper — Click or tap this button to print the receipt using your thermal receipt printer.
- Electronic — Click or tap this button to enter the mobile phone number where the customer wants to receive a text message link for the receipt. If the customer was added to the transaction and has a mobile number saved, the system will auto-fill that saved number, but you can change it to send to any number they prefer.
- Both — Click or tap this button to print the receipt and send it via text message to the mobile number you enter for the customer.
- No Receipt — Click or tap this button to proceed without a receipt.
Your transaction is now complete. It will remain on-screen for a short while for reference, if needed. You can start a new transaction at any time by adding items or a customer.
Payment Methods include the following:
- Cash — Your cash drawer will automatically open. Place the cash in the appropriate receptacle and give your customer their change, as needed.
- Credit / Debit (PIN terminal not integrated with the POS) — The system will ask you to confirm Electronic Transaction. It may also ask you to confirm the amount. Run the card on the card terminal and press OK once it's successfully charged.
- Credit / Debit (PIN terminal integrated with the POS) — After you click or tap Credit or Debit the POS will display a “Please Wait” message and the customer will be prompted to insert, swipe, or tap their card.
- Gift Card — After you click or tap the Gift Card button, the POS will display a “Please Wait” message. Depending on settings, you may be asked to confirm the amount.
Please Note: Many times, Gift Card transactions require a separate gift card processor. You will need to do third-party processing setup separately from our system.
- Check — After you click or tap the Check button, the POS will ask for the amount. Enter the amount for the check and it will be applied to the transaction.
- EBT Cash — After you click or tap the EBT Cash button, the system will prompt the customer to swipe their card on the PIN pad. After the customer's card information is processed, the screen and receipt will display the EBT funds used on this purchase as well as the remaining balance.
Please Note: To check an EBT card's balance, go to Manager Functions > EBT Manager > EBT Balance Check.
- EBT Food — After you click or tap the EBT Food button, the system will prompt the customer to enter their card. After the customer's card information is processed, the screen and receipt will display the EBT funds used on this purchase as well as the remaining balance on the card.
- Receive On Account — If a customer is loaded into the transaction and they have a balance they owe the store, you can use Receive On Account to let them make a payment toward their balance, as pictured below. Select the method they'll use for payment on the left from the Tenders list, then enter the amount and click or tap the OK button to take the payment. Payments made this way will appear on the In-Store Charge report in the Customers & Discounts area of the Back End. Please Note: For transactions of this type, you cannot have other items in the transaction.
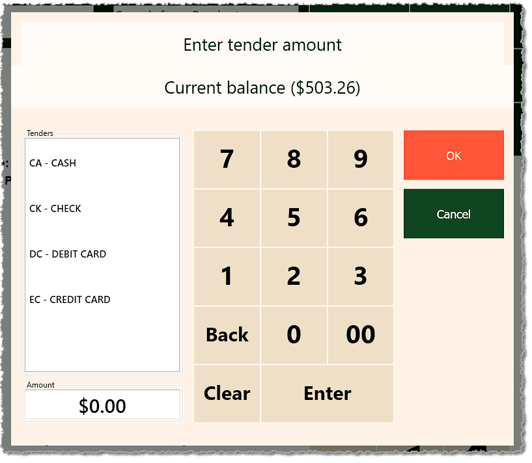
- Pay On Account — If the customer in the transaction is allowed to charge purchases in-store and pay toward their balance later, you can click or tap the Pay On Account button and the amount will be added to their balance owed. Payments made this way will appear on the In-Store Charge report in the Customers & Discounts area of the Back End.
Doing a Refund
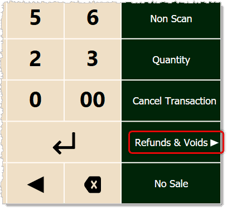
You'll occasionally need to do refunds on purchases for whatever reason, and the IT Retail makes it easy for you. Start by clicking or tapping the Refunds & Voids button on the right, as pictured above.
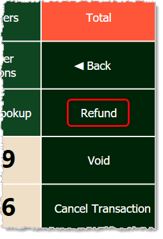
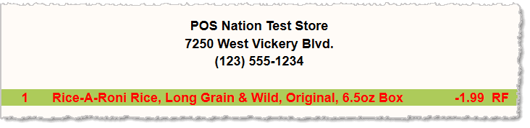
Click or tap the Refund button on the right. You'll see 'RF' in the item scan field in the upper left. You can scan in the item, find the item using Product Lookup, or weigh the item if you're using a PLU. This will add the refund as a line item to the Register, as pictured here:
You can then click or tap the Total button in the upper right to choose the payment type for the return. If you're returning to a card, choose Debit or Credit. If you're using integrated IT Retail Payments, the customer will be prompted to insert, swipe, or tap their card to receive the funds. Otherwise, you will manually need to process the return to their card on a terminal that is not integrated with the system.
Related Topics
POS Front End Tour
Working With Products in Transactions
Entering a Non-Scan Item
Suspending and Resuming Transactions
How to Void Items
Refunds and Returns in the Register
Tender Types in the POS
Frequently Asked Questions
Q: Can multiple cashiers log into the same register at the same time and just switch off as needed?
A: No. Only one cashier can be logged into the system at a time.
Q: I have a question, but I can't find my answer here. How do I get more assistance?
A: If you need immediate assistance, the IT Retail team is available 24/7. Feel free to contact our support team at: 877-752-0625. Or you can email us at support@marktpos.com and we will respond within 24-hours.








 November 10, 2025
Is this page helpful?
×Help us improve our articles