POS Front End Tour

December 01, 2025
We have worked hard to make our Front End as user-friendly as possible, but there are a lot of moving parts. This article will show you the areas of the Front End and what you can do with each of them. Explore what's there for you!
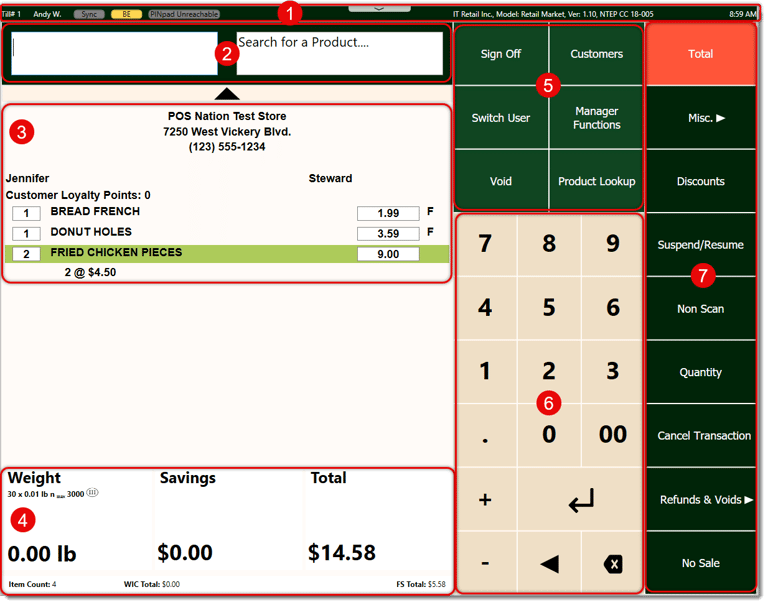
Here is what you'll learn:
- System Info
- Scan and Search
- Register
- Totals
- User and Item Functions
- Keypad
- Register Functions
System Info
The system status area at the top of the Front End has the following:

- Till and Cashier — The Till Number and Cashier's username will display here for reference.
- Status Indicators — Items that are highlighted in this area are active. Status indicators include Sync (actively syncing with the Back End), Back End (if the Back End is accessible to the signed-in user), and PINpad (if an integrated card-processing terminal is connected). Depending on your configuration, there may be other indicators that display here.
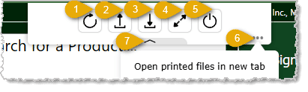
- System Functions — Click this drop-down panel to access the following system functions: 1) Refresh (reloads the Front End to update data), 2) Upload File, 3) Download File, 4) Fullscreen, 5) Disconnect (this will log you out), 6) Options (items you select in here will be active), and 7) Close.
- Version Info — This area displays the type and version of the IT Retail system for reference.
- Time — The current local time displays here.
Scan and Search

- Scan — When the Front End initially loads or whenever you start a new transaction, the Scan field will be active with a cursor flashing so you can scan in items immediately.
- Search — You can search in this field by product name for Product Code items. Please Note: For UPC items, in the Manager Functions area, you can use the Product Search to find any item by its name or description.
Register
The register area of the Front End lists items in the transaction and other important information. Here is what is in this area for you:
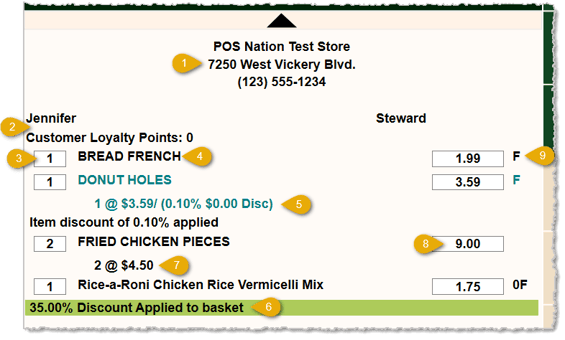
- Store Info — The name, address, and phone number for the store will display here. This information also prints on the receipt.
- Customer Info — If you add a customer to the transaction, their name, loyalty points, credit balance, or balance owed will appear here.
- Item Quantity — You can click in this field to enter the quantity for the item, or you can use the Plus and Minus buttons to increase or decrease the active item's quantity. The active item is highlighted in green. If you scan the same item multiple times, the system will add a new line item for it each time, which is useful when doing BOGO deals.
- Item Name — The full name of the item displays here.
- Line Item Discount — If you have applied a discount to a specific item, it will display below the item in the format pictured above.
- Basket Discount — If you have applied a discount for all eligible items in the register, it will display below the final item.
- Quantity Pricing — If an item has a quantity that's more than one, the individual price for the item and the quantity will display here for reference.
- Line Item Subtotal Price — The item's price will display here, and this amount includes any tax it might have. Please Note: Tax charges are itemized (if there are multiple taxes applied, all will be listed with amounts charged) once payment is made for the transaction and will print itemized on the receipt. If an item has a quantity greater than one, this area shows the subtotal for that price calculation.
- Food Stamp / WIC Eligibility — If the item is eligible to be paid for via EBT or WIC (Women / Infants / Children), the system will indicate eligibility using F or W, respectively. It also shows the Tax ID on the far right, with 0F being standard tax (Tax Code 1) and items that are EBT-eligible will be either 2F or simply 2 in that area. Please Note: The IT Retail system currently does not support payment via WIC at this time.
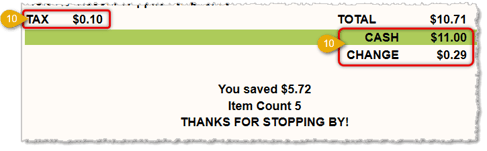
- Tax, Payment, and Change — Once the customer has made payment, the register will display the total tax on the order as well as the payment method(s), amount(s), and any change due.
Totals
This area of the Front End shows the transaction totals and other important information:
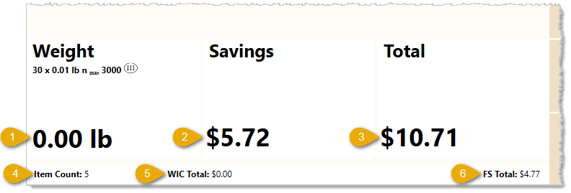
- Weight — This area will show the sum total of all weight values for items in the transaction.
- Savings — You will see the total discounted amount across all items in the transaction in this area.
- Total — The subtotal after any discounts will display in this area. This is the amount the customer needs to pay.
- Item Count — This area displays the total quantity of items in the transaction. Please note, this might be different from the number of unique line items.
- WIC Total — You will see the total amount eligible to be paid via WIC (Women / Children / Infants) in this area. Please Note: The IT Retail system currently does not support payment via WIC at this time.
- Food Stamps Total — You will see the total amount eligible to be paid via EBT in this area.
User and Item Functions
This area of the Front End offers functions for different levels of users as well as for products:
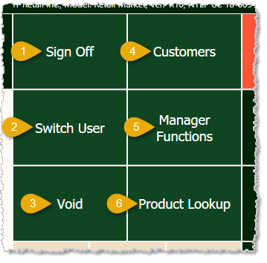
- Sign Off — Click or tap this button to log out of the Front End. This is useful whenever someone else won't be signing in right away.
- Switch User — Click or tap this button if you need to quickly switch and have another Cashier sign in.
- Void — If you need to void out an item from the transaction, click or tap this button. This will add voided entry and the original item's information will remain for reference but won't be active in the transaction.
- Customers — Click or tap this button to open the Customers window, where you can search for a customer by name or phone number. You can also browse through and click on the one you need. You don't have to load a customer to complete a transaction unless they want to earn loyalty points.
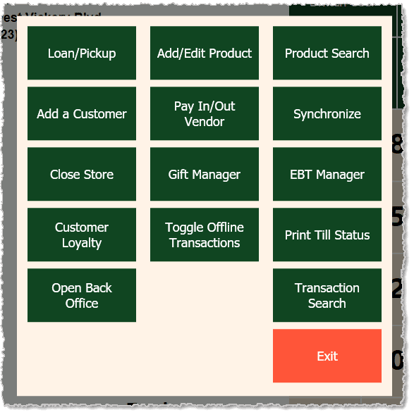
- Manager Functions — Click or tap this button to open the Manager Functions window. Functions include Loan/Pickup (add or remove cash from the drawer), Add/Edit Product, Product Search, Add a Customer, Pay In/Pay Out Vendor, Synchronize (update data changes with the Back End), Close Store, Gift Manager, EBT Manager, Customer Loyalty, Toggle Offline Transactions, Print Till Status, Open Back Office, and Transaction Search. Full details about each function are listed for you in the article linked below on Manager Functions.
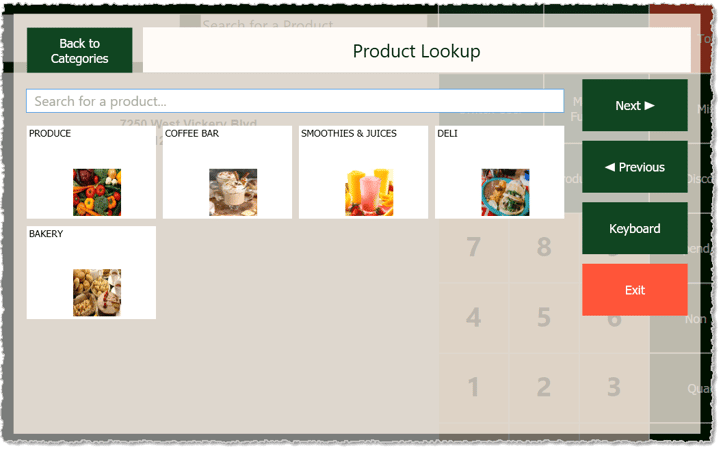
- Product Lookup — You can browse products you have configured in the Product Lookup Designer in the Back End if you click or tap this button. You can search for what you want at the top, or use the thumbnails and navigation controls to find what you need.
Keypad
You can use the on-screen keypad to enter any numeric information. It also has some unique functions your ten-key keyboard cannot do:
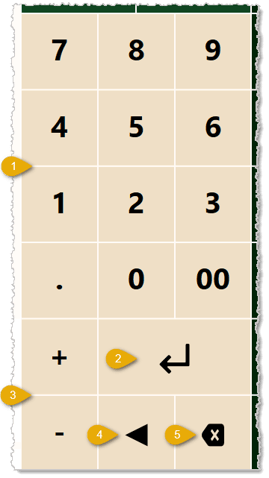
- Number Keys — Click or tap the number keys to enter numbers into the active area. When you sign into the Front End or start a new transaction, the Scan area in the upper left will be active and you can manually enter a UPC or PLU code if it won't scan.
- Enter — Click or tap this button when you've finished entering your numbers to enter the added code or amount.
- Increase / Reduce Quantity — Click or tap the Plus or Minus buttons to increase or decrease the active item's quantity in the register. The active line item is highlighted in green.
- Backspace — Click or tap this button to delete the last number you added.
- Delete — Click or tap this button to delete all numbers you've keyed into the active field.
Register Functions
Important functions of your register are on the right side of the Front End. Here is what we have for you:
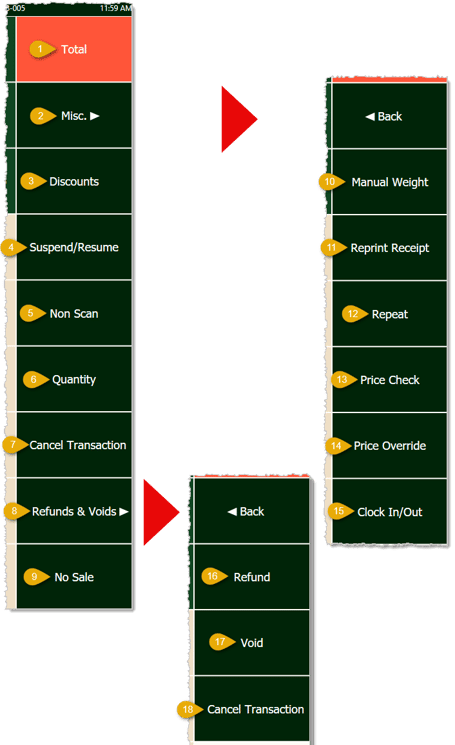
Main Menu
- Total — Click or tap this button when you're ready to take payment from the customer. Once you do, you'll see options for the payment type they can use.
- Miscellaneous Functions — Click or tap this button to see the miscellaneous functions described in numbers 10 through 15 below.
- Discounts — You can add any saved item or basket discounts to the transaction by clicking or tapping this button. You can search by discount title or browse and click on the one you want.
- Suspend / Resume — If you are working on a transaction, you can click or tap this button and you'll either be given an order number or you’ll be prompted to enter a name for the order to suspend it. If you haven't started a transaction and you click or tap this button, you'll see a list of transactions. You can click or tap the one you want to resume.
- Non Scan — Click or tap this button to add an item that won't scan because it has not been entered into the system database.
- Quantity — Click or tap this button to enter the quantity for the active item in the register. The active item is highlighted in green.
- Cancel Transaction — If you need to cancel the current transaction without taking payment you can click or tap this button. You will be offered receipt options, if needed.
- Refunds & Voids — Click or tap this button to access the refund and voids functions detailed in numbers 16 through 18 below.
- No Sale — Click or tap this button to open your cash drawer. You will be prompted for your password, and if you have user permission to do so the drawer will open. The system will log the event and print a ticket.
Misc. Menu
- Manual Weight — If you need to manually enter a weight value for an item, enter the weight using the number pad. Then click or tap this button enter the weight value for the item.
- Reprint Receipt — Click or tap this button to reprint the most recent transaction receipt. The print will start immediately and you'll be returned to the main menu for the Register functions.
- Repeat — You can click or tap this button after adding an item to the Register to add it once again without having to search for it.
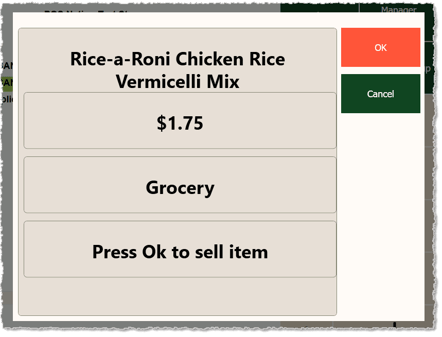
- Price Check — Click or tap this button and the system will add PV to the scan field in the upper left so you can scan in an item just to check its price. This will not add it to the transaction. In the info window that pops up you can click or tap the OK button to add the item to the transaction.
- Price Override — Click or tap this button, then scan in an item for which you need to adjust the price.
- Clock In / Clock Out — Click or tap this button to access the time clock so you can clock in or clock out for your shift.
Refunds & Voids Menu
- Refund — Click or tap this button to refund an item you scan into the Scan field in the upper left. The item will be coded to go in with a negative Price and Quantity, and you can manually adjust the quantity if needed. It is recommended to do refunds as separate transactions from purchases.
- Void — If you need to void out an item from the transaction, click or tap this button. A voided entry will be added and the original item's information will remain for reference but won't be active in the transaction.
- Cancel Transaction — If you need to cancel the current transaction without taking payment you can click or tap this button. You will be offered receipt options, if needed.
Related Topics
Cashier Training
Manager Functions in the Front End
Entering a Non-Scan Item
Suspending and Resuming Transactions
How to Void Items
Refunds and Returns in the Register
Tender Types in the POS
Frequently Asked Questions
Q: I have a question, but I can't find my answer here. How do I get more assistance?
A: If you need immediate assistance, the IT Retail team is available 24/7. Feel free to contact our support team at: 877-752-0625. Or you can email us at support@marktpos.com and we will respond within 24-hours.
Welcome to IT Retail, we’re so glad you’ve chosen our POS for your store! This article will guide yo
Adding products to a customer’s transaction is straightforward. Below is a step-by-step guide on how
You can ring up a product as a Non-Scan item if it doesn’t have a UPC / PLU code or it's not yet reg








Is this page helpful?
×Help us improve our articles