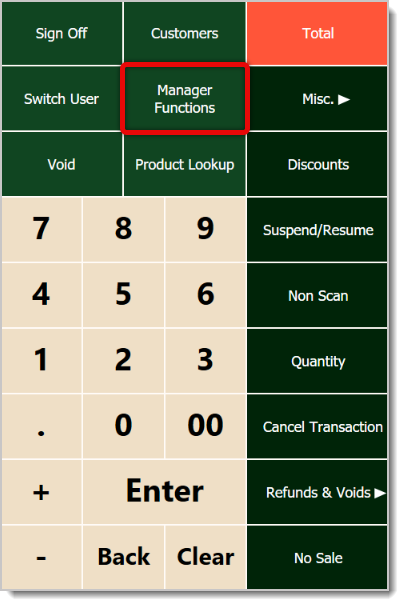
There is a wealth of administrative functionality for you in the Manager Functions area of the Front End. This article will show you the what tools you have and how to use them. Take a look at what this area allows you to do!
Here is what you'll learn:
Cash Drawer Loans and Pickups
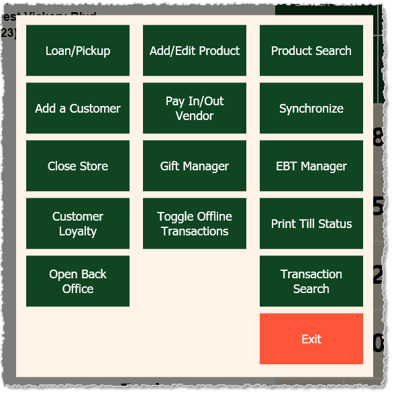
Whenever you add cash to a drawer, in the IT Retail system that is a Loan. Whenever you remove cash from the drawer for security reasons, such as when you have too much and need to make a cash drop into the safe, that is a Pickup. Here is how those functions work from the Manager Functions window:
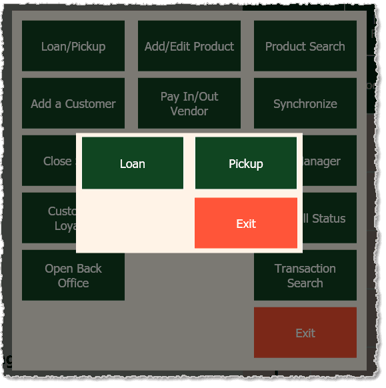
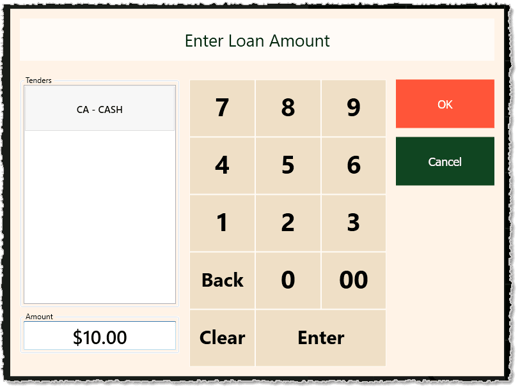
- Loan — Click or tap the Loan button whenever you're adding cash to your drawer. In the Loan Amount window that opens, enter the total dollar amount of the cash you're adding to the drawer. Then click or tap Enter or OK to complete the loan. The amount will show up in your End of Day report, but won't be included in the deposit.
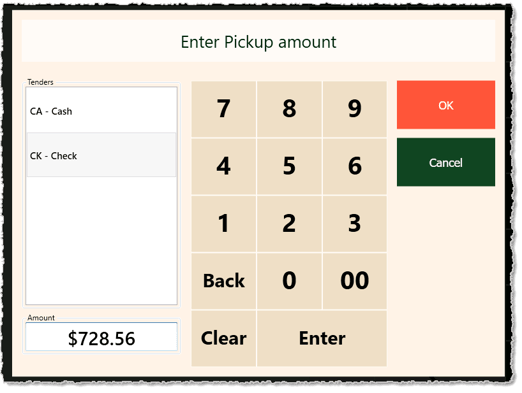
- Pickup — Whenever you need to take cash out of the drawer to do a cash drop, you will click or tap the Pickup button. You'll need to add up the dollar total of cash and checks you're picking up and enter it into the Pickup Amount window, as pictured below. Don't worry now about accounting for the amounts for each of those tender types separately, you'll do that in your End of Day procedures. When you have the total in place, click or tap the Enter or OK buttons to complete the pickup. This money will be included in your deposit in the End of Day report.
Adding and Editing Products
In the Manager Functions window, you can click or tap the Add/Edit Product button, as pictured in the Manager Functions window above, to get to this area. You are able to enter or edit the following information:
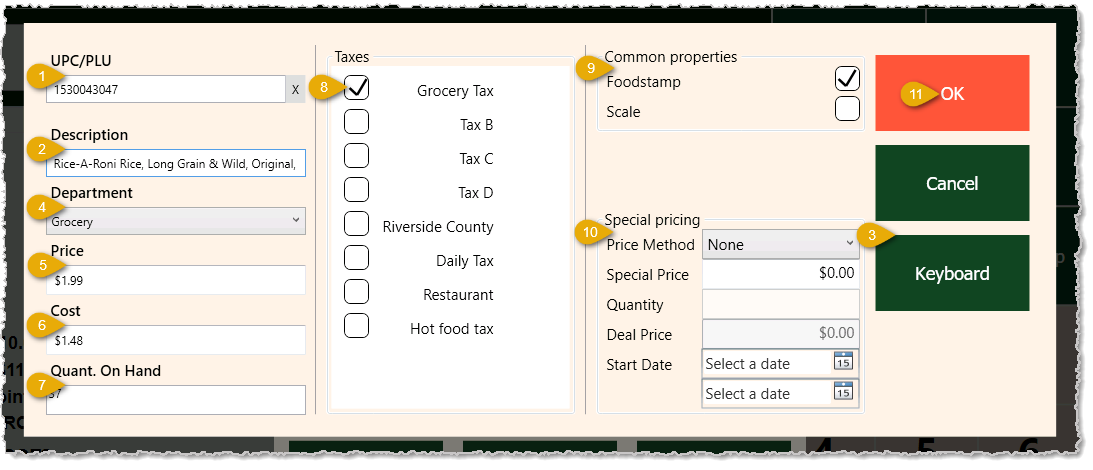
- UPC/PLU — You can scan the product's UPC barcode from the package or from its PLU label into this field to use as the primary product identifier. If you are editing a product, scan it in to adjust whatever is needed and the data that is already saved will load for you.
- Description — If the system finds the item by its code, the Description and other fields will fill in automatically. If not, you can enter the full title of the product and include its size, for example 3.25oz or 125ml, if applicable.
- Keyboard — If you're using a touch-screen device, tap this button to open the on-screen keyboard to enter the Description and other information. When entering dollar-amount information, you don't need to worry about the dollar sign or decimal point. Just tap in the field to get the cursor flashing and enter the numbers for the amount and the system will format it for you.
- Department — Select the Department for the item from the list.
- Price — Enter the regular Price of the item.
- Cost — If you know the per-unit Cost the store pays for the item, you can enter it here, or leave this blank and enter it later.
- Quantity on Hand — Enter the quantity you currently have of the item, if you know the count.
- Taxes — This area shows the Taxes that are set up for your Front End. Check the boxes for the appropriate Taxes for the item.
- Common Properties — You may have different options displaying in this area than are shown in the image above, but common ones are Foodstamp (EBT) eligibility and whether or not the item is sold by weight, which would require the Scale option. Check the boxes for all properties that apply to the item.
- Special Pricing — You can configure special pricing for the item, if needed, in this area.
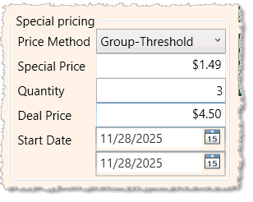
- For the Price Method, you can select from:
- None — This is the default.
- Unit-Pricing — Standard item discounted pricing.
- Split-Package — Individual items broken out from a combined package, like cans from a 6-pack.
- Group-Threshold — Standard unit price is paid until a set number of items is reached, and then you get an additional item free. For example, if you buy four items at their normal price of $1.25 each, the fifth one is free for a total of $5.
- Group-Adjusted — Standard unit price is paid but if you buy a set quantity or more, the per-unit price is reduced to the Group-Adjusted price. For example, if you buy three or fewer of an item, they are the standard price of $1.25, but if you buy 4 or more, they are each $1.
- Limited Pricing — You set a number of items that will have limited pricing and any additional items are standard price. For example, the first four items are $1 each, then each additional item would be the standard $1.25.
- If needed, you can enter a Special Price for the item.
- If you are using price methods other than Unit Pricing, you can set the Quantity and the Deal Price for buying that quantity of items. For example, the item is normally $1.99 but if you buy 3, you get them for $4.50, which is only $1.50 each.
- You can set a Start Date and End Date for the Deal Price or Special Pricing, and the system will clear it when the date has passed.
- OK — Click or tap this button once you have all of the item information entered to save it in the system.
Product Search
If you're in the Manager Functions window and you click the Product Search button, the window below will open. Here is what is in this area for you:
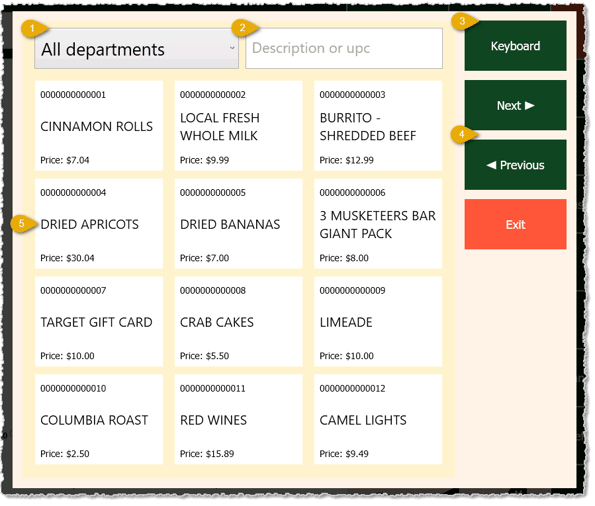
- Department — You can use this drop-list to filter down to a single Department of your choice or you can use the default option of All Departments to search all saved products in the database.
- Search — You can scan in a UPC here or enter part of it, or you can search by anything in the product's Description (the name of the product). The window will display matching results.
- Keyboard — If you need the on-screen keyboard, click or tap this button to open it.
- Browse — If you don't know the exact words for the item's description, you can always use the navigation buttons for Next and Previous to browse for the item you want.
- Products — Once you find the item you need, click or tap on its thumbnail to load it into the transaction. Then click or tap the Exit button when you're finished.
Add Customers
If you have a new customer you need to add to the system, from the Manager Functions window, click or tap the Add a Customer button. The Add Customer window will open for you:
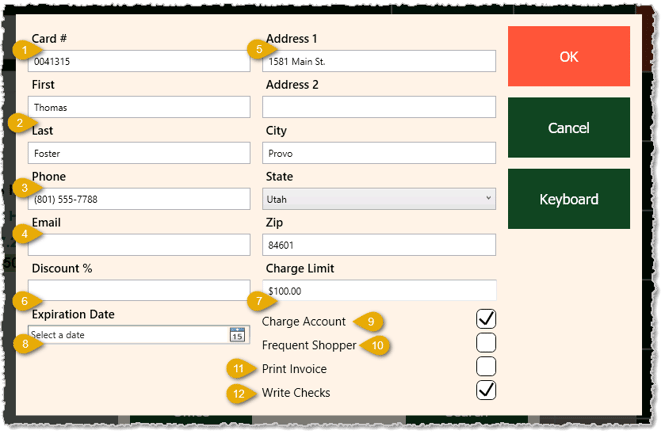
- Customer Card Number — Enter a number for the customer's loyalty card, if you are using them. For loyalty cards, if you're having them printed by a service such as Duracard.com, make sure they have the prefix 004. This is so the system will recognize the number as a customer card number. After that prefix, you can use whatever numbers or characters you like. Also, if you don't have a magnetic card strip reader connected to your register device, you will want to have the cards printed with barcodes you can just scan. For full information on this topic, please see the Customer Loyalty article linked below.
Please Note: Do NOT store credit or debit card numbers in this area! That is a serious security risk.
- Name — Enter the name the customer wants to use for their store account. Enter the customer's First Name and Last name in the respective fields.
- Phone — If the customer wants to receive receipt links and coupons via text, enter their mobile phone number here.
- Email — If the customer wants to be on your mailing list, add their email address here.
- Address — If needed, you can enter the full street address for the customer using these fields.
- Discount Percentage — If you give the customer a discount off of eligible items, enter that percentage here.
- Charge Limit — If you want to give the customer the ability to charge items to an in-store account they pay later, you can enter the amount of credit you want to extend to them here.
- Expiration Date — If you want customer accounts that expire, you can enter the expiration date here. This can be useful to keep the customer's information accurate. For full details on this topic, see the link for the Customer Account Expiration article linked below.
- Charge Account — If you are giving the customer a charge limit, check this box so they have an active charge account. Charges the customer makes and pays toward will be listed in the In-Store Charge Report on the Back End.
- Frequent Shopper — If the customer is a regular for you, whether or not you are rewarding them with a customer discount from #6 above, you can flag them as a Frequent Shopper so they can be part of that group for your marketing.
- Write Checks — If you trust the customer for personal checks, you can check this box so they can use that payment method.
Pay In / Pay Out Vendor
This area of the Front End offers functions for different levels of users as well as for products:
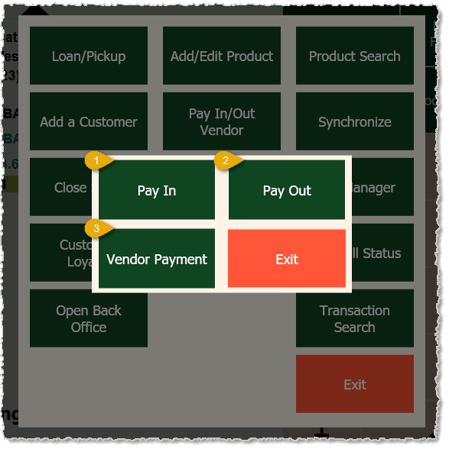
- Pay In — You can click or tap the Pay In button to open the list of saved Pay In items you use for your store. Examples of this would include payments you receive from customers purchasing Lotto tickets or newspapers. You can create your Pay In items on the Back End from Balancing > Paid In And Out, on the Paid In tab. After you click the item you want, a window will open that will let you specify the amount that the customer is paying:
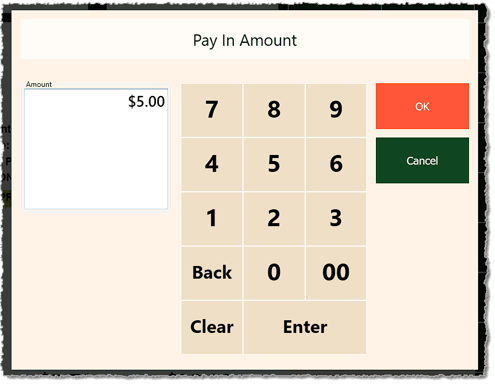
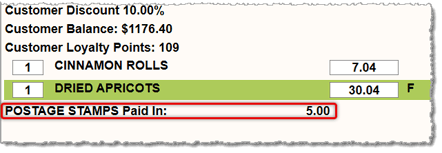
When you click or tap to Enter the amount or the OK button, the item will be added as a Paid In line in the Register, as in this example with postage stamps:
- Pay Out — You can click or tap the Pay Out button to open the list of saved Pay Out items you use for your store. Examples of this would be payments you give to customers for winning Lotto tickets or cash you pay out for bottle deposit returns. After you click the item you want, a window will open that will let you specify the amount that the customer is paying. That window is like the example above, and entering a payment amount and then clicking or tapping Enter or OK will load a line item for the pay out. This looks similar to the one above except the amount will be a negative value for the transaction. You can create your Pay Out items on the Back End from Balancing > Paid In And Out, on the Paid Out tab.
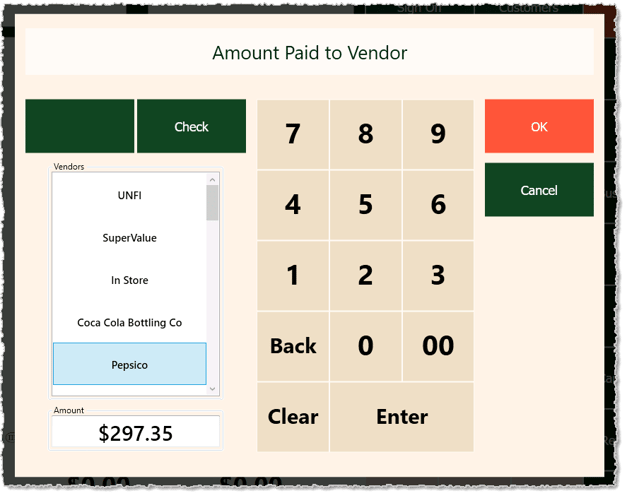
- Vendor Payments — You can click or tap the Vendor Payment button to open the Amount Paid to Vendor window, as pictured below. It will list all of your saved Vendors and you can click or tap on the one receiving the payment. Enter the payment amount and then click or tap Enter or OK. The system will load a line item for the vendor payment into the register. The amount will be a negative value for the transaction. Please Note: These payments can only be for Vendors you have saved in the system.
Synchronize
The Synchronize function of the Manager Functions offers two tools for updating the Front End:
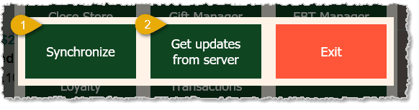
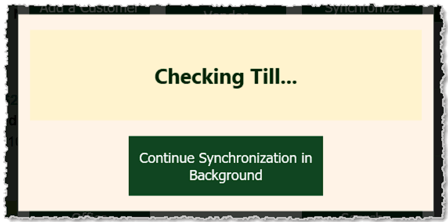
- Synchronize — Click or tap this button if you have worked in offline mode and made changes that need to be sent to the database, such as the creation of new customers or products. Do this after you are back online and connected to the server and your data will be sent and will update the database. When either this function or the Get Updates from Server Function are activated, you will see the message below. You can click to hide it and have the update run in the background. If you don't click or tap the button, the message will close automatically when the sync is complete.
- Get Updates from Server — Every time the Front End initially loads for you, it checks for updates from the Back End for all system data. However, sometimes during the day, you might have made additions to that data from other devices. To update your terminal, click or tap this button. The system will run the update and load any new data locally so you have access to the latest additions.
Close Store
In the Manager Functions window, you can click the Close Store button when you're ready for your final drawer count for the day:
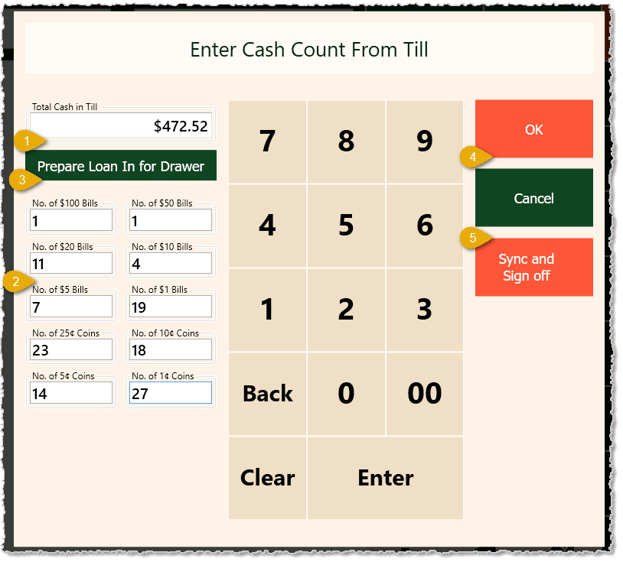
- Drawer Cash Count — You can manually enter a total here if you don't need to use the fields below to enter each denomination type. As you enter values into each cash denomination field, this area will total those entries and give you a final drawer count of your cash.
- Bill and Coin Denomination Counts — You can count each type of bill and coin you have and enter those amounts in these respective fields so the system knows what types of coins and bills you have in what quantities.
- Prepare Loan-In for Drawer — If the cash in the drawer totals less than you need in the drawer to start your next shift, you can click this button to run a Loan-In to add cash to the drawer to get to that total. For example, near the end of the shift, you had to remove cash to pay a vendor, and your closing cash in the drawer is only $124.00, but you need to start each shift with $200.00 for your store policy, so you can click this button to run a Loan-In for the $76.00 you need.
- OK — When you've completed your drawer cash count and any Loan-In you might have needed, and if you are doing another shift after this one, you would click or tap this button. But for most of your shift changes, if someone else is taking a shift after you, use the function below to finalize this operation.
- Sync and Sign Off — Click or tap this button to update the server with your cash-count and any Loan-In you might have needed, and to close the store for the day by signing off.
💡Please Note: The article linked below on End of Day Procedures has more detail on this process.
Gift Manager
Click or tap the Gift Manager button in the Manager Functions window to work with Gift Cards in the Front End. Here are the functions you can use:
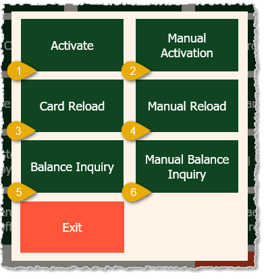
- Activate — If you have gift cards that will work with your integrated card reader, you can click or tap this button. The terminal will prompt you to tap, swipe, or insert the card being activated (depending on the card and terminal capabilities your activation methods may vary) and then enter the amount being loaded onto the card.
- Manual Activation — If you have gift cards that are not integrated with the system, you can click or tap this button. You'll be prompted to enter the amount and then the card number. If your gift cards have barcodes printed on them, you can scan in the barcode. The new gift card will be registered in the system at the completion of this process.
- Card Reload — If you are using an integrated card terminal that will work with your gift cards, you can click or tap this button and that terminal will prompt you to enter the card and amount you are loading into it. The terminal will offer some preset amounts ($10, $20, and $50) as well as a Custom amount.
- Manual Reload — If you are not using an integrated card terminal that works with your gift cards, click or tap this button and you'll be prompted to enter the amount you're loading onto the card. Then either scan in the card number via barcode scanner or manually enter the number to reload the card.
- Balance Inquiry — If you are working with an integrated card terminal that can work with your gift cards, when you click or tap this button the terminal will prompt the customer to tap, insert, or swipe their card. It will then display the remaining card balance for them and for you.
- Manual Balance Inquiry — Click or tap this button if you are not using an integrated terminal for your gift cards. A window will pop up that will allow you to scan a gift card barcode or manually enter its number. The system will show you the remaining balance on the card.
EBT Manager
Click or tap the EBT Manager button in the Manager Functions window to work with EBT (SNAP / Food Stamps) Cards in the Front End. Here are the functions you can use:
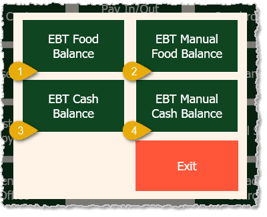
- EBT Food Balance — If you have an integrated card reader for EBT Food cards, you can click or tap this button and that terminal will prompt to tap, swipe, or insert the customer's card. The system will then display the remaining card balance for them and for you.
- EBT Manual Food Balance — If you have an integrated card reader for EBT Food cards but the card isn't scanning in, you can click or tap this button. That terminal will prompt you to manually enter the customer's card number. The system will then display the remaining card balance for them and for you.
- EBT Cash Balance — If you have an integrated card reader for EBT Cash cards, you can click or tap this button. That terminal will prompt you to tap, swipe, or insert the customer's card and the system will then display the remaining card balance for them and for you.
- EBT Manual Cash Balance — If you have an integrated card reader for EBT Cash cards but the card isn't scanning in, you can click or tap this button. That terminal will prompt you to tap, swipe, or insert the customer's card and the system will then display the remaining card balance for them and for you.
Customer Loyalty
If you have started a transaction with a customer who has Loyalty Rewards they haven't used, first load the items they want to buy, and then click or tap this button. The system will show you how many different rewards they have to choose from and then will show you the specific Loyalty Rewards and it will ask if you want to view them. After clicking Yes, you'll be able to click or tap on the one(s) they want to redeem. When you click or tap to apply them, you'll see the discount(s) in the Register, as in the example below.
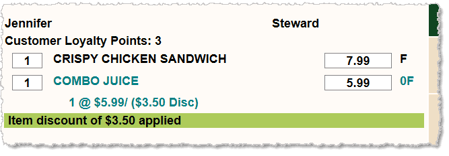
For full details on working with Customer Loyalty, please see the linked article on Giving Customer Reward Coupons in the Front End below.
Toggle Offline Transactions
If you are using the legacy Worldpay card-processing integration and if Offline Transactions are active with that integration, you can click or tap this button to run transactions when you are not connected to the server (offline from the internet). You can later run a Synchronization to update the server with those transactions once you are online again.
Print Till Status
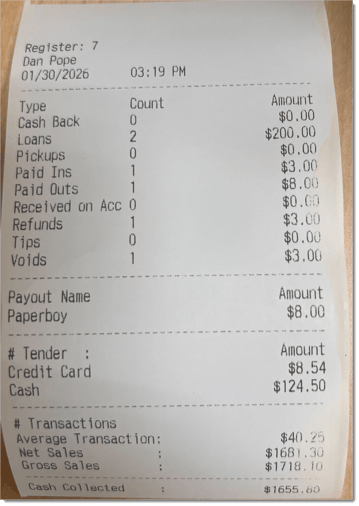
You can click or tap this button to print a Till Status Report for your terminal. The report contains details for what you can expect in your cash drawer, showing how many Pickups, Loans, Refunds, and Voids were done for the current shift, as well as the tender types used for transactions. For full details see the article linked below on the Till Status Report.
Open Back Office
Click or tap this button to open the IT Retail Back End in a new browser window. You'll be prompted to log into that part of the system, which has a different login from what you use to sign into the Front End.
Transaction Search
Click or tap the Transaction Search button in the Manager Functions window to find a transaction you need. The Transaction Search window offers a number of ways to find what you want, depending on what details you have for the transaction. Here is what you can do:
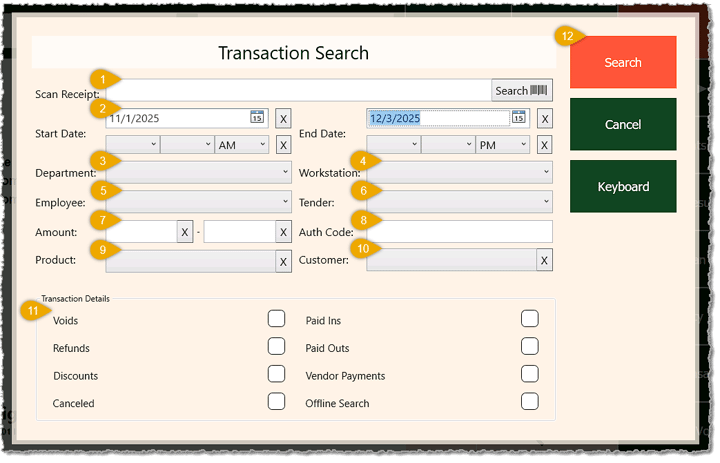
If you will be manually entering information, you can click or tap the Keyboard button on the right to open the on-screen keyboard, if needed.
-
- Scan Receipt — This is the fastest way to get to a transaction. You can scan the receipt barcode, and then click or tap Search to go straight to the one you want.
- Date Range — You can enter a Start Date and Time and an End Date and Time to restrict your search to all transactions in the range.
- Department — If you choose a Department from the drop-list, the search will be restricted to transactions with items from the department.
- Workstation — If you choose a Workstation from the drop-list, the search will be restricted to transactions completed from that workstation.
- Employee — If you choose an Employee from the drop-list, the search will be restricted to transactions completed by that employee.
- Tender — If you choose a Tender Type from the drop-list, the search will be restricted to transactions paid for using that tender.
- Amount Range — You can enter a dollar From Amount and To Amount in the amount fields and the search will be restricted to transactions with Totals falling within that dollar amount range.
- Auth Code — You can enter the Authorization Code generated for a card payment on the transaction and the system will find that transaction when you click or tap the Search button.
- Product — Click or tap this field to open the Product Search window where you can find the product you want and click on it. Once you have selected the product, the search will be restricted to transactions that had that item.
- Customer — Click or tap this field to open the Customer Search window where you can find the customer you want and click on them. Once you have selected the customer, the search will be restricted to transactions for only that customer.
- Transaction Details — Click or tap the checkboxes to restrict your search to transactions with the selected details. These options include transactions with Voids, Refunds, Discounts, Canceled, Paid Ins, Paid Outs, Vendor Payments, and Offline Search.
- Search — Click or tap the Search button in the upper right whenever you have your selections configured.
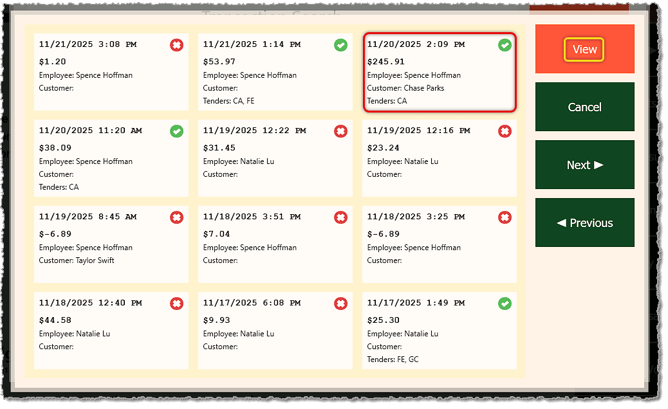
The Transactions window will open with all orders matching your search criteria. Each will display its Date and Time, Amount, the Employee that completed it, the Customer name, if any, and the Tenders used. If the transaction was completed, you'll see a green Checkmark Icon in the upper right. If it was canceled, you'll see a red X Icon. Browse transactions using the Next and Previous buttons until you find what you want, then click or tap the transaction's thumbnail. Once you have selected the one you want, click or tap the View button in the upper right to see the receipt.
Related Topics
Working With Products in Transactions
How to Create Customers in the Front End
End of Shift Procedures
Tender Types in the Front End
Setup and Use of EBT
Giving Customer Reward Coupons in the Front End
Till Status Report
Getting Started With the Back End
Reprint a Customer Receipt
Frequently Asked Questions
Q: I have a question, but I can't find my answer here. How do I get more assistance?
A: If you need immediate assistance, the IT Retail team is available 24/7. Feel free to contact our support team at: 877-752-0625. Or you can email us at support@marktpos.com and we will respond within 24-hours.








 December 02, 2025
Is this page helpful?
×Help us improve our articles