







Cashier Training
Welcome to IT Retail, we’re so glad you’ve chosen our POS for your store! This article will guide yo
 November 20, 2025
If a customer wants to sign up for your store’s membership program, you can add them in the Front End. The customer will start earning reward points right away through your loyalty program and you can offer them member discounts, in-store charge accounts, and more. Here’s how to add customer profiles to your system from the register!
From the Front End, click or tap on Manager Functions on the right.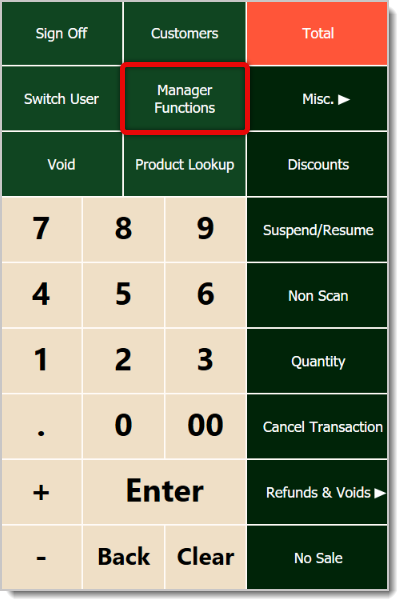
In the Manager Functions window, click or tap on Add a Customer.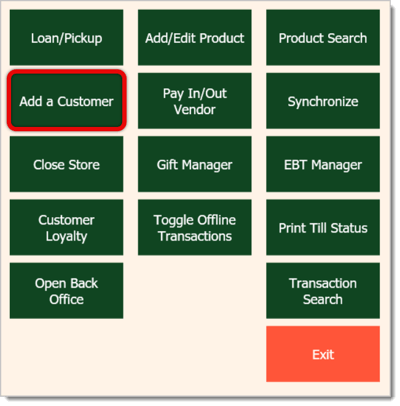
A window will open so you can add the customer’s information. Here is what each function is for:
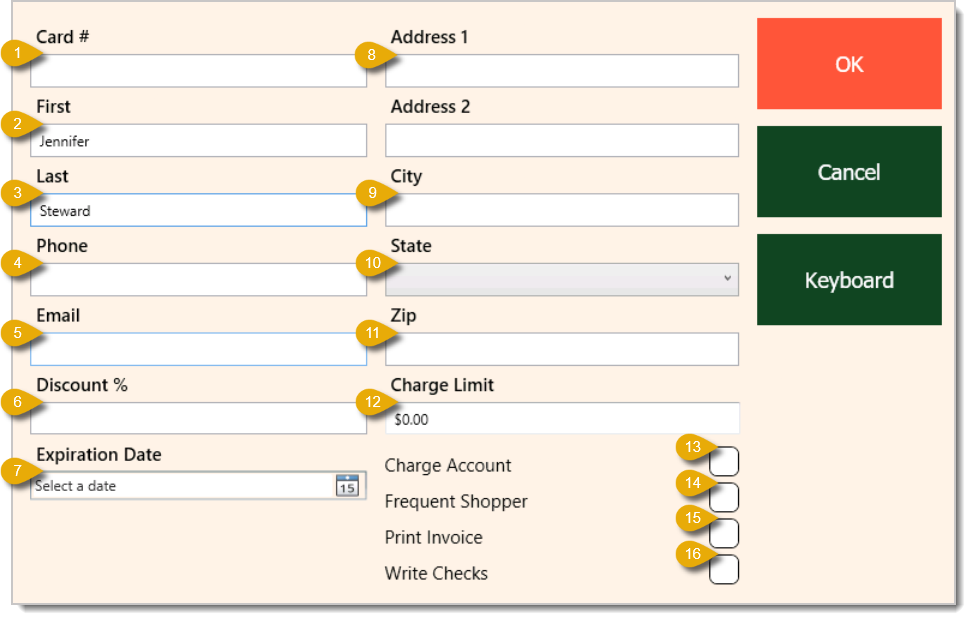
Card Number — If your business gives out membership cards, enter the card number you’ll assign to this customer here.
First* — Enter the customer’s first name.
Last* — Enter the customer’s last name.
Phone — Add the customer’s phone number. While only the First and Last name fields are required, we recommend adding their phone number or email address so you can easily look up the customer during later purchases.
Email — Add the customer’s email address. Similar to the Phone field, we recommend adding this so you can look up the customer more easily later.
Discount Percentage — Enter the percentage discount the customer gets for being a member.
Expiration Date — Select the date this customer’s membership will expire, so they will have to renew it after this day.
Address — Add the customer’s address. There are two fields for this in case there is additional information, like what apartment number the customer lives at.
City — Enter the city the customer lives in.
State — Enter what state the customer lives in.
Zip — Enter the customer’s zip code.
Charge Limit — Input the maximum amount allowed for the customer in their in-store charge account.
Charge Account — Check this box if the customer will have an in-store charge account.
Frequent Shopper — Check this box if they’re a frequent customer at your business.
Print Invoice — Check this box if the customer wants invoices printed out.
Write Checks — Check this box if the customer wants to pay using checks.
*Required Field
After you’ve entered the customer’s information, click or tap on the OK button to add the customer. You’ll see a window that reads Customer successfully saved. The customer’s details are now saved in the system!
To learn about setting up a customer loyalty membership system, read our article on Customer Loyalty linked in Related Articles.
Customer Membership Expirations in the Front End
Customer Membership Expirations in the Back End
Giving Customer Reward Coupons in the Front End
Q: How do I deactivate loyalty rewards for a customer?
A: All customers will have rewards active, but they only apply if the customer is added to a transaction. If they don't want the loyalty rewards, their transactions can be completed without adding them as a customer.
Q: I have a question, but I can't find my answer here. How do I get more assistance?
A: If you need immediate assistance, the IT Retail team is available 24/7. Feel free to contact our support team at 877-752-0625. You can also email us at support@marktpos.com, and we will respond within 24 hours.
Is this page helpful?
×Help us improve our articles