







Cashier Training
Welcome to IT Retail, we’re so glad you’ve chosen our POS for your store! This article will guide yo
 October 01, 2024
The Payment Portal is a dashboard included as part of our payments offering. It allows users to view or edit account details, review recent transactions, process new sales, view reports, and manage disputes. As an extra security measure, we’ve also hosted this page independently which means should the IT Retail system ever experience any outages, this would continue to function and serve as a backup. This allows you to continue processing transactions without interruption.
Please Note: The Payment Portal is not backwards compatible so transactions done through the Virtual Terminal will NOT show up in the IT Retail and inventory will not be affected.
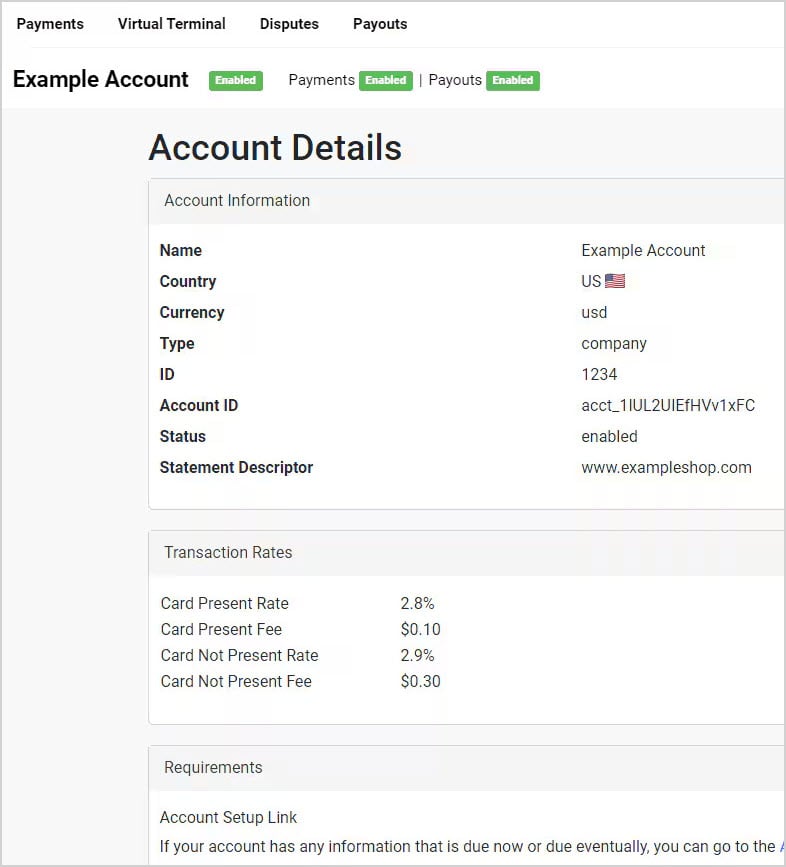
When a user first logs in, they are taken to the Account Details page. At the top of the page, users can see their Account Status, Payment Status, and Payouts Status. If an account has not completed their application, then these statuses will remain Disabled. Once the account has been completed and approved, these statuses will change.
On this page you can find all account information, including:
You can also view all processing fees, account requirements, bank account, and hardware information. If you have multiple locations, you can also view the additional locations associated with your account.
Users can come back to this page by going to Settings > Account Details.
This page shows all recent transactions processed through the IT Retail system, in-store and online. Date Ranges of up to 30 days can be used to filter the results, and the Status filter allows you to view specified statuses. You can also Search using the Transaction ID or Amount.
On the table below you can see the following information:
You can click on any row to show more information about the transaction (see the image below).
You can also Print or Export the data using the icons in the upper right corner.
Please Note: It may take up to 5 minutes for a transaction to appear so if you don’t see it, please refresh the page.
To refund a transaction, click on the appropriate row, and click on Refund towards the bottom of the Payment Details panel. This action cannot be undone.
Use this page to run transactions outside the IT Retail system. This is primarily for when the IT Retail system cannot be used. On this page, you can collect the following information:
Once you have filled out the information, click the green Charge button to process the sale.
Clicking the Clear button will clear and reset the page.
Please Note:
- Negative balances (unreferenced refunds) are NOT supported
- The Payment Portal is not backwards compatible so transactions you do through the Virtual Terminal will NOT show up in the IT Retail system and inventory quantities will not be affected. You will need to manually adjust them when your system is back online.
When the system receives a dispute, the Administrator on the account should receive an email notification. Users can respond to and manage disputes on this page. The following information is available on this page and can be filtered by Date and Status:
To submit evidence in a dispute, click on the Submit Evidence button in the appropriate row. Additional details will be visible and you will need to fill out information about the transaction. Once you have filled out the form, click the blue Submit Evidence button to submit the information.
Please Note: This action cannot be undone.
To accept a dispute without submitting evidence, click the Accept Dispute button.
This page can also be printed or exported using the icons at the top right-hand corner.
Use this page to see deposit information as soon as the payout has been initiated. You can filter by Date or by searching the Payout ID.
This page is intended to be as transparent as possible, showing the breakdown of Fees, Refunds, and Deposits.
The following information is available in the table below:
You can also click any row to see the individual transactions that made up that Payout.
Use the icons in the upper right to Print or Export the page.
You can Edit or Add Users by going to Settings > Manage Users. The following information is available for Users:
To add a new User, click the blue Create User button. From here, you can assign the User specific permissions.
Please Note: You can add or disable login access without affecting permissions.
Q: Can I use the Payment Portal from within the Back End?
A: No. The Payments Portal is a standalone hub for working directly with your PayFac. You must log into it separately from the IT Retail Back End.
Q: I have a question, but I can't find my answer here, how do I get more assistance?
A: If you need immediate assistance, the IT Retail team is available 24/7. Feel free to contact our support team at: 877-752-0625. Or you can email us at support@marktpos.com and we will respond within 24-hours.
Is this page helpful?
×Help us improve our articles