POS Manager Checkstand Receipt

January 16, 2026
The POS Manager Checkstand Receipt tab allows you to configure the IT Retail system Front End receipts to include you need. This article will show you how to configure each setting. See what's there for you!
Front End Receipt Configuration
You can get to this part of the system by logging into the Back End and opening the Administration menu. Click on POS Manager to get started.
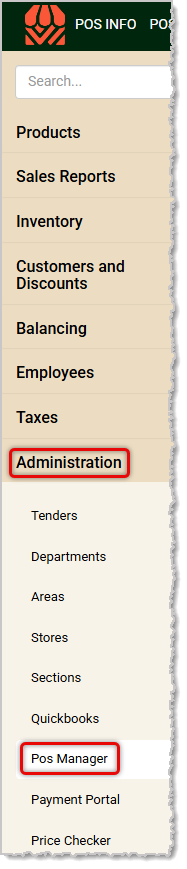
Once the POS Manager loads, you will automatically see the Security tab since it loads by default. Click to open the Checkstand Receipt tab. If you're looking for a specific setting or option, you can use the Search tab to find it and you can configure it from there. Always remember to click the Save button in the upper right if you have made any changes to your settings.
Printing Options
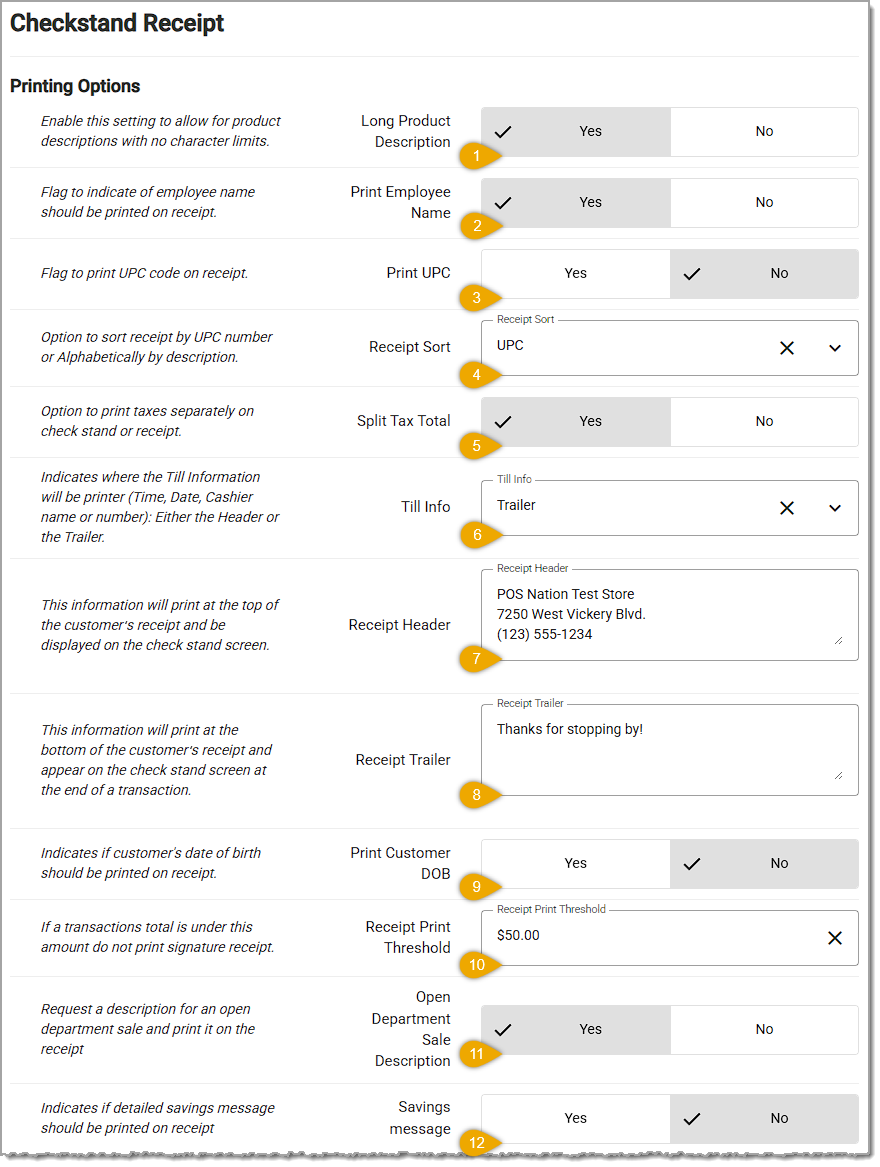
- Long Product Description — If this is set to Yes, product descriptions (names) will print with no character count limitation. If it is set to No, product line item Descriptions on receipts will be limited to 34-characters, including punctuation and spaces, and will never exceed one printed line.
- Print Employee Name — If it is helpful for you to know the employee that does each transaction, you can enable this setting to print the employee name on receipts.
- Print UPC — If you want to have the UPC for each item on your printed receipts, turn this setting on.
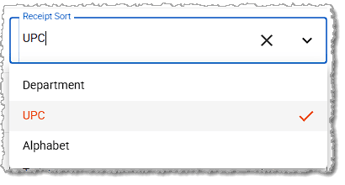
- Receipt Sort — Please Note: This setting has been locked to have the receipt printed order of items identical to the order in which they were entered into the sale. The options in the drop-list here are not functional. This is old functionality that is going to be phased out of the interface in the future.
- Split Tax Total — If you have multiple taxes involved in a transaction—for example State, County, and Municipal sales taxes—you can set this to Yes to have each tax print on a separate line on the receipts.
- Till Info — This option governs where information about the register, time, date, cashier name, etc., will print on the receipt; either up in the Header or below everything else in the Trailer (footer).
- Receipt Header — Enter the information you want to print at the top of your receipts. Typically this is the store name, address, phone, email, and possibly the website address.
- Receipt Trailer (Footer) — Enter the text you want to print below everything else on your receipts. This text will also appear on the customer's screen at the completion of the transaction.
- Print Customer DOB — If you customer birth dates printed on receipts, you can enable this setting. By default, this is set to No, and for most retail stores we recommend not using this unless required for age-restricted items.
- Receipt Print Threshold — Enter the maximum dollar amount at which or below receipts will not need a signature copy for the customer to sign.
- Open Department Sale Description — For items that a cashier rings up that are not yet saved in the system ('Open' Department items, if that setting is enabled for departments), turning this setting on will require the cashier to enter a Description (name or title) of the product in order to add it to the register. If this is off, open department items can be added without descriptions.
- Savings Message — If you want a detailed Savings Message to print on customer receipts, turn this setting on. You can enter the text for those messages in the POS Manager Checkstand Screen tab in the Savings Message setting (see the article linked below for full details on that tab).
Receipt Confirmations
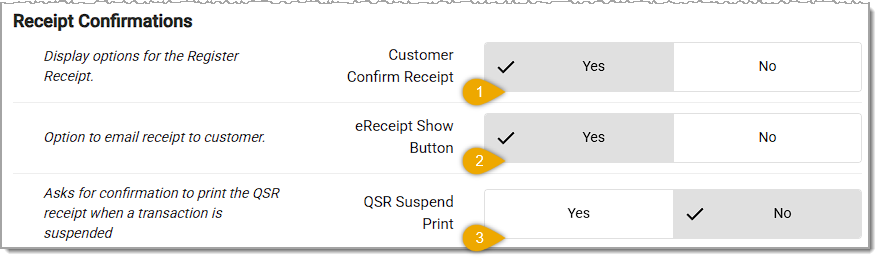
- Customer Confirm Receipt — Turn this setting on to offer the customer the option of what type of receipt to print: Paper, Electronic (text message, if the E-Receipt Show option is enabled), Both, or None.
- eReceipt Show Button — Turn this setting on if you want the option to text message receipts to customers.
- QSR Suspend Print — For stores using the QSR integration, with this setting on, you can add receipt printouts to a queue in your kitchen, which you can later print out when the customer pays for the order.
Please Note: The TenantID and StoreID codes at the bottom of the page are used by the support team and you won't need to do anything with them.
Related Articles
POS Manager Overview: Your System Settings
POS Manager Checkstand Screen
POS Manager API Setup
POS Manager Printer Setup
Cashier Training
Frequently Asked Questions
Q: I have a question, but I can't find my answer here. How do I get more assistance?
A: If you need immediate assistance, the IT Retail team is available 24/7. Feel free to contact our support team at 877-752-0625. You can also email us at support@marktpos.com, and we will respond within 24 hours.
Welcome to IT Retail, we’re so glad you’ve chosen our POS for your store! This article will guide yo
We have worked hard to make our Front End as user-friendly as possible, but there are a lot of movin
There is a wealth of administrative functionality for you in the Manager Functions area of the Front








Is this page helpful?
×Help us improve our articles