POS Manager Printer Setup

January 20, 2026
The POS Manager Printer Setup tab allows you to configure your barcode label printer settings. Your receipt printer will not require setup here, but you can set preferences for receipts in the POS Manager Security tab. This article will show you how to work with your printer options. Take a look!
Set Up Your Printers
You can get to this part of the system by logging into the Back End and opening the Administration menu. Click on POS Manager to get started.
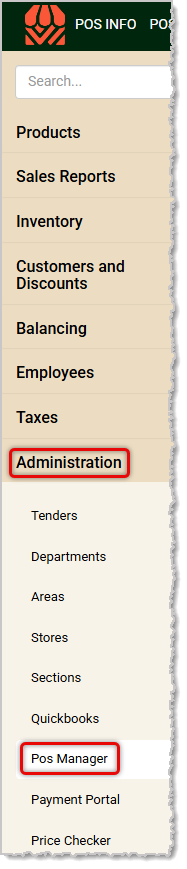
Once the POS Manager loads, you will automatically see the Security tab since it loads by default. Click on the Printer Setup tab, and follow the instructions below to get your printers working the way you need.
Please Note: Printing reports on letter size paper and printing receipts to your receipt printer requires no special setup.
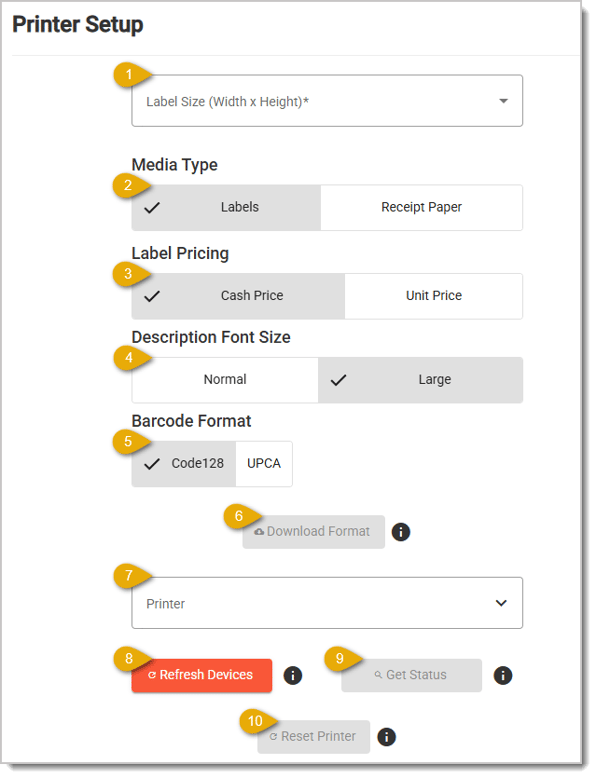
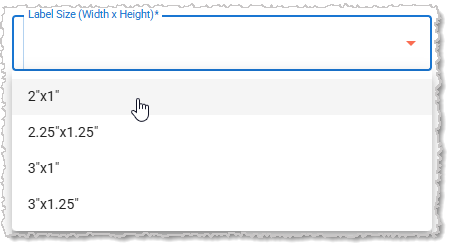
- Label Size — Click to open the drop-list to select the size of labels you use. The common sizes offered are 2"x1", 2.25"x1.25", 3"x1", and 3"x1.25", as pictured below. Click on the size you will use.
- Media Type — In cases where you’re not using one of our preferred label printers that has a label-gap sensor, you can use Labels tab to prevent such a printer from ‘continuous printing’ your labels since it won’t detect when the last label prints. The Receipt tab for this area is not needed for your receipt printer.
- Label Pricing — When printing labels, this setting allows you to choose whether you want to print the Cash Price for items (if you use our Dual Price setting; see the article linked below for the POS Manager Security tab) or if you want to use the standard Unit Price. If Dual Price is enabled for you in the Back End, this button will read Dual Price, and Cash will be the regular retail price.
- Description Font Size — For the item Description that prints on your labels and receipts, you can use this setting to either print those at the Normal size text, or print them Large so they're more legible to shoppers with reduced vision.
- Barcode Format — We recommend using the Code128 encoding for your barcodes and just leaving that default unless you have a specific reason to use UPC-A format for encoding. Code128 is the most commonly used encoding for barcode labels, and the same encoding will be used for barcodes on receipts.
- Download Format — Click this button if you want a test printout of your selected formats to get an idea of what they will look like.
- Printer — Choose the Printer you are configuring from your list of connected printers.
- Refresh Devices — Click this button if you are not seeing the printer you need in the Printer drop-list described above. If you have power-cycled (turned off and then turned on again) a printer, you may need to click this button for it to show up in the list.
- Get Status — If you're unsure of your printer's availability, click this button to check whether it is Online or Offline.
- Reset Printer — If your printer has worked before with the system but has stopped doing so and its status is Online, you can click this button to reset its settings to the defaults.
Related Articles
POS Manager Overview: Your System Settings
POS Manager Security
POS Manager Checkstand Screen
POS Manager Checkstand Receipt
POS Manager API Setup
Cashier Training
Receive Inventory
Frequently Asked Questions
Q: I have a question, but I can't find my answer here. How do I get more assistance?
A: If you need immediate assistance, the IT Retail team is available 24/7. Feel free to contact our support team at 877-752-0625. You can also email us at support@marktpos.com, and we will respond within 24 hours.
There is a wealth of administrative functionality for you in the Manager Functions area of the Front
If you're just getting started in the IT Retail system you will want to set up your Departments befo
The IT Retail Tenders page allows you to create and edit Tender Types like cash, debit cards, and EB








Is this page helpful?
×Help us improve our articles