The POS Manager Security tab allows you to configure the IT Retail system Front End to work the way you need. This article will show you how to configure each setting. See what's there for you!
Front End Configuration
You can get to this part of the system by logging into the Back End and opening the Administration menu. Click on POS Manager to get started.
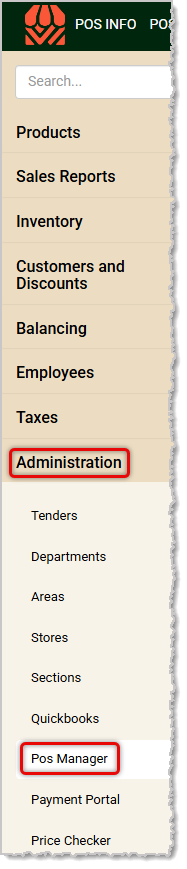
Once the POS Manager loads, you will automatically see the Security tab since it loads by default. If you're looking for a specific setting or option, you can use the Search tab to find it and configure it from there. There are six sections on the Security tab and some export options at the bottom. Always remember to click the Save button in the upper right if you have made any changes to your settings. Here are the different sections of the Security tab page:
Initial Setup — Register configuration options.
Balancing — Front End initial cash setting.
Age Restrictions — Settings for configuring product age restrictions for cashiers to be able to sell them.
Time Limits — Timeout settings for the Front End register and for previous transactions to clear.
Dual Pricing — Configuration options for cash-discounts on item sales to encourage purchases via cash.
Product Exports — Exports for all products active in the system and all products for all-time since initial activation of the system.
Initial Setup
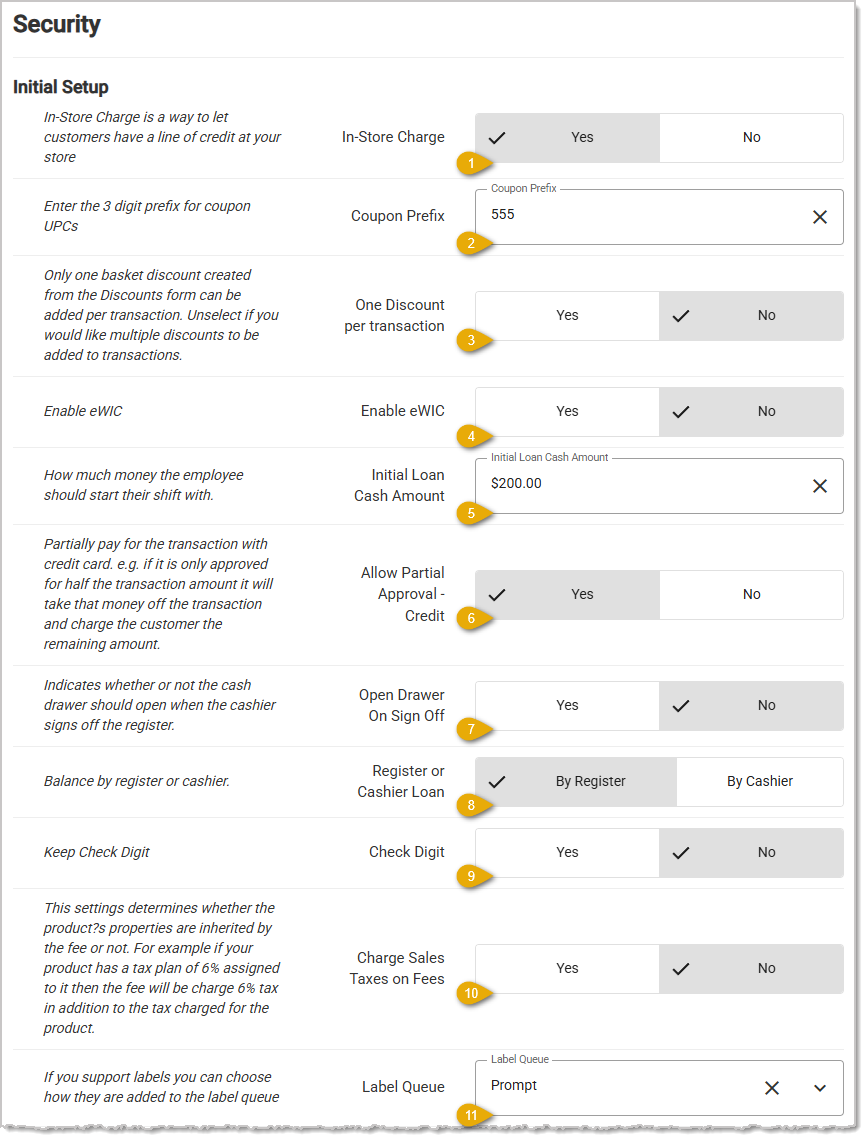
- In-Store Charge — Set this to Yes if you want select customers to be able to have in-house accounts (in-store credit). They can charge purchases to these accounts and then pay them off periodically.
- Coupon Prefix — The IT Retail system uses barcodes for coupon discounts you create and they need a three-digit prefix that isn't commonly used for other barcodes. We recommend 555 but you can enter what you prefer here.
- One Discount Per Transaction — By default, this is set to Yes, but if you want to allow customers to use more than one discount in a transaction you can change it to No.
- Enable eWIC — The IT Retail system does not currently support eWIC payments.
- Initial Loan Cash Amount — You can set the cash amount register cash drawers will start each shift with in this area, just enter the dollar amount.
- Allow Partial-Approval Credit — If a customer's card doesn't have enough funds to cover the full transaction amount, if this setting is on, the system will allow the customer to use whatever is available on the card and then pay the remaining amount another way.
- Open Drawer on Sign Off — In the Front End when a cashier is going through the end-of-shift procedures and signs off, if this is set to Yes, the cash drawer will open for counting.
- Register or Cashier Loan — Whenever a 'loan' of cash is needed for a register during a shift, this setting allows you to assign that loan to either the Register or to the individual Cashier. If you have multiple shifts with different cashiers throughout the day, you might want to assign loans by Cashier to be able to track who did which loan. If you use the same cashier throughout the day, Register might be the best choice.
- Check Digit — The Check Digit is the last number on a UPC barcode on product packaging and is used for scales and label prints. That number is formulaic and allows the system to 'check' if it was manually entered correctly. If your cashiers end up manually entering numbers fairly often, setting this option to Yes will preserve the check digits in your UPC codes and might catch errors when manually entering those codes.
- Charge Sales Tax on Fees — If this is set to No, then products that charge tax that also have a fee will not have that fee charged tax as well. For example, if you have a Delivery Fee and the products being delivered were taxed, the fee for that delivery would not be taxed if this was set to No. If you are unclear whether fees should be taxed in your area, you should contact your tax authority (often called a Tax Commission) or see if that information is available for you online.
- Label Queue — The IT Retail system can utilize a queue for product barcode price labels. The system can either prompt you for permission to add new products to the queue or can just automatically add new products to the print queue. You are then able to go in and print out the queue whenever you like. This option offers a drop-list for None (you don't want to use the label queue), Prompt, or Automatically.
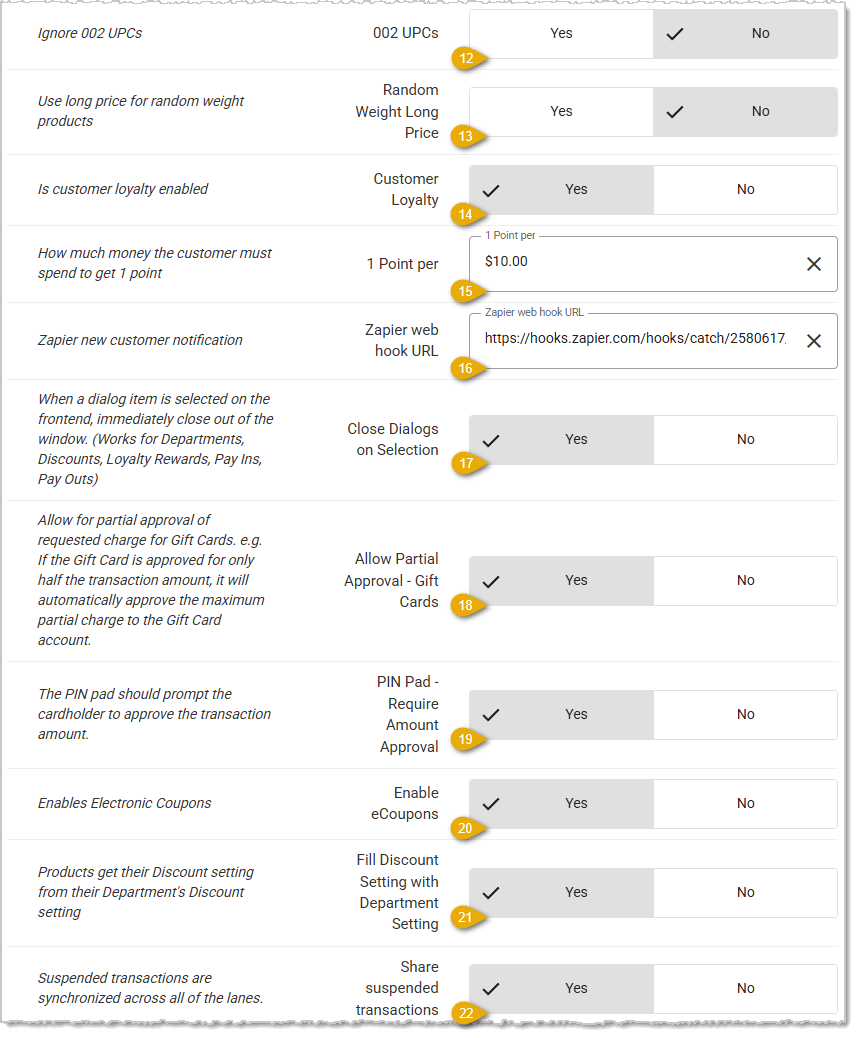
- Ignore 002 UPCs — UPC codes starting with 002 are for fresh items sold by weight such as produce, meat, and seafood. Set this to Yes if you don't need to work with such codes.
- Random Weight Long Price — For items you sell by weight such as a deli scale, you can set the system to use 'long prices'. For example, if a customer buys eight pounds of ribeye steaks at $24 per pound, prices above $99.99 would normally not be able to display, but with this setting on the resulting price of $192.00 would display.
- Customer Loyalty — The IT Retail system allows you to give customers incentive to shop with you more often with a customer loyalty program. If you enable this, all customers will earn loyalty points for amounts they spend on products (pre-tax amounts) and they can use those points to redeem reward discounts on future purchases.
- One Point Per X Dollars — If you are using Customer Loyalty, you can set how many dollars a customer must spend to get one point. Then when you are creating your Loyalty Rewards (more info in the article linked near the bottom of this page) you can set the number of points a customer must use to get the reward.
- Zapier Web Hook URL — Our support team will configure this for you. The IT Retail system uses this integration to automatically send customers to whatever tool you want in Zapier. If you have a Zapier account, you can create custom workflows from Zapier for new customers as well.
For example, once this is set up and you create a new customer, that customer will automatically be sent to Zapier. From Zapier you can connect to MailChimp, Constant Contact, or to SendGrid to send an email, a text message, or another communication platform. From there, you would then manage all of your communication with the customer from the CRM of choice.
- Close Dialogs on Selection — In the Front End, if this setting is not active, when you make a selection for Departments, Discounts, Loyalty Rewards, Pay Ins, and Pay Outs, you must then manually close the window. Having this set to Yes saves you that step.
- Allow Partial Approval, Gift Cards — This is similar to #6 above for Credit and Debit cards. If a customer's Gift Card doesn't have enough funds to cover the full transaction amount, and if this setting is on, the system will allow the customer to use whatever is available on the card. They can then pay the remaining amount another way.
- PIN Pad: Require Amount Approval — For card transactions, if this setting is on, the terminal will require the customer to approve the final transaction amount before it charges the card.
- Enable eCoupons — The IT Retail system allows you to use non-printed or Electronic Coupons in the Front End if this is enabled. You can configure those coupons in the Customers & Discounts > Electronic Coupons area.
- Full Discount Setting With Department Setting — If this is enabled, your products will use the Discount settings of the Department they are in instead of whatever is set for the Discount setting in the Properties tab of the Product Maintenance page for the item.
- Share Suspended Transactions — If you have this turned on, suspended transactions can be resumed from any register within the same store .
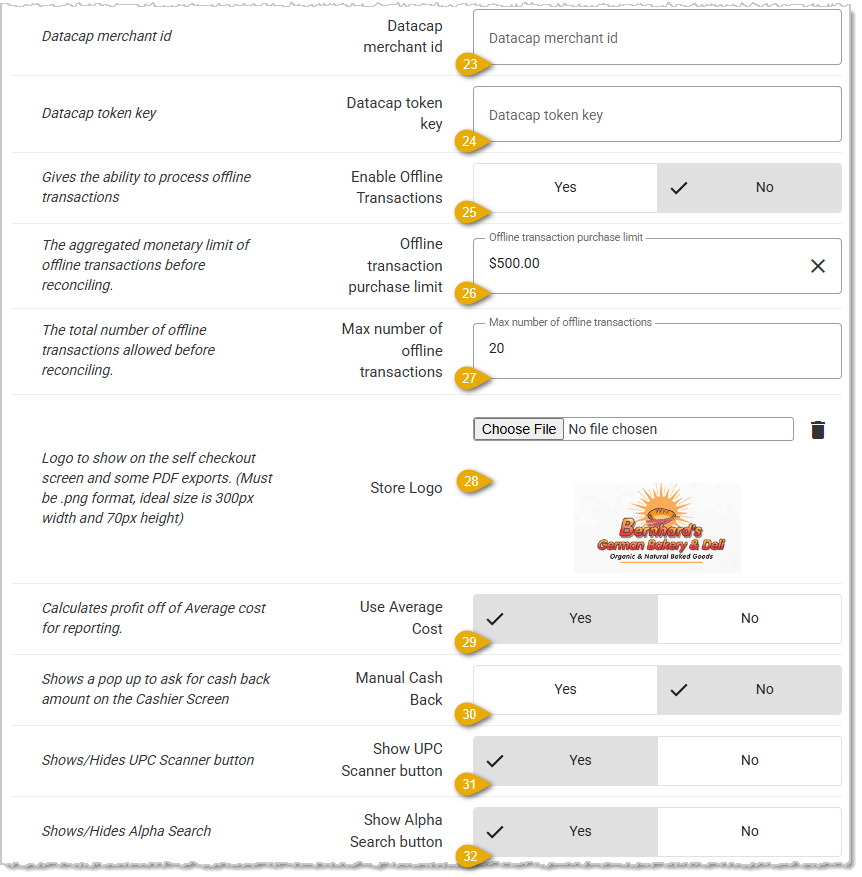
- Datacap Merchant ID — We are no longer configuring this integration for new stores, so there is no need to do anything with this setting.
- Datacap Token Key — We are no longer configuring this integration for new stores, so there is no need to do anything with this setting.
- Enable Offline Transactions — Please Note: This setting only works with processors such as ZIosk or WorldPay. Live server updates require a working internet connection, so if the one in your store goes down transactions won't be able to be completed unless this setting is on. With it on, the system will save transactions and other updates such as new customers, and will sync them the next time the connection goes live.
- Offline Transaction Purchase Limit — If you run offline card transactions, there won't be confirmation that the customer's card has enough funds, so it is a risk to run those offline. If you do so, you can set the limit here for how much total across transactions is allowed until the connection comes back.
- Max Number of Offline Transactions — For the reasons listed above, you can also set a limit to the number of offline transactions you might allow until your connection is active again.
- Store Logo — If you upload an image here by clicking Choose File and browsing your device, it will be used in the customer's checkout screen. Images must be PNG format and ideally should be 300px wide and 70px high.
- Use Average Cost — If this is turned on, your profits on sales reports will be calculated using average cost values. By default, the system will use the actual cost of products sold for that calculation.
- Manual Cash Back — This setting is only needed if you use the P5 card processing terminal so that cashback can function using that system.
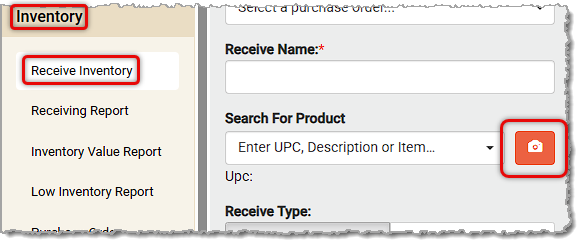
- Show UPC Scanner Button — If you want the UPC Scanner button to display in the Receive Inventory page on your mobile phone, turn this setting on. Please note, this will only display on a mobile device.
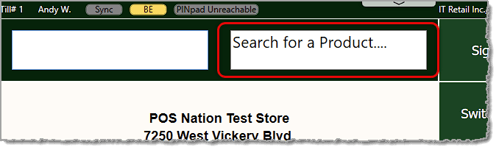
- Show Alpha Search Button — If you use Product Codes with mixed numbers and letters as your product identifiers, turning this setting on will give you an alphanumeric Search field in the Front End for looking up those products, as pictured here.
Balancing

- Prompt Cashier to Enter Loan — Whenever a cashier starts a new shift, if this setting is on, the Front End will pop up a prompt them to enter the initial cash drawer 'loan' amount they start with for the shift.
Age Restrictions
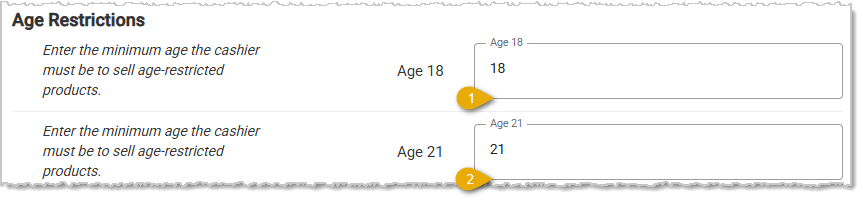
- Age 18 — For the sale of items that are age restricted to eighteen years or older, such as tobacco and alcohol in some states, enter the minimum age for a cashier to be able to sell those items. (Please Note: Federal law was recently passed making 21 the minimum age for tobacco, vape, and alcohol products in all 50 states.)
- Age 21 — For the sale of items that are age restricted to twenty-one years or older, such as tobacco and alcohol in some states, enter the minimum age for a cashier to be able to sell those items.
Time Limits
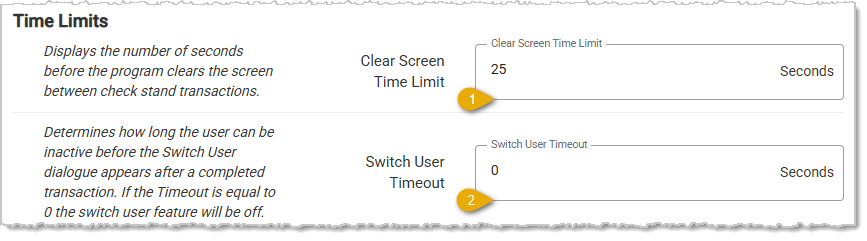
- Clear Screen Time Limit — After completing a transaction in the Front End, the details of the transaction will remain visible to the cashier for however many seconds you enter here.
- Switch User Timeout — If there is no activity in the Front End for however many seconds you enter here, the system will pop up a Switch User window. This can be a good thing if you sometimes leave an active register open for longer periods of time, helping you stay secure. If you set this option to 0 seconds, it will never time out.
Dual Pricing
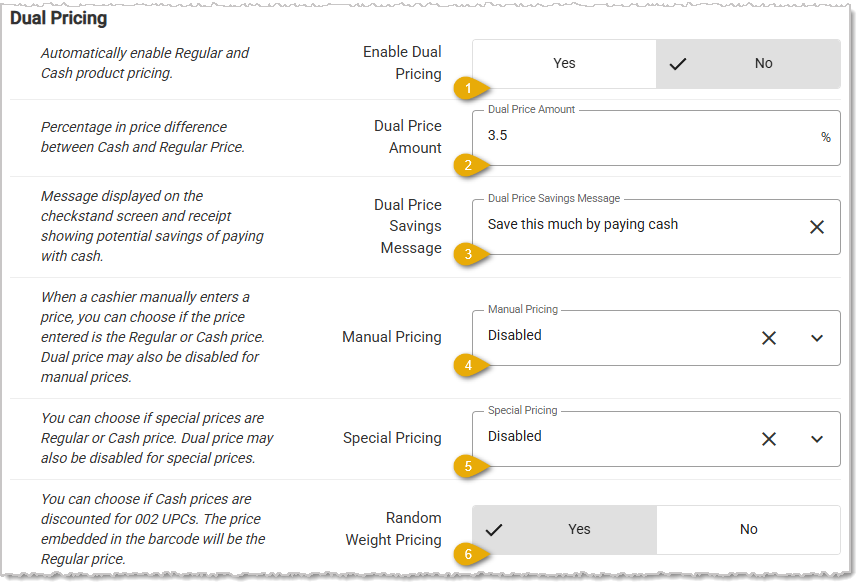
- Enable Dual Pricing — This is a setting that one of our support or onboarding representatives can enable for you. With this setting on, Cash pricing will automatically display along with regular pricing in the Front End and on the customer's checkstand display.
- Dual Price Amount — If using Dual Pricing, enter the percentage discount customers will get for paying with cash.
- Dual Price Savings Message — Enter text for the customer's checkout display for how the system will let them know their savings by using cash. For example, "Save this much if you pay with cash: [System-Inserted Savings Amount]" Whatever you enter will be followed by the dollar amount the customer will save by using cash.
- Manual Pricing — Whenever a cashier manually enters an item price, if this setting is on, the cashier can choose whether the price is 'regular payment' (not discounted by Dual Pricing) or cash. If this is disabled, all prices entered manually are for regular payment methods.
- Special Pricing — For Special Pricing you set for products in the Product Maintenance area of the Back End (Products > Product Maintenance > Special Pricing), if this setting is on, you are able to set whether special pricing methods are Regular or Cash pricing. If the setting is off, all special pricing will be Regular Pricing and will not allow Cash Discounting.
- Random Weight Pricing — If you sell fresh items that use product codes starting with 002, you can use this setting to enable dual pricing for those items.
Product Exports
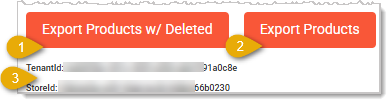
- Export Products with Deleted — Click this button to export a CSV spreadsheet of all products for all time that have been saved in your IT Retail system, including currently deleted products. The export may be large, so please be patient.
- Export Products — Click this button to export a CSV spreadsheet of all products currently saved in your IT Retail system. The export may be large, so please be patient.
- Reference Codes — The TenantID and StoreID codes are used by the support team and you won't need to do anything with them.
Related Articles
POS Manager Overview: Your System Settings
POS Manager Security (This Article)
POS Manager Checkstand Screen
POS Manager Checkstand Receipt
POS Manager API Setup
POS Manager Printer Setup
Frequently Asked Questions
Q: I have a question, but I can't find my answer here. How do I get more assistance?
A: If you need immediate assistance, the IT Retail team is available 24/7. Feel free to contact our support team at 877-752-0625. You can also email us at support@marktpos.com, and we will respond within 24 hours.








 January 13, 2026
Is this page helpful?
×Help us improve our articles