POS Manager Checkstand Screen

January 16, 2026
The POS Manager Checkstand Screen tab allows you to configure the IT Retail system Front End cashier's display to work the way you need. This article will show you how to configure each setting. Take a look!
Cashier's Screen Configuration
You can get to this part of the system by logging into the Back End and opening the Administration menu. Click on POS Manager to get started.
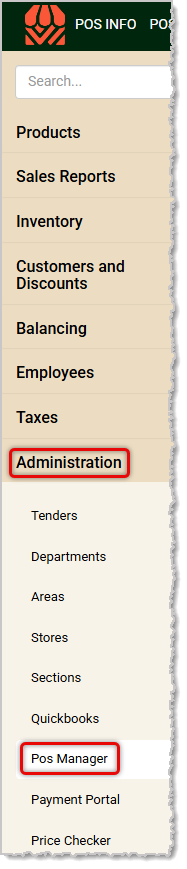
Once the POS Manager loads, you will automatically see the Security tab since it loads by default. Click to open the Checkstand Screen tab. If you're looking for a specific setting or option, you can use the Search tab to find it and you can configure it from there. There are five sections on the Checkstand Screen tab. Always remember to click the Save button in the upper right if you have made any changes to your settings. Here are the different sections of the page:
Display on Touchscreen — Configure your cashier's display options.
Resume Transactions — Set up requirements for resuming suspended transactions.
Receipt Confirmations — Configure electronic receipts.
Security — Set up required actions after a No Sale.
Suspend Transactions — Configure customer name requirement for transaction suspension.
Display on Touchscreen
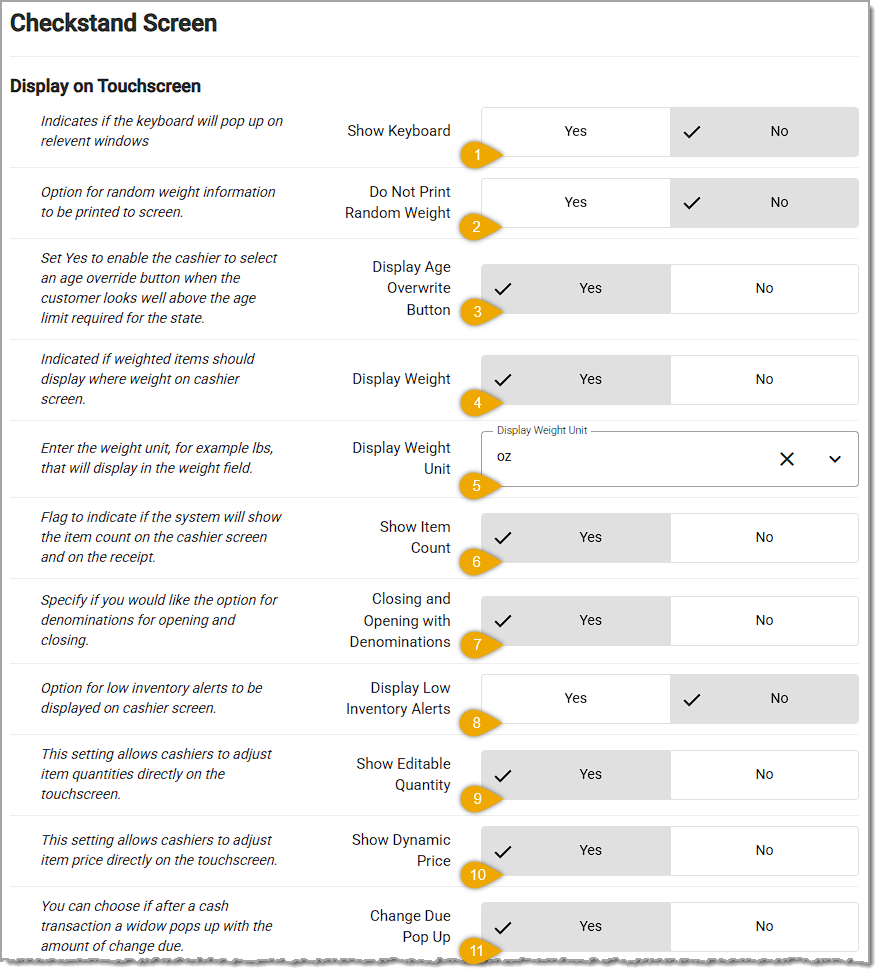
- Show Keyboard — If this setting is on, whenever you need to enter text in the Front End, an on-screen keyboard will automatically pop up.
- Do Not Print Random Weight — This setting is for what 'prints' to the cashier's screen regarding random weights: Set this to Yes, if you do NOT enter a price per pound for Random Weight items. Otherwise, set to No if you DO want the price per pound to print. Some stores do not enter a price because the random weight label is printed on a scale, which also stores and prints the prices.
- Display Age Overwrite Button — Set this to Yes to allow the cashier to click an Age Override button when the customer looks well above the age limit for Age Restricted products. Set this to No to require the cashier to enter the birth date in the form.
- Display Weight — For items sold based on weight, turn this setting on if you want weight values for items (such as 8oz) to display for the cashier.
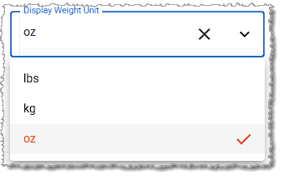
- Display Weight Unit — If you will be displaying item weight values, you can click the drop-list for this setting to choose which weight unit the system will use for those values; either Pounds (lbs), Kilograms (kg), or Ounces (oz). Please Note: This area has not been used by any stores for anything but the Ounces setting, so the functionality is internally locked to that setting no matter how you configure this area.
- Show Item Count — Turn this on if you want the IT Retail system to display a total item count (not the number of unique items, the total count of all items in the basket) on the cashier's display and on the receipt.
- Closing and Opening Denominations — In the Front End when a cashier is starting or ending their shift, they can enter their initial 'loan' for the cash drawer or the final cash drawer count in one of two ways: if this is set to Yes, the cashier will be required to enter specific bill and coin denominations and numbers. If it is set to No, the cashier will only need to enter the cash amount they count.
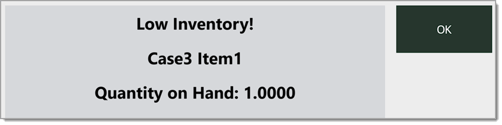
- Display Low Inventory Alerts — If this is set to Yes and if you have set Low Inventory Alert values in the Product Maintenance > Inventory area, when your Quantity on Hand reaches that number or goes below it, a popup will warn the cashier that the item is low in inventory, as pictured below.
- Show Editable Quantity — If you want your cashiers to be able to click or tap the Quantity of an item in a transaction so they can adjust it, set this to Yes.
- Show Dynamic Price — If you want your cashiers to be able to click or tap the Price of an item in a transaction so they can adjust it, set this to Yes.
- Change Due Pop Up — With this set to Yes, a helpful Change Due window will pop up after completing a transaction to remind the cashier how much change to give the customer.
Resume Transactions
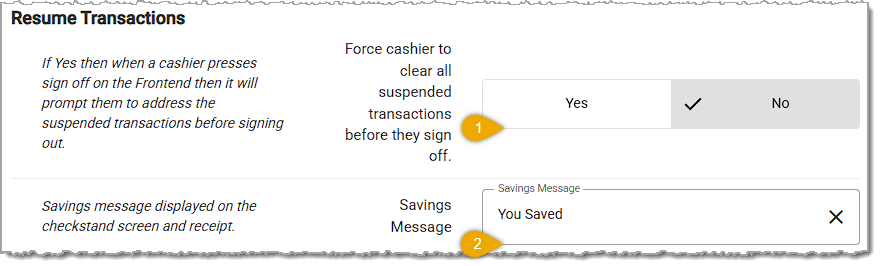
- Force Cashier to Clear All Suspended Transactions Before Signing Off — If you want to avoid having suspended transactions pile up in your registers, turn this setting on to require your cashiers to open and resolve each suspended transaction before they can sign out of the system.
- Savings Message — Enter text into this area that will precede the amount the customer saved. This message will display on the cashier's screen and will print on the receipt. For example, if you enter "Today you saved" it will display "Today you saved $4.12."
Receipt Confirmations

- Enable Electronic Receipts — With this setting on, the customer will have the option of entering their mobile phone number so the system will send them a link to view the receipt via SMS text message.
Security
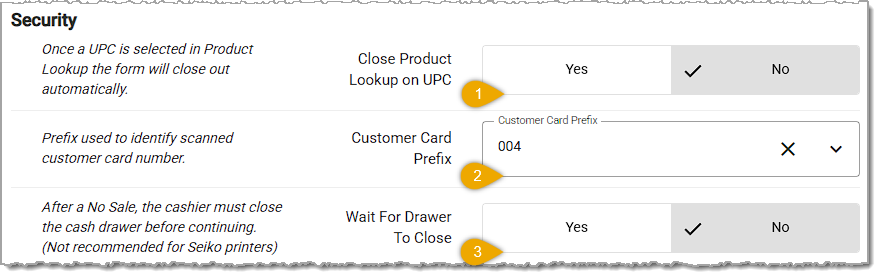
- Close Product Lookup on UPC — With this set to Yes, when using the Product Lookup popup window in the Front End, once the cashier selects an item, the window will automatically close. If you often add more than one item at a time to transactions from this area you will want this setting to be off so the window will stay open until you are done.
- Customer Card Prefix — For customer membership cards in the system, you can click on the drop-list for this setting and choose the prefix you prefer, as in the example above. This prefix will be used in barcodes for customer membership cards scanned into the system.
- Wait for Drawer to Close — With this set to Yes, whenever the cashier clicks or taps the No Sale button in the Front End to open the cash drawer, they must close the drawer again to proceed with a transaction.
Suspend Transactions

- Prompt for Order Name on Suspend — With this setting on, the cashier will not be able to suspend a transaction without entering a customer name or description.
Please Note: The TenantID and StoreID codes at the bottom of the page are used by the support team and you won't need to do anything with them.
Related Articles
POS Manager Overview: Your System Settings
POS Manager Checkstand Receipt
POS Manager API Setup
POS Manager Printer Setup
Cashier Training
Frequently Asked Questions
Q: I have a question, but I can't find my answer here. How do I get more assistance?
A: If you need immediate assistance, the IT Retail team is available 24/7. Feel free to contact our support team at 877-752-0625. You can also email us at support@marktpos.com, and we will respond within 24 hours.
There is a wealth of administrative functionality for you in the Manager Functions area of the Front
If you're just getting started in the IT Retail system you will want to set up your Departments befo
The IT Retail Tenders page allows you to create and edit Tender Types like cash, debit cards, and EB








Is this page helpful?
×Help us improve our articles