







Cashier Training
Welcome to IT Retail, we’re so glad you’ve chosen our POS for your store! This article will guide yo
 January 05, 2026
The IT Retail Tenders page allows you to create and edit Tender Types like cash, debit cards, and EBT. You'll also be able to add restrictions and other settings for certain Tenders in this page. Read on to see all of the possibilities this page has to offer!
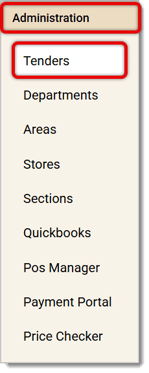
In the Back End go to Administration > Tenders using the main menu.
When you open the page, you'll see a list of your saved Tenders. Here's how to work with your Tenders:
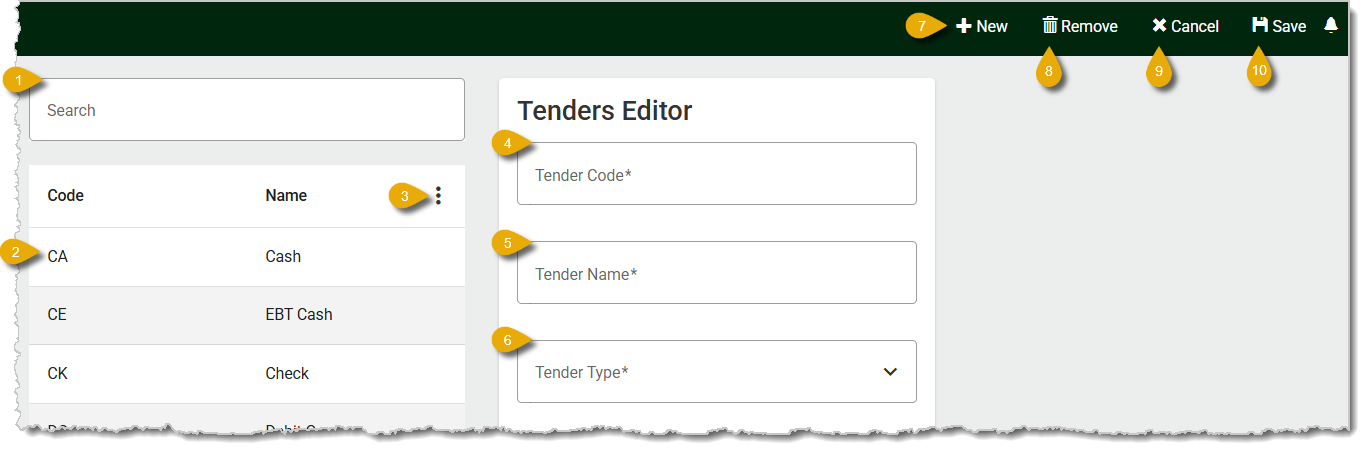
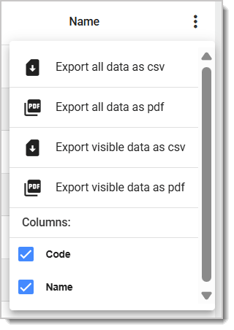
* Required Field
If you scroll down the Tenders Editor, you'll find tabs for General Settings, Limits, Signature, and Miscellaneous.
Here is everything you can configure in the General Settings Tab for Tenders:
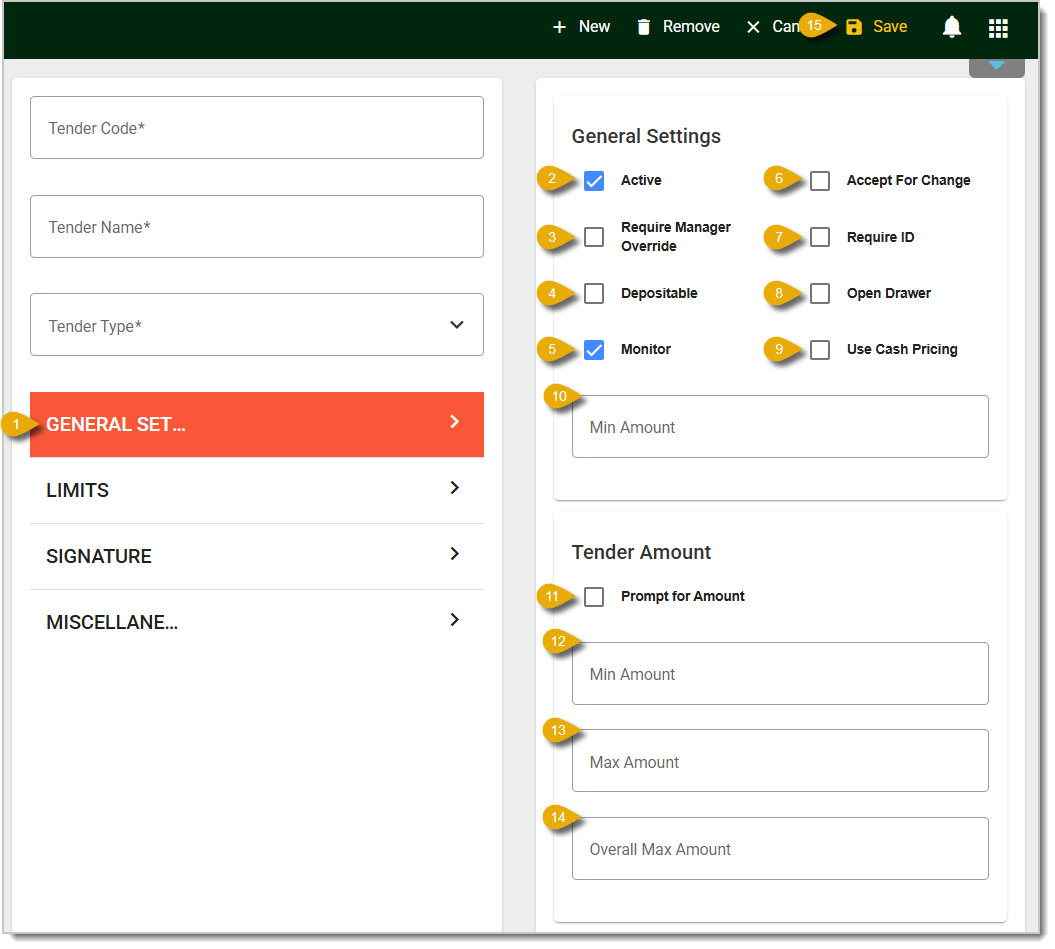
Open General Settings — Click on the General Settings Tab below the Tenders Editor to see your general configuration options.
Active — Check this box to mark the Tender as an active acceptable payment method for transactions. Make sure this is checked for all active Tenders.
Require Manager Override — Check this box so that whenever a customer pays using this Tender, the transaction can't be completed until a manager checks the transaction and enters their manager passcode to override the restriction.
Depositable — Check this box if you want payments with this Tender to be deposited into the store's bank account.
Monitor — Check this box so transactions with this Tender are recorded in reports like the End of Day Report in the Sales Reports menu. Make sure to check this for accurate report data.
Accept for Change — Check this box if a customer using this Tender can receive change. For example, you would check this box for a Cash Tender, but not for a Credit Card Tender.
Require ID — Check this box so cashiers will be prompted to check customer IDs if the customer uses this Tender.
Open Drawer — Check this box so the Tender will trigger the register cash drawer to open. For example, you should check this box for Debit Card payments in case a customer uses it and requests cashback.
Use Cash Pricing — If your store has different pricing for transactions that use cash, check this box so the cash pricing applies to this Tender.
Minimum Amount — Enter the minimum amount a customer has to spend if they want to use this Tender, if needed. For example, your store can require a customer to spend a minimum of $10 for credit card payments.
Prompt for Amount — Check this box so that whenever a customer uses this Tender, a prompt will pop up on the Front End asking the cashier to confirm the amount the customer paid.
Minimum Amount for Tender Amount — Enter the minimum amount a customer has to spend if they want to use this Tender, if needed. For example, your store can require a customer to spend a minimum of $10 for credit card payments. Note that most stores usually don't set a minimum amount.
Maximum Amount for Tender Amount — Enter the maximum amount a customer can spend if they want to use this Tender, if needed.
Overall Maximum Amount for Tender Amount — Enter the maximum amount in this Tender you want your store to accept altogether combined in a day, if needed.
Save — Remember to Save anything you've edited in General Settings.
In the Limits tab of the Tenders page, you can set maximum limits for refunds, loans, and cash back, specifically for the Tender you're editing. Here is everything you can configure in the Limits Tab:
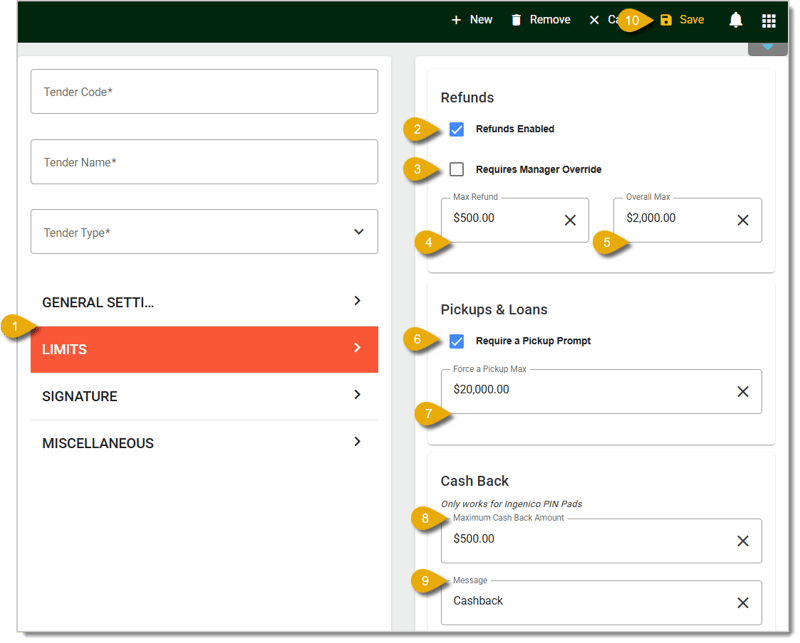
Select the Limits Tab — Click on the Limits tab to open the menu.
Refunds Enabled — Check this box for if you want this Tender as an acceptable method for refunds.
Requires Manager Override — Check this box if you want refunds with this Tender to require a manager's confirmation. The manager must use their passcode to override a restriction on the transaction.
Maximum Refund — Enter the maximum amount of a refund a customer can receive in this Tender, if needed.
Overall Maximum Refund — Enter the maximum amount of refunds your store can give in a day, altogether combined, if needed.
Require a Pickup Prompt — Note that this field is meant for cash. Check this box so that when the amount from this Tender reaches the Force a Pickup Maximum (described in number 7 below), a window will pop up on the Front End, telling the cashier to "pick up" the excess cash in the drawer and place it into a safe.
Force a Pickup Maximum — Note that this field is meant for cash. Enter the maximum amount the cash in the register can reach until a prompt on the Front End will pop up, telling the cashier to "pick up" the excess cash in the drawer and place it into a safe.
Maximum Cash Back Amount — When customers use debit cards, they sometimes will also request cashback. Enter the maximum amount a customer can receive in cashback in this Tender, if needed. Note that this only works if you're using Ingenico, Kiosk, or Priority / Tysy PIN Pads.
Message — Enter a message about cashback for the customer, if needed.
If you want a signature when a customer or merchant uses this Tender, click on the Signature tab of the Tenders page. Here is everything you can configure in the Signature Tab: 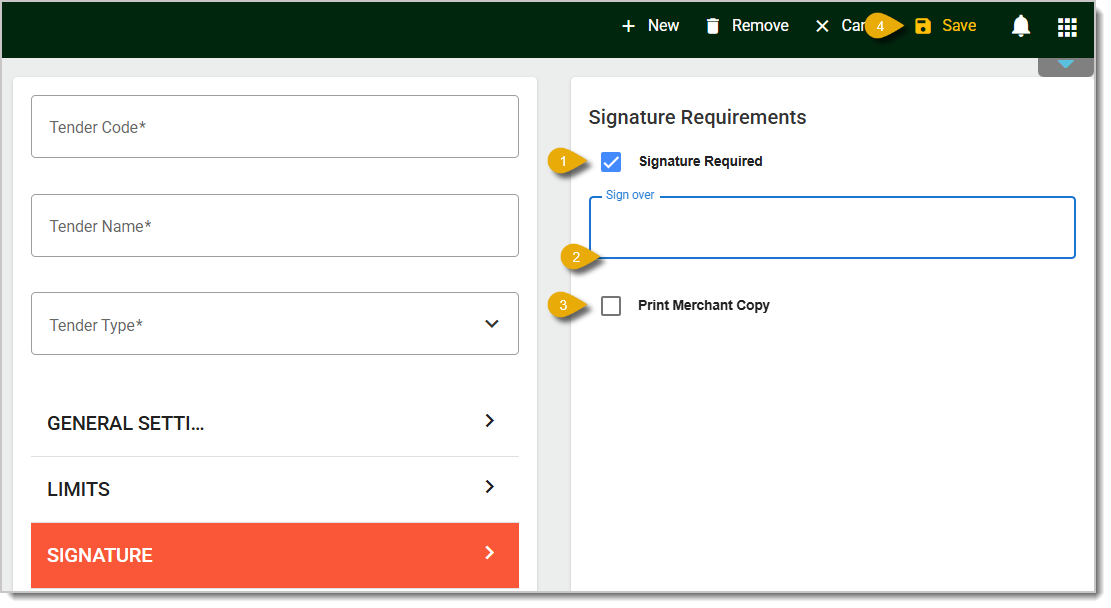
Signature Required — Check this box if you want transactions using this Tender to require signatures from customers.
Sign Over — Enter the minimum dollar amount for this Tender that would prompt for a signature. For example, you can require customers paying for $100 purchases with credit cards to sign their names.
Print Merchant Copy — If you want printed receipt copies for transactions with signatures using this Tender, check this box.
Save — Remember to Save anything you've added or edited in this area.
On the Miscellaneous tab of the Tenders page, you can enter a cashier prompt for a transaction that's using the selected Tender. For example, if a customer chooses to pay with a paper check, you can prompt the cashier to first verify their ID. You can also use this function if you'd like to gather ZIP Code data. Here is everything you can configure in the Miscellaneous Tab:
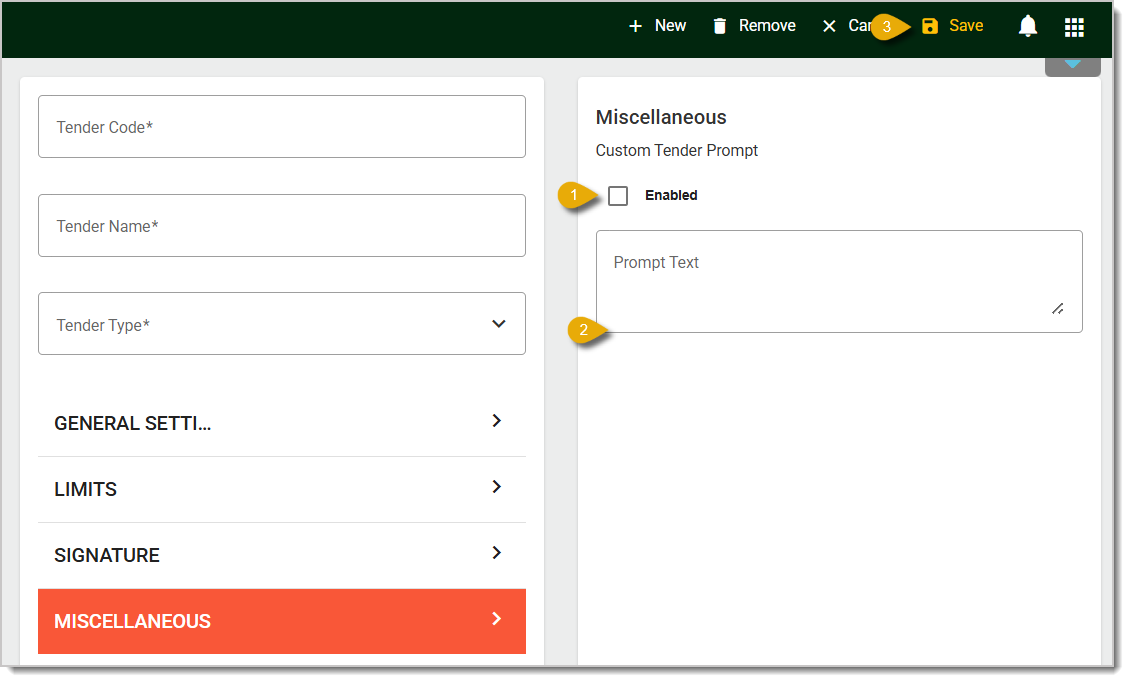
Enabled — Check the box for Enabled to add a Customer Tender Prompt.
Prompt Text — Enter the Prompt Text in the text box for cashier instructions for this Tender. On the Front End, cashiers will see a pop-up window prompting them to take the appropriate action.
Q: I have a question, but I can't find my answer here. How do I get more assistance?
A: If you need immediate assistance, the IT Retail team is available 24/7. Feel free to contact our support team at 877-752-0625. You can also email us at support@marktpos.com, and we will respond within 24 hours.
Is this page helpful?
×Help us improve our articles