Departments

December 17, 2025
If you're just getting started in the IT Retail system you will want to set up your Departments before you start working on your products. This article details how to create your departments and configure them so the products in them will have the properties they need. Take a look at what you can do!
Create Your Departments
Your Departments are used for important functions in the IT Retail system:
- Use them to organize your store to make product management more structured and intuitive.
- Every new product requires a Department and will use the Department's settings, such as Tax or Age Restriction.
- You can adjust Department properties and have it push the changes to its products after you've made the edits.
- In your reporting, Departments show sales and inventory data to better help you understand that information.
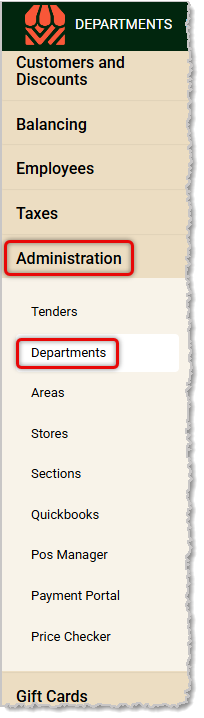
To get to this area, from the Back End, click to open the Administration menu and click on Departments.
From here you can Search for any Departments you've created and click on one to see and edit its details. You will need to create all of your Departments before you start adding products to the system, since they require a Department before you can save them. From the Departments page, here is how to create a new Department:
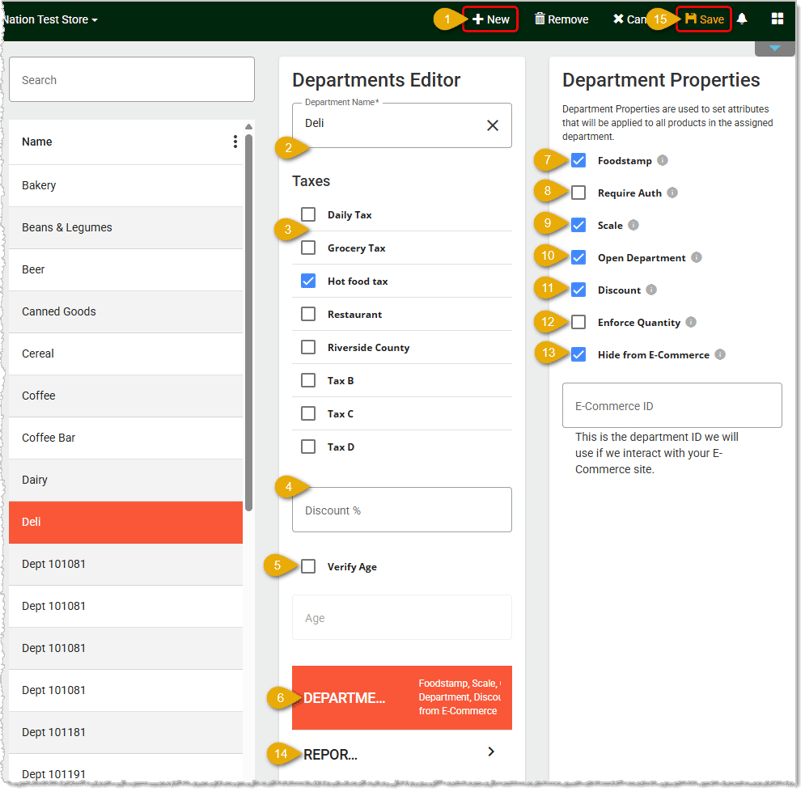
- New Department — Click the +New button at the top to begin creating your new department.
- Department Name — Enter the name you want for the department.
- Tax — Check the box for the Tax(es) used by the new department.
- Discount — If the products in the department will be discounted by default, you can enter that percentage here. Remove it again to go back to the standard pricing.
- Verify Age — If the product is age-restricted, such as alcohol, tobacco, or vape items, check this box to make Age Verification active in the Front End for the item. Enter the minimum Age a customer must be to purchase the item, such as 21.
- Department Properties — Click this tab to set the properties you want for products in the department.
- Foodstamps — Check this box if the items are eligible to be purchased using EBT / EBT Cash / SNAP (Food Stamps).
- Require Auth — Check this box if the items in this department will require authorization from a manager for a customer to purchase.
- Scale — If the department's items are sold based on weight, check this box so they will use the scale.
- Open Department — Check this box if you want this department to be able to work with non-scan items that have not yet been entered into the system. When such an item is added to a transaction in the Front End, it will prompt for a price. If this department is set as an Open Department, the cashier can add the product to the department so it goes into the reporting correctly for you.
- Discount Eligibility — Check this box if items in the Department can be discounted in the Front End.
- Enforce Quantity — Check this box if the items in this department are frequently purchased in multiples, such as with avocados or limes. With this box checked, in the Front End, whenever this department's products are added to a transaction, the Quantity window will open allowing the cashier to enter the quantity.
- Hide from eCommerce — Check this box if you won't be selling items in this department in your eCommerce web store. If you will be doing so, leave the box un-checked and the system will enter an eCommerce ID for the department automatically for you (if you are using the Grazecart eCommerce integration).
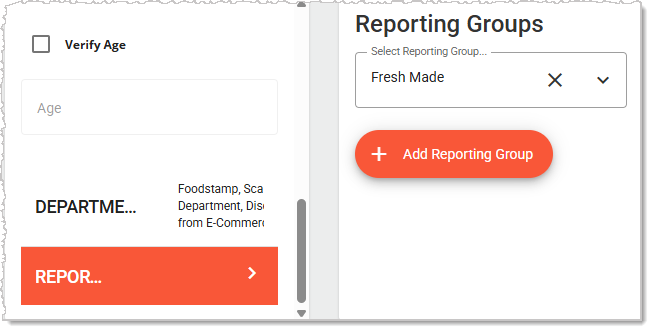
- Reporting Groups — If this department should be grouped with other similar departments, you can add it to an existing Reporting Group from the list or you can click the +Add Reporting Group button to make one. For example, this Deli department might be in a group with the Coffee Bar and Bakery departments called Fresh Made so that group would have reporting on all fresh-made item sales.
- Save — When you have configured your department the way you need, click the Save button in the upper right of the page. A window will open to help you refine what you're saving (see #16 below).
- Select Update Fields — If you're creating a new department, check all the boxes you configured for the department and proceed. If you're adjusting products already in saved in the system, check the boxes for only the data you want to update.
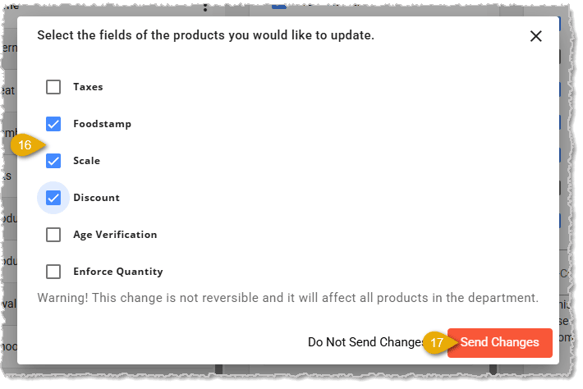
- Send Changes — Click this button when you're ready to irrevocably update existing products and save the department. These changes are NOT reversible, so be sure to double-check that you have selected the appropriate areas.
Repeat the steps above to create all of your Departments in the system.
Related Topics
Quick Add
Product Maintenance
Sections
Import Products 1: Data File
Import Products 2: Easy Import
Import Products 3: Mass Import
Frequently Asked Questions
Q: I have a question, but I can't find my answer here. How do I get more assistance?
A: If you need immediate assistance, the IT Retail team is available 24/7. Feel free to contact our support team at: 877-752-0625. You can also email us at support@marktpos.com and we will respond within 24-hours.
Welcome to IT Retail, we’re so glad you’ve chosen our POS for your store! This article will guide yo
Adding products to a customer’s transaction is straightforward. Below is a step-by-step guide on how
Processing refunds and returns is a natural part of retail sales. We’ll walk you through the steps o








Is this page helpful?
×Help us improve our articles