







Working With Products in Transactions
Adding products to a customer’s transaction is straightforward. Below is a step-by-step guide on how
 December 05, 2025
Transitioning to IT Retail becomes simple if you have a file containing your store's inventory information. This article will show you the steps and information you need to easily import your digital inventory using spreadsheet files. We'll go over:
Please Note: Before you start your data import, we recommend reading the other two articles in the Import series: Import Products 2: Easy Import and Import Products 3: Mass Import. These will help you better understand your inventory migration options and choose the one best for you. Both articles are linked in the Related Articles section at the bottom of this page.
Before you import your products, you have to first add the following information in the Back End:
Sections (Administration > Sections) and Vendors (Inventory > Vendors) are optional columns, but if you want to include them in your file, make sure to first create all Sections and Vendors in the Back End.
These file columns need to match the information in the Back End you’ve added. For example, if you have a Department ID of 55 for a product in your file, make sure you have a department with an ID of 55 in your Back End.
We also recommend spending time to make your file thorough and well-organized, as it will make the transition to IT Retail much easier.
Before you can get started on inventory importing, you'll have to first set up a file in the correct format and with the right fields. First, make sure that your file is saved in the CSV format. Your file also must have, at minimum, these columns:
Other recommended, but not required, fields are:
You can also add more columns as you see fit to simplify operations for the future.
Please note: Make sure that Department, SectionID, VendorID, and Tax all have a reference in your Back End. For example, if you have a Department ID of 55 for a product in your file, make sure you have a department with an ID of 55 in your Back End. We also recommend spending time to make your file thorough and well-organized, as it will make the transition to IT Retail much easier.
You can download a standard template we've made here. This template has every field, both required and recommended, listed out in the section above.
Later on, if you would like to make an update to a file via import, you must include the UPC field. All other fields will be ignored unless they have a value in them. For example, if you do not have anything in the cost field of an item, updating it will leave the cost as it was, rather than replacing it with 0.
If you want a more advanced template for the import process, you can download one we've made here. This includes Special Pricing Methods for temporary price reduction. For a description of each pricing method, refer to our article on Special Product Pricing.
In the “SpecialPricingMethod” field, put the numeric value that corresponds with the following pricing methods.
Here is what each Special Pricing Method means:
Unit-Pricing — Standard item discount pricing.
Split-Package — Individual items broken out from a combined package, like cans from a 6-pack.
Group-Threshold — Standard unit price is paid until a set number of items is reached, and then you get an additional item free; for example, if you buy four items at their normal price of $1.25 each, the fifth one is free for that total of $5.
Group-Adjusted — Standard unit price is paid but if you buy a set quantity or more, the per-unit price is reduced to the Group-Adjusted price. For example, if you buy three or fewer of an item, they are the standard price of $1.25, but if you buy 4 or more, they are each $1.
For fields indicating dates, like Start Date and End Date, format them in MM/DD/YYYY format.
If you want to add multiple taxes or fees, separate the IDs with an ampersand (&). For example, if you want to add 3, 6, and 7 as Tax IDs to one item, you would populate the field like so: 3&6&7.
Delete Fields: If you would like to remove a field during the importing process, add an exclamation mark (!) to the field that you would like to remove. Here's an example:
| UPC | Description | Cost | Price | DepartmentID | TaxID | Foodstampable | Deleted |
| 491308 | RADISHES | ! | 3.55 | 1 | 00000000 | TRUE | FALSE |
Note that the Cost field for this item has only an exclamation mark in it.
Selecting columns not in the template: If you would like to import a CSV file that is not aligned with the template below, you can still map every section in your file to a corresponding column. This step will come after your file upload. Note that we do not allow one column to be mapped to two fields, and every field has to be mapped. If you have a column you don’t want to map, please delete the column from your file before importing.
Here are some Microsoft Excel shortcuts to help you navigate the program as you create your file.
Use the Find and Replace feature in Excel to search for something in your workbook, such as a particular number or text string.
On the Home tab, in the Editing group, click Find & Select.
To find text or numbers, click on Find. You can also use the keyboard shortcut by pressing Ctrl + F. To find and replace text or numbers, click on Replace.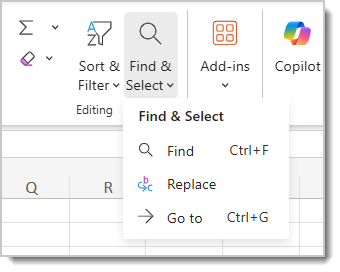
In the Find What field, type the text or numbers that you want to find. You can use wildcard characters, such as an asterisk (*) or a question mark (?), in your search criteria.
Click Options to further define your search. You can do any of the following:
Once you've set all of your search filters, click on Find Next or Replace to find or replace individual cells. If you want to find or replace all cells that have your search criteria, click on Find All or Replace All.
Articles in this series:Import Products 1: Data File (this article)Import Products 2: Easy ImportImport Products 3: Mass Import
Q: I have a question, but I can't find my answer here. How do I get more assistance?
A: If you need immediate assistance, the IT Retail team is available 24/7. Feel free to contact our support team at 877-752-0625. You can also email us at support@marktpos.com, and we will respond within 24 hours.
Is this page helpful?
×Help us improve our articles