Mass Product Editor

December 12, 2025
If you need to update a large number of products, you can use this area to find them and download the data and edit what you need. This article will show you how to use the Mass Product Editor and get the data downloaded. Take a look at how it works!
The Product Mass-Editing Process
To get to this area, log into the Back End and click to open the Products menu, then click Mass Product Editor.
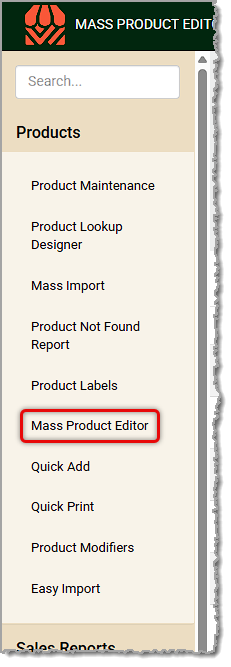
You can edit individual products within the Product Maintenance page, but it's best to use the Mass Products Editor tool whenever you need to update multiple products. There are three major steps in this process:
- Gather Data — You will use the Mass Product Editor to gather the specific products you need in a CSV file download. This data format is more limited than Excel or other spreadsheet apps, but is universally usable by all data systems, including the IT Retail system. This article is about this step of this process.
- Edit Data — You can use the app's tools to edit and update whatever data changes are needed for your products. Some of the data fields are not editable (Net Sales, UPC, and Markup). This part of the process is described in detail in the article Import Products 1: Data File, and includes information on required data columns and recommended ones, as well as pro tips on data work.
- Import Data — There are two tools in the IT Retail system for importing your updated data file:
- The Easy Import Tool — This tool offers a guided process for importing an updated data file. If you are editing products from a single Department, this tool makes the process easy for you. This tool is detailed in the article Import Products 2: Easy Import.
- The Mass Import Tool — This tool offers a way to build a custom product template file download that uses only the product attributes you will be editing, if you want a tailored starting point for your data work. This tool is detailed in the article Import Products 3: Mass Import.
The steps below will show you how to gather the data you need for the first step of the process.
How to Use the Mass Product Editor
Once the Mass Product Editor page loads, you'll see several filters at the top and a list of products that are currently active in the system. To get the products you want you can do the following:
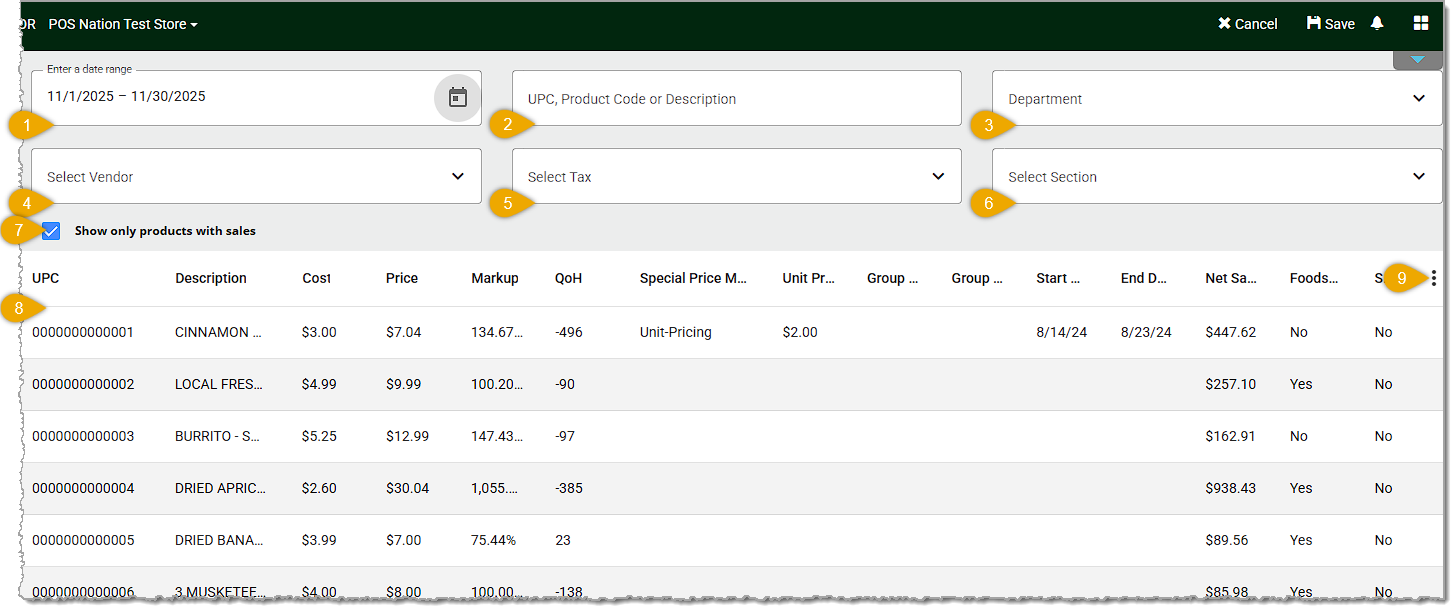
Initially all active products will display. Use the filters described below to filter out items you don't need. Please note that the system can't work with more than 2,000 items in a single import file, so it's good to work with groups of products that have 2,000 items or fewer.
- Date Range — This filter initially displays all active products for the current day. You can adjust the date range to work with previously active products as well, if needed.
- Search — You can scan in a barcode or manually search in this field by UPC, Product Code, or the product's Description (Name).
- Department — If you need to work within a Department, choose the one you want from the drop-list.
- Vendor — If the products you're editing are from the same Vendor, select that vendor from the list.
- Tax — If you only want to work with products that use a certain Tax, select it from the list.
- Section — If the products you want are within a Department but you need to narrow it down further to a specific Section, choose the one you want from the list. You don't have to select the Department; all Sections you've saved are in the list.
- Products With Sales — If you only need to update products that have had sales within the date range you've selected, check this box.
- Data Table — The products that display here will adjust every time you apply a filter to match what you've selected. The table will only display one page of results as an example of the data.
- Action Menu — Click the Three-Dot Stack button to open the Action Menu. You will use this area to export your product data file. Unless you only have a few results, you will almost always want to select Export All Data as a CSV. If you're downloading for your inventory records, the PDF files can be useful, since they can't be edited easily.
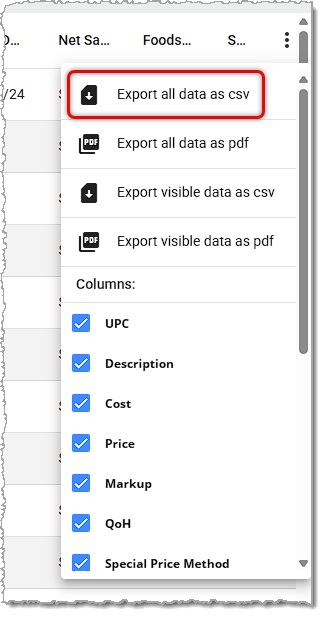
Here are the Action Menu options:
- Export All Data as a CSV — This will include the vendor name, cost for this item, and vendor number.
- Export Visible Data as a CSV — This will include only the data for the active columns selected in the lower part of the Action Menu.
- Export All Data as a PDF — This will create a PDF file with the vendor name, cost for this item, and vendor number.
- Export Visible Data as a PDF — This will create a PDF file using only the data for the active columns in the lower part of the Action Menu.
- Columns — By default, the Vendor Name and Cost columns will be active (checkmark), but you can also activate the Vendor Number column.
Related Topics
Cashier Training
Product Maintenance
The Import Products article series:
Import Products 1: Data File
Import Products 2: Easy Import
Import Products 3: Mass Import
Frequently Asked Questions
Q: I have a question, but I can't find my answer here. How do I get more assistance?
A: If you need immediate assistance, the IT Retail team is available 24/7. Feel free to contact our support team at: 877-752-0625. You can also email us at support@marktpos.com and we will respond within 24-hours.
Adding products to a customer’s transaction is straightforward. Below is a step-by-step guide on how
Processing refunds and returns is a natural part of retail sales. We’ll walk you through the steps o
Going live with EBT (SNAP) is exciting and may not be as daunting as you’d think. We've done a few t








Is this page helpful?
×Help us improve our articles