POS Manager Overview: Your System Settings

January 13, 2026
The POS Manager area is where you can configure the IT Retail system to work the way you need. This article will show you what is available. Take a look!
System Configuration and Integration
You can get to this part of the system by logging into the Back End and opening the Administration menu. Click on POS Manager to get started.
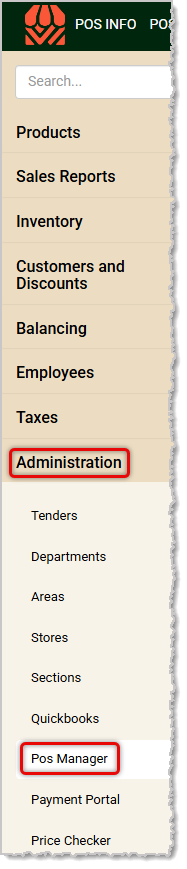
There are several tabs for the POS Manager and they offer the following:
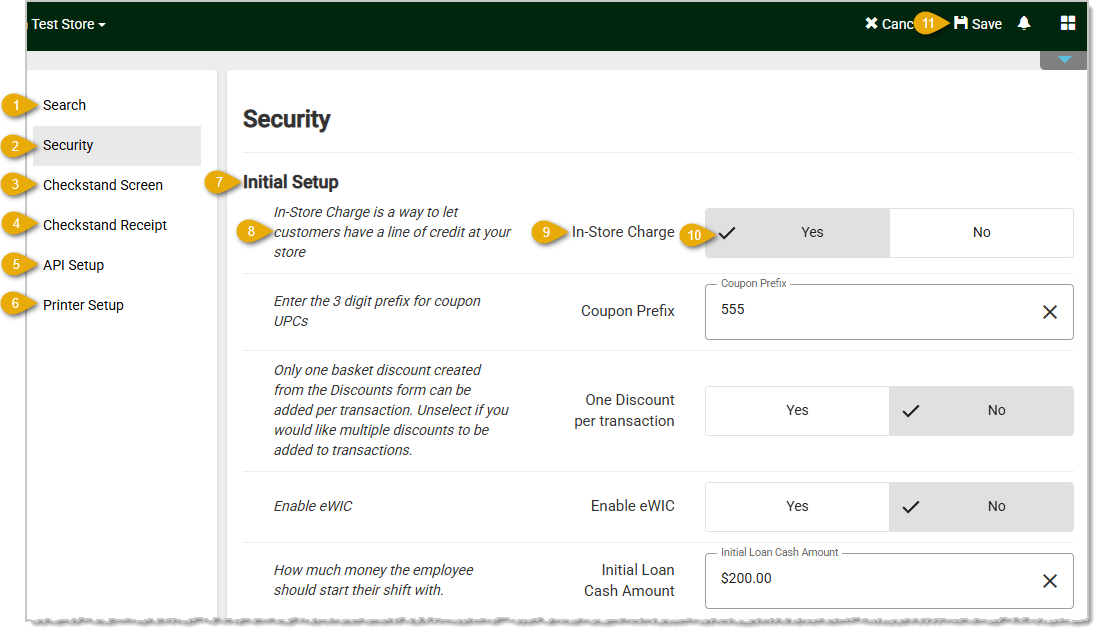
- Search — Enter search text relating to the area you need and matching functions will appear for you. You are able to configure functions directly on the Search tab.
- Security — Use this tab to set up Front End functions such as Age Restrictions, Time Limits, Balance by Cashier or Till, Loan In amounts, PIN Pad options, Dual Pricing, etc.
- Checkstand Screen — This tab has options for what appears on the Front End for the cashier's checkstand display, such as the Age Override button, weight of scaled items, item count, security, etc.
- Checkstand Receipt — This tab has options for what will print on the receipt, such as Store Name and Phone number, UPC, Customer name, etc.
- API Setup — This tab is used by our Support team to set up Application Interfaces, such as the eCommerce solution with GrazeCart. Other examples include gift cards or third-party API integrations.
- Printer Setup — Use this tab to configure label and receipt printing preferences, default printers, and barcode formats. Receipt printers and letter-size printers do not require special setup.
- Configuration Section — Each tab is organized into major sections you can configure.
- Description — Each item has a description to let you know how to use it.
- Setting Name — The name of each setting is provided for you in the middle column.
- Setting — Settings are usually a Yes (setting is on) / No (setting is off), a data field to enter text, a choice of buttons (such as Code128 or UPCA for barcode format with the chosen one displaying a checkmark), or a drop-list where you choose your selection.
- Save — Always remember to click the Save button in the upper right if you have made any changes to your settings.
Related Articles
POS Manager Overview: Your System Settings (This Article)
POS Manager Security
POS Manager Checkstand Screen
POS Manager Checkstand Receipt
POS Manager API Setup
POS Manager Printer Setup
Frequently Asked Questions
Q: I have a question, but I can't find my answer here. How do I get more assistance?
A: If you need immediate assistance, the IT Retail team is available 24/7. Feel free to contact our support team at 877-752-0625. You can also email us at support@marktpos.com, and we will respond within 24 hours.
Welcome to IT Retail, we’re so glad you’ve chosen our POS for your store! This article will guide yo
We have worked hard to make our Front End as user-friendly as possible, but there are a lot of movin
There is a wealth of administrative functionality for you in the Manager Functions area of the Front








Is this page helpful?
×Help us improve our articles