Create a Product in the Back End

December 16, 2025
You can easily create products as needed in the Back End. This article details that process for you, covering all areas of product creation. Take a look at how easy it can be!
Please Note: The fastest way to enter a new product is with the Quick Add tool. For details on working in that area, follow the link in the Related Topics area below for the Quick Add article. This article will cover only the essential elements you'll need to create a new product using the Product Maintenance page, which offers full product data options.
Create a Product From the Product Maintenance Page
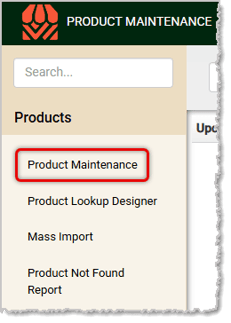
You will need to log into the Back End to begin creating a product in this area. Click on Products and in the Products menu, click on Product Maintenance. For full details on all product aspects in this area, please see the article linked below in the Related Topics area about the Product Maintenance page.
To create a new product from this area, use the following steps:
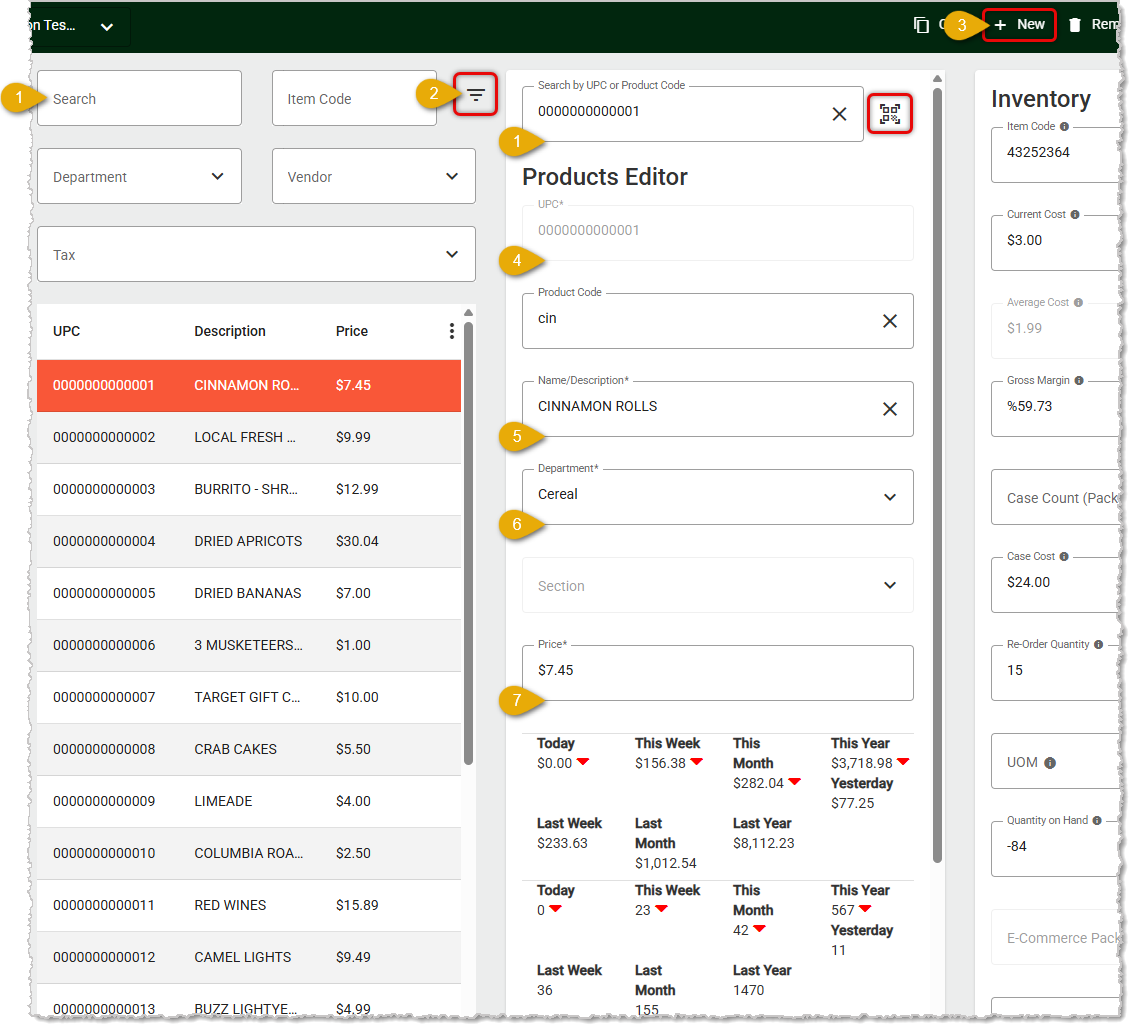
Please Note: The areas not detailed below are optional. If you need full descriptions of everything, scroll down to Related Topics and take a look at the Product Maintenance article.
*Items marked this way are required in order to save the product.
- Search — If it's possible the product has already been added to the system you might want to search using the UPC or keywords from the Name or Description.
- Filters — You can use the Filters Button next display or hide fields to filter by Department, Vendor, and Tax. If the product is not already in the system, proceed.
- New — Click the +New button to get started.
- UPC* — If you have a scanner connected to your device, you can scan in the UPC barcode. If you are using a device that has a connected camera, you can click the Scan button to the right to scan the code into a window that will pop up for you.
- Name* — Enter the full name of the product, as in the example above. This will appear as the Description for the item whenever it's viewed in the Front End.
- Department* — Click the drop-list to open it and select the Department for the item. In the field for Section, you have the option of adding a Section if the item should be in one.
- Price* — Enter the regular Price you will use to sell the item.
- Inventory — While you're not required to enter Inventory information, we recommend that you do so, especially if you plan to use the IT Retail Purchase Order system. Here are major areas of the Inventory tab:
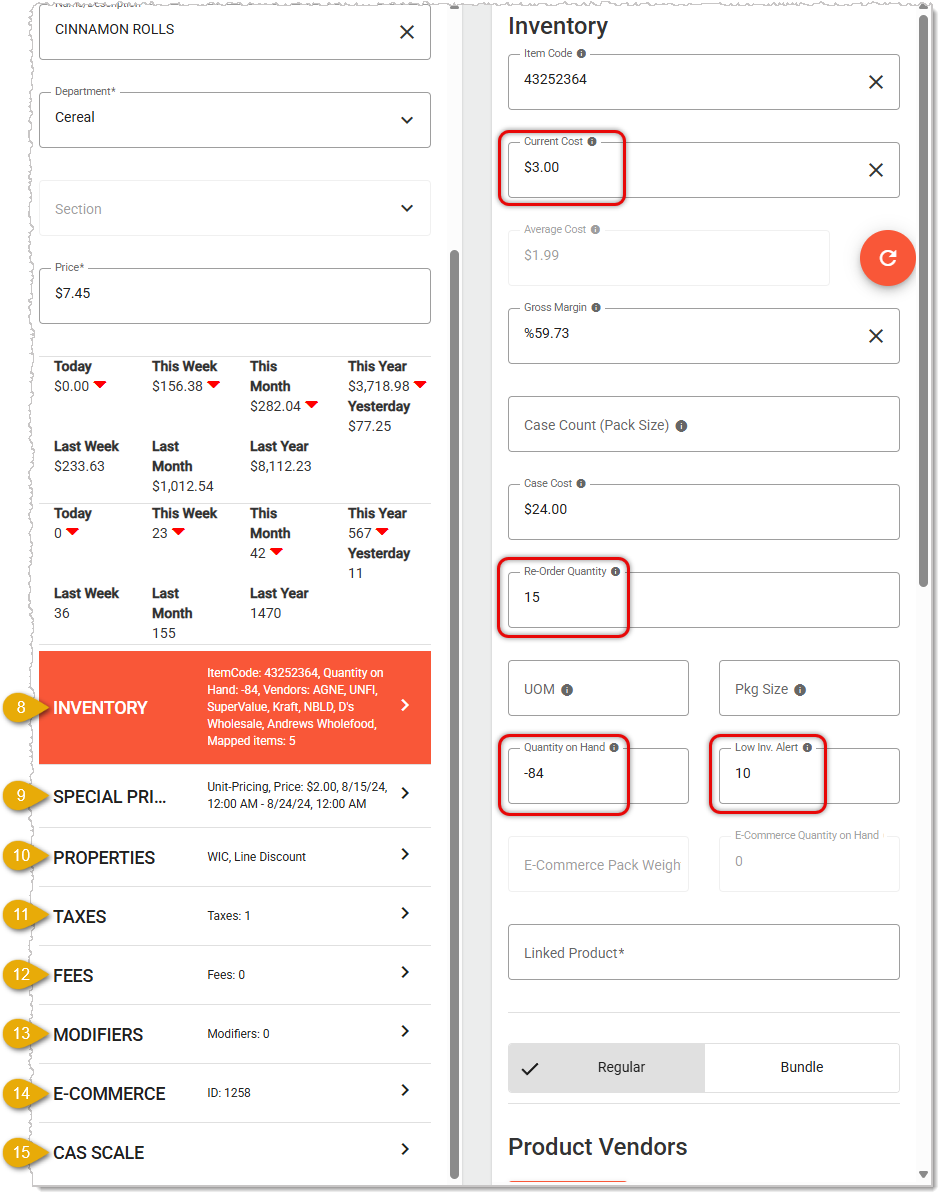
- At the least, putting in your Current Cost and Quantity on Hand would help you track your margins and your inventory count for the item. For produce and deli items like the example above, you don't need to enter the Quantity.
- You can set Re-Order Quantity and Low Inventory Alert values to help you keep items you'll be reordering in stock.
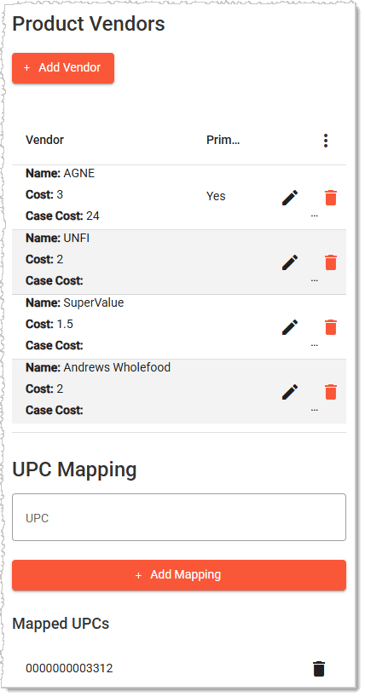
- You are able to enter information about the Vendor you use for the product, and if you have more than one, you can add as many secondary vendors as you need.
- In the UPC Mapping area, you can add additional barcodes that you can use for the product. Unless you have an alternate UPC, you don't need to work in this area.
- Special Pricing — If you're not starting the item out with any special sale pricing such as BOGO or similar types, you don't need to work in this area. For more information on the special pricing methods and how to enter them in this area see the article linked below titled Special Product Pricing.
- Properties — There are several things on the Properties tab that are notable:
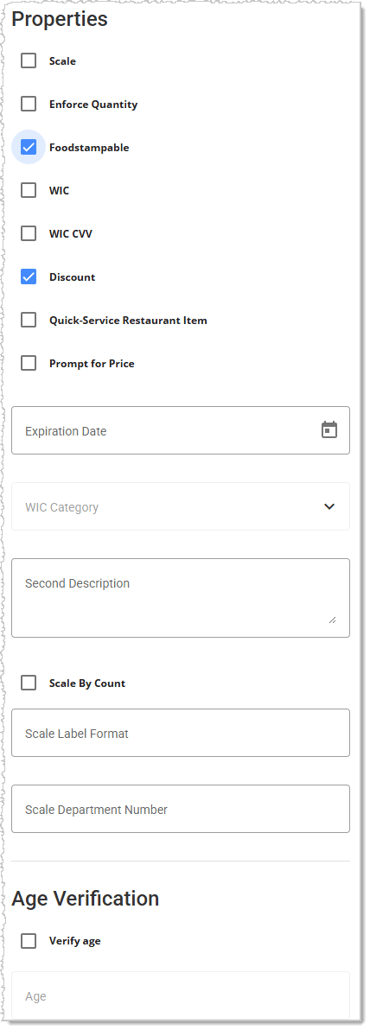
- Scale — If the item is sold based on weight, check this box so it will use the scale.
- Enforce Quantity — Check this box if the item is frequently purchased in multiples, such as with avocados or limes. With this box checked, in the Front End, whenever the product is added to a transaction, the Quantity window will open allowing the cashier enter the quantity.
- Foodstampable — Check this box if the item is eligible to be paid for using EBT / EBT Cash / SNAP (Food Stamps).
- WIC & WIC CVV — At present the IT Retail system does not support the use of WIC (Women Infants Children) and WIC CVV for payment, but we hope to add this functionality in the future.
- Discount — Check this box if the item can be discounted by electronic coupons and discounts for which it is eligible.
- Quick-Service Restaurant Item — If the item is offered fresh-made with optional ingredients, check this box. Whenever the product is added to a transaction on the Front End a window will pop up so the cashier can add or remove ingredients to the item. These ingredients are pulled from the list of Modifiers and you can define which are available for this item on the Modifiers tab described in #12 below. An additional small receipt will also be printed to give to the kitchen showing the order number and any extra items. For details on how to create your product modifiers, please see the linked article on Product Modifiers in the Related Topics area near the bottom of this article.
- Prompt for Price — Check this box if you want the Price window to pop up whenever the item is added to a transaction in the Front End. Use this for items that have prices that fluctuate frequently.
- Expiration Date — If you want to be able to look up the item's expiration date in the system, enter it here for your reference.
- Second Description — The main product Name / Description area has limited space, so if you need further description for the item you can enter paragraph text here.
- Scale Info — Unless you use the ePlum integration, you won't need anything in this area. If you are using the integration, our support team will help you configure this area.
- Age Verification — If the item is age-restricted, such as with alcohol and tobacco, you can set Age Verification to be active and the minimum age for customers allowed to purchase it.
- Taxes — In this area you'll see all of the Taxes you've created in the system (under Taxes > Taxes). You can check the boxes for whichever ones apply to this product.
- Fees — In this area you'll see all of the Fees you've created in the system (under Taxes > Fees). You can check the boxes for whichever ones apply to this product, if any.
- Modifiers — If you set the item to be a Quick Service Restaurant Item you can select the available options from the list of all of your saved Modifiers that will be offered for possible use with this product when it's added to a transaction in the Front End.
- E-Commerce — If you will be selling the item online, you will need to work in the areas detailed below. If not, you don't need to do anything here. Here are the areas to which you should pay attention for eCommerce items:
- Open in Grazecart — Click this button to open this item and work with it in the Grazecart interface. For full details on how to work in that area, please see the article linked below in the Related Topics area on Set Up Products for eCommerce with Grazecart. The areas below are also important for your eCommerce integration.
- Hide From eCommerce — Check this box if you don't want this product to display in your web store.
- eCommerce Product ID — This field will automatically populate with the Product ID for Grazecart and will create the product on the Grazecart side if the setting to Hide From eCommerce (above) is not checked. That code in the IT Retail system is linked to the product in Grazecart. For example on Grazecart if we have a product with a product ID of 12345 and the field auto-populates the 12345 code here, changes made to this product will sync over to Grazecart product ID 12345.
- eCommerce Price — Enter a price for the item to use exclusively online if you will be pricing it differently from its standard price.
- On Sale — Toggle this on by checking the box to make the sale price in #6 below active until you un-check this again.
- eCommerce Sale Price — Enter a sale price for the item for its sale exclusively online. This price will only be active whenever the checkbox in #5 above is checked.
- eCommerce Unit Description — If you need to list any information about the item, such as its dimensions or weight in kg/grams, you can enter those details here.
- eCommerce Package Weight — For items sold in Grazecart by weight, those values will populate here for this product through the integration. If they are adjusted in Grazecart they will update here.
- eCommerce Summary — Enter a short description of the item for the page that lists the item with other items in its category and on search result pages. Be sure to include the most important item details, and keep it brief (one or two sentences). Please note that this field and the one below will sync their information during the initial product sync to Grazecart, and then will disappear from this tab and you will manage them in the Grazecart interface.
- eCommerce Description — Enter the full item description including all details you want for the product on its web page. As noted above, this field and the one above will disappear after the product initially syncs to Grazecart and you can manage this information in that interface.
- CAS Scale — The CAS Scale tab allows you to configure the CAS Scale integration, if it is enabled. Your configuration will sync over to your deli scales automatically after the Front End syncs. You can see full details about this area in the article linked below about the Product Maintenance page.
- Save — When you have finished configuring your product, click the Save button in the upper right and the system will add or update the product.
*Items marked this way are required in order to save the product.
Related Topics
Quick Add
Product Maintenance
Taxes
Fees
Product Modifiers
Set Up Products for eCommerce With GrazeCart
Frequently Asked Questions
Q: I have a question, but I can't find my answer here. How do I get more assistance?
A: If you need immediate assistance, the IT Retail team is available 24/7. Feel free to contact our support team at: 877-752-0625. You can also email us at support@marktpos.com and we will respond within 24-hours.
Adding products to a customer’s transaction is straightforward. Below is a step-by-step guide on how
Processing refunds and returns is a natural part of retail sales. We’ll walk you through the steps o
Going live with EBT (SNAP) is exciting and may not be as daunting as you’d think. We've done a few t








Is this page helpful?
×Help us improve our articles