







Working With Products in Transactions
Adding products to a customer’s transaction is straightforward. Below is a step-by-step guide on how
 February 03, 2026
IT Retail gives you the ability to set up product inventory details like Vendors, Age Minimum, Taxes, and more. This allows you to take advantage of the full functionality available for inventory in the system. Read on to see all of the Product Inventory Fields available to you!
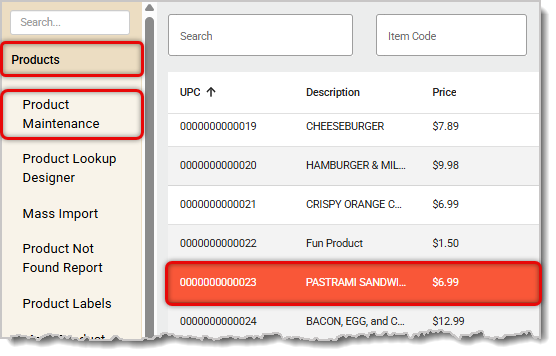
To access Product Inventory Fields, you'll first have to log into the Back End and go to Products > Product Maintenance using the left-hand panel. Then you can search for or scan in what you’re looking for, then click to select the item.
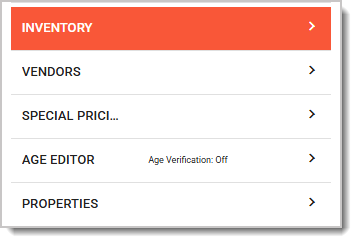
In the Product Editor, which is located to the right of the Product List, scroll down to find the Inventory tab.
On the far right of the page, you'll see the Product Inventory Fields. We'll describe each field in more detail.
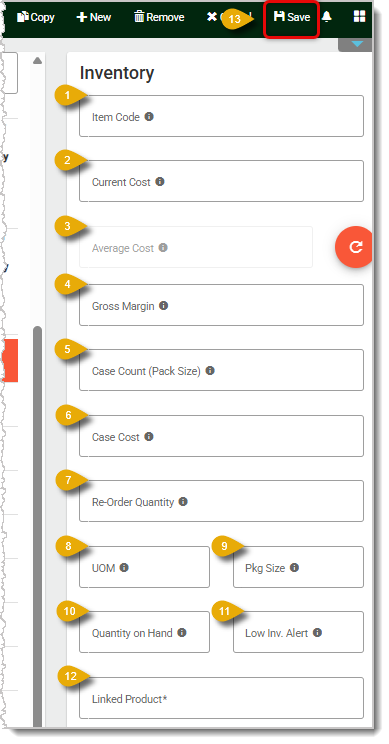
Item Code — Enter the unique identifying number for the Product, which is usually provided by its Vendor or wholesaler.
Current Cost — This is the current cost per unit you pay the Vendor.
Average Cost — This is the weighted average cost you pay the Vendor for this Product. The value is calculated according to the cost of the Product you have on hand, as well as additional ones you've received. This cost is updated when you edit Receive Inventory, and you can refresh it by clicking on the arrow button to the right of this field.
Gross Margin — This value is calculated by Price minus Cost, then divided by Price.
Case Count — Enter the number of units in each case. In Receive Inventory, IT Retail uses this to find how many cases you're receiving.
Case Cost — Enter the dollar amount of one case for this item.
Re-Order Quantity — Enter how many units or cases of this Product you want to eventually re-order. When you're filling out a Purchase Order, the Re-Order Quantity will automatically populate the Quantity for this Product.
Unit of Measure (UOM) — Enter the weight according to pounds (lbs). This is is only used if you're calculating inventory of weighted items. If this Product is marked with Scale, or the UPC begins with 002, the UOM field will come in handy.
Package Size — Enter the size of a package, such as 16 oz. or 1 liter. This field is helpful when you want to print Product Labels.
Quantity on Hand — This is the number of units you have at the moment. You can use this field at any time to update inventory. It's also helpful if you're opening a new store.
Low Inventory Alert — Enter the amount of inventory this Product has to reach for you to get a Low Inventory Alert. For example, if you enter 15, IT Retail will alert you once the Product reaches only 15 units.
Linked Product — The Linked Product field helps you calculate Quantity on Hand for two or more products together. For example, you might sell multiple cans of soda together in cases, but also sell individual cans. Select the item for cases, then enter the UPC of the individual package (one can) in the Linked Product field. The quantity on hand of the individual can will be calculated according to the quantity of the case. When packs or cartons are sold on the Front End, the quantity on hand will be updated for both UPCs. Please note: This field is only enabled when the Case Count is greater than 0.
Save — Be sure to click on the Save button when you make any changes to the Product Inventory Fields.
Q: I have a question, but I can't find my answer here. How do I get more assistance?
A: If you need immediate assistance, the IT Retail team is available 24/7. Feel free to contact our support team at 877-752-0625. You can also email us at support@marktpos.com, and we will respond within 24 hours.
Is this page helpful?
×Help us improve our articles