Your IT Retail system Back End gives you administrative control over the entire system. This article will show you the areas of the Back End and what you can do with each of them. Explore what's there for you!
Here is what you'll learn:
Back End Core Controls
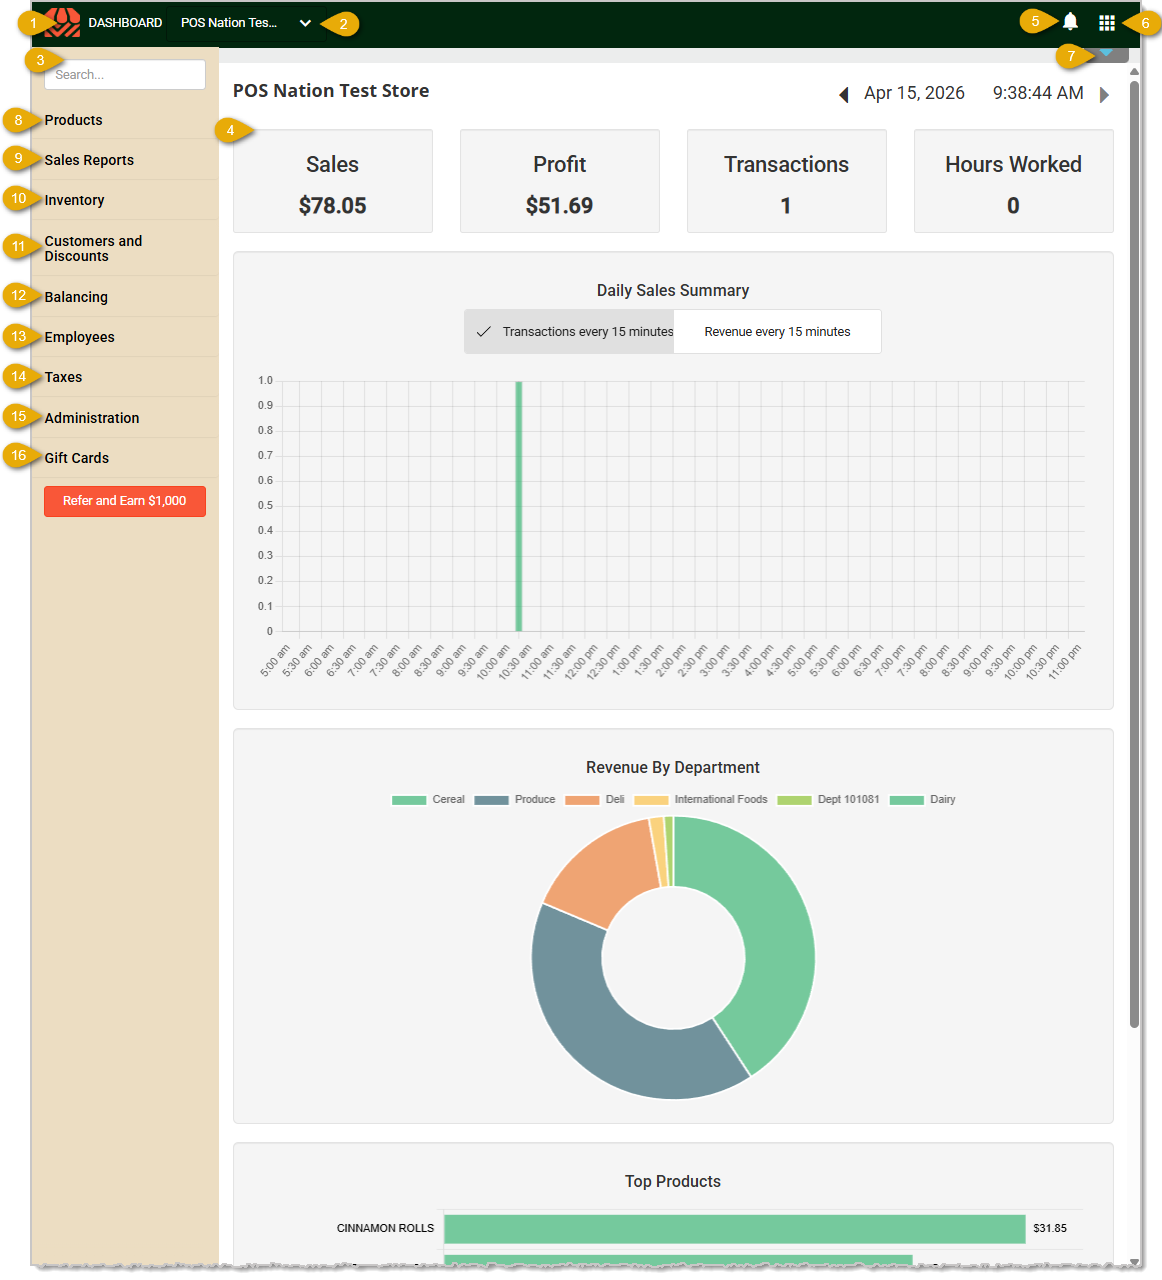
At the top of the IT Retail system Back End the following core controls are at the top of the page for you:
- Home Logo and System Area — You can click on the IT Retail logo from anywhere in the system to return to the Dashboard page. To the right of the logo, the system will display the name of the area you are currently viewing.
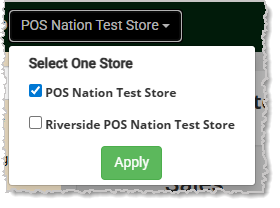
- Store — If you have multiple stores set up in the system, you can choose which store you want to work with using this drop-list.
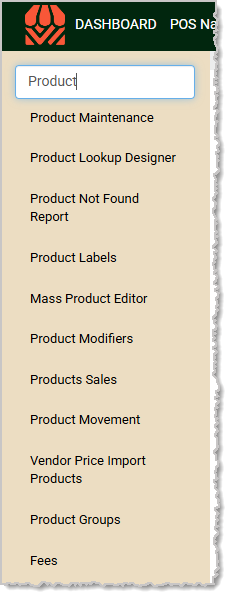
- Back End Search — Enter keywords here to quickly find the area of the system you need, as pictured here.
- Dashboard — Your Dashboard shows your current sales details for the active day, including the total dollar amount of sales, profit, number of transactions, hours worked, a bar chart with the number of sales over time in 15-minute increments (you can change it to show revenue over time). There is also a donut chart showing revenue by department for the day. At the bottom of the Dashboard page is a horizontal bar chart showing your Top Products for the day.
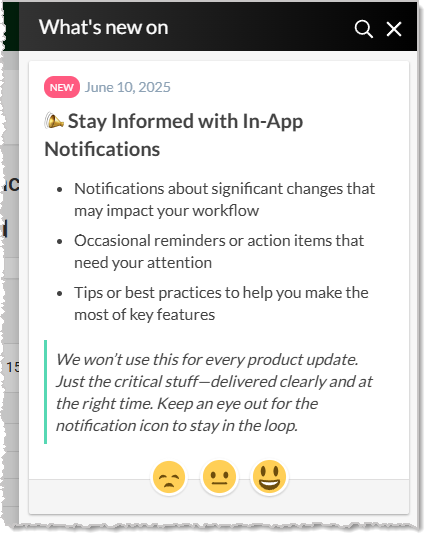
- Alerts — If there are current developments or important news for the system, the Bell icon will display the number of unseen notices. If you click on it, you'll see a list of notices, with the newest at the top, as pictured below.
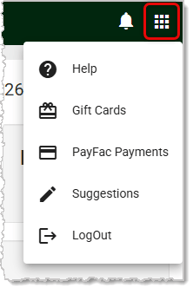
- Admin Menu — You can open the Admin menu by clicking on the Grid Button in the upper right of the page. Depending on your store configuration, you will have menu options for Help, Gift Cards, PayFac Payments, Suggestions, and to Log Out of the system.
- Shortcut Menu — You can click the blue arrow button in the upper right of the page for a Shortcut menu to popular areas of the IT Retail system, as in the example below.

8. Products
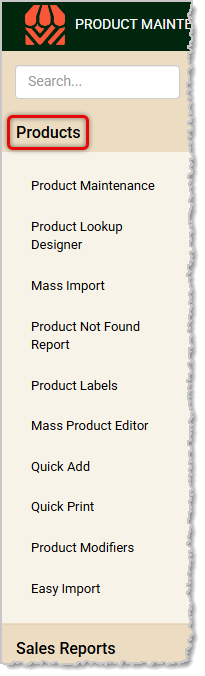
The Products menu is where you can create, edit and manage all aspects of the products you sell in your store. You have options for the following areas (links open topic-specific articles in a new browser tab):
- Product Maintenance — Create and edit full product details in this area.
- Product Lookup Designer — Build visual menus for the Front End for commonly-purchased items with this tool.
- Mass Import — Need to add a large number of products into the system all at once? This area allows you to use CSV spreadsheet uploads to get the core details of your products into the system rapidly.
- Product Not Found Report — In the Front End, whenever a cashier scans in an item and the system can't find it, this report logs that event for you so you can see what you haven't yet entered into the system.
- Product Labels — This area contains your label queue for product barcode labels that are in line to be printed. You can manually add items to your queue as well, and you can print your labels from here in bulk.
- Mass Product Editor — This convenient tool allows you to filter down to the products you need to update. You can edit data points such as Price, Cost, Special Pricing (discounted price methods and details), and other areas.
- Quick Add — This tool allows you to easily add new items or edit existing ones for basic details, including UPC, Product Code (if you don't use official UPCs and need alphanumeric codes), Description, Price, Cost, Department, and Quantity on Hand. For other product details, you'll need to work in the Product Maintenance area.
- Quick Print — Need to print some product barcode labels fast? This area will let you work with one item at a time and print the barcode labels you need.
- Product Modifiers — Do you sell fresh items with options, such as sandwich toppings or coffee ingredients? Define all the options in this area.
- Easy Import — Follow a step-by-step process to generate a spreadsheet template to upload new items with data for UPC, Description, Price, and Cost to quickly get items into the system in bulk. Later, you can use the Product Maintenance area to update other important details.
9. Sales Reports
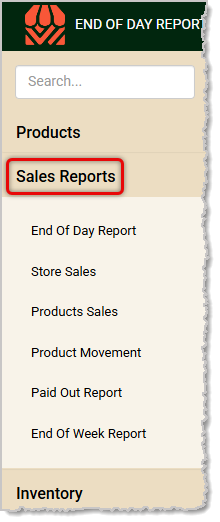
The Sales Reports menu is where you can see how well inventory is selling in your store. You have options for the following areas (links open topic-specific articles in a new browser tab):
- End of Day Report — You can generate your End of Day report whenever you need, and the PDF download will contain detailed sales information about everything that happened in your store for the date selected.
- Store Sales — This useful on-screen report gives you a Sales Summary for the date range you need as well as a Sales Comparison to previous periods, Department Sales, and a Monthly Summary. You can export each of these major areas to PDF or CSV.
- Product Sales — Filter products in the system by Department, Vendor, Section, and Product Group, or just search by keyword for products you need. The report will give you sales data on the products you find. You can export to PDF or CSV.
- Product Movement — This useful tool will let you look at the sales volume over time for whatever product you need, comparing the current year's sales volume to the previous year's volume over whatever date range you choose. View Weekly Movement or Historical Movement as you prefer.
- Paid Out Report — View all Paid Out events done in the Front End for the store for whatever date range you choose. Details include the Paid Out Name, Employee Name, Employee ID, the Date & Time of the event, and the Amount. You can export to PDF or CSV.
- End of Week Report — This on-screen report gives you daily sales totals for the past week for Department Sales, Tax Summary, and Tender Summary. You can choose a different date range if you like, and you can export a PDF of the data.
10. Inventory
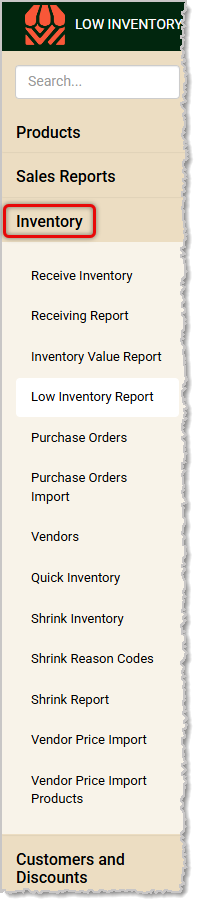
The Inventory menu is where you can order, receive, and manage inventory for your store. You have options for the following areas (links open topic-specific articles in a new browser tab):
- Receive Inventory — Use this tool when you get a shipment of inventory to receive item quantities. This area allows you to process Vendor Orders and Purchase Orders. You can also manage Vendors you've saved in the system.
- Receiving Report — This on-screen report shows you all items received in the date range you prefer and you can filter by Vendor, Department, and Section as needed. You'll see data for the Product Name, Quantity Received, Weight Received, and dollar Value Received. You can export to PDF or CSV.
- Inventory Value Report — View inventory value data by Department or at the Product level. You'll see UPC, Department Name, Description, the Number of Products, Total Cost Value, Total Price Value, and any Expiration Dates. You can export to PDF or CSV.
- Low Inventory Report — If an item’s quantity has reached or gone lower than the Low Inventory Alert threshold you’ve set, it will be listed in the Low Inventory Report. You can filter by Vendor, Department, or Section and export to PDF or CSV.
- Purchase Orders — You can view your saved Purchase Orders or create new ones with this tool, then use them with the Receive Inventory tool when the shipment comes in.
- Purchase Orders Import — This convenient tool allows you to import products from a CSV, such as one you export from the Low Inventory Report for a vendor. The import file uses UPC, Item Code, Quantity, Case Cost, Case Count, and Unit Cost for each item's data. You can also take photos of your Purchase Orders and load a PO from the image.
- Vendors — Save important information about the vendors from whom you order in this area. Vendors are used for Purchase Orders, Receiving Inventory, and filtering your products. They are also used in some system reports.
- Quick Inventory — Use this convenient tool to add new products, receive inventory, or update existing items for the UPC, Product Code, Description, Department, and Quantity on Hand. Add or adjust other details in the Product Maintenance area.
- Shrink Inventory — Use this tool to account for inventory shrinkage. Scan or manually enter items and you'll see the UPC and Description for the item. Set the Reason Code for the shrinkage, the Quantity or the Weight that you've lost, and then you can Delete the quantities for items you enter this way when you're ready, and the system will adjust the inventory.
- Shrink Reason Codes — Set up reasons you'll use in the Shrink Inventory tool for why the inventory is lost.
- Shrink Report — This report shows you how much dollar value you've lost to shrinkage for the current day, but you can adjust the date range. Filter by Department, Section, UPC or Description, and/or Reason Code. You can export to PDF or CSV.
- Vendor Price Import — For integrated vendors (currently only Agne) you can use this area and have our support team set up a live feed update of item pricing that will save new item prices for the vendor whenever they post updates.
- Vendor Price Import Products — This area will show you a list of all Staging products recently added to the system and you can edit data as needed for Description, Cost, Price, Gross Margin, Special Cost, Special Price, and Start Date of special pricing method. After you've made your updates on the page, you can save the changes to all of the inventory at once. You are also able to create barcode labels from this area.
11. Customers and Discounts
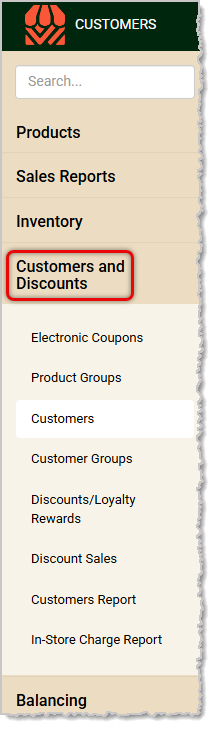
The Customers and Discounts menu is where you can create, edit, and manage customers, discounts, and loyalty rewards in your store. You have options for the following areas (links open topic-specific articles in a new browser tab):
- Electronic Coupons — Set up discounts with active dates, limits, triggers, and the awards they give for use in the Front End. These discounts are entirely electronic and do not require printed coupons.
- Product Groups — Create and manage groups of products to which you can apply discounts. This is especially helpful for mix-and-match coupons.
- Customers — You will find a list of all customers who have been added to the system here, and you can add new customers or work with existing ones from this page.
- Customer Groups — Use this area to create groups of customers for special group discounts for your store’s marketing.
- Discounts / Loyalty Rewards — For special discounts you offer and Loyalty Rewards you give to your customers when they've earned enough points, this tool allows you to create and manage those benefits.
- Discount Sales — This on-screen report gives you amounts discounted for your discounts for whatever date range you choose. You can see the Discount Name, Type (Percent or Dollar Amount), the Count of the discounts used, Transaction Totals, and Amount Discounted. You can export to PDF or CSV.
- Customer Report — This on-screen report shows you spending by customer and can let you quickly identify your top customers for your chosen date range. You can export to PDF or CSV.
- In-Store Charge Report — If you offer in-store charge accounts to some of your customers this report can show you details about their charge account spending. You'll see each customer's Name, Email, Total Due, Last Paid date, Last Charge date to the account, and Number of Transactions. You can export itemized invoices for the customers, and export all data to PDF or CSV.
12. Balancing
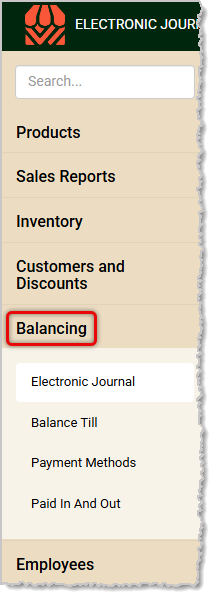
The Balancing menu is where you can view till activity and balance revenues for your store. You have options for the following areas (links open topic-specific articles in a new browser tab):
- Electronic Journal — This on-screen report shows you dollar amounts and tender types by employee that were taken in or paid out. This data will span whatever date range you choose. You can also see individual transactions that happened in the chosen date range. This is useful for viewing transactions when you are not at the register. You can export the data to CSV or PDF.
- Balance Till — This tool lets you see the Cash Drawer Analysis for your tills and gives you the Actual Count, the System Count, and drawer Over / Short so you can balance the till by what is actually in the drawer. If the drawer has more cash actually counted than was in the System Count, it is Over, and the reverse is true for Short.
- Payment Methods — See the dollar amounts by tender type with this on-screen report for whatever date range you choose. It also provides useful information about voids and refunds. You can export to PDF or CSV.
- Paid In and Out — You can use this area to create or edit your different types of Paid In and Paid Out items for use in the Front End.
13. Employees
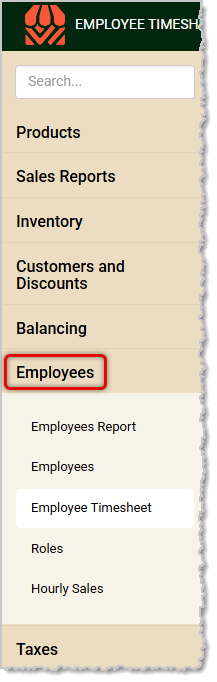
The Employees menu is where you can create employee system accounts, set permissions and roles, and manage timesheets for employees in your store. You have options for the following areas (links open topic-specific articles in a new browser tab):
- Employees Report — This report shows sales data and till activity by employee for whatever date range you choose. See employee Rating, Name, Sales dollar amount total, Voids, No Sale drawer opens, Refunds, Discount dollar totals, Tips, Cancels, and Transaction counts. You can export to PDF or CSV.
- Employees — Use this area to create and manage login accounts for your employees. Set their contact info, a Role for their system permissions, a Cashier PIN for the Front End, any Back End access, and the Store(s) to which they have access. You can export to PDF or CSV.
- Employee Timesheet — For employees using the system's Time Clock, view In and Out clock punches, Total time worked, and Actions they performed in the date range you choose. You can use the Trashcan Icon in the Actions column to delete a clock punch line item. You can export the data to a PDF file.
- Roles — Create and Manage Roles for the store and set system permissions for Admin, Transactions, Paid Ins, Paid Outs, and Discounts for the Front End. Set permissions for major areas in the Back End as well. In the Employees area you can assign any of your saved Roles for your team members in the system.
- Hourly Sales — In this visual report, you can see a stacked or grouped chart of your hourly transaction numbers by Department or Section for your store for whatever date range you choose.
14. Taxes
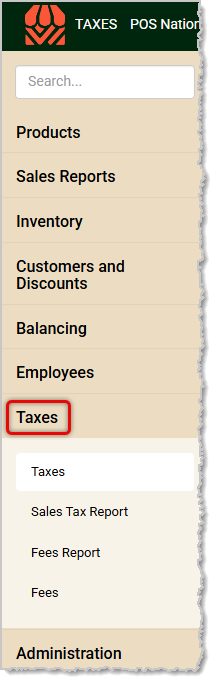
The Taxes menu is where you can create, edit and manage taxes and fees you will need in your store. You have options for the following areas (links open topic-specific articles in a new browser tab):
- Taxes — You can create your taxes and their rates in this tool. You can set different rates for different geographical Tax Areas for the taxes you create.
- Sales Tax Report — Your Sales Tax Report shows you a Summary of the taxes you collected for the date range you choose. It can also give you the Details, Departments with Taxes, and the Tenders Summary of taxes for your store. You can export to PDF or CSV.
- Fee Report — Use this simple on-screen report to view total fee amounts you earned for the date range you choose. You'll see the Fee Name and the Fee Amount total taken in. You can export to PDF or CSV.
- Fees — You can create and manage any Fees you need for the Front End in this area, giving each a Fee Name and a Fee Amount. Please note, for fees specifically attached to products, refer to this article.
15. Administration
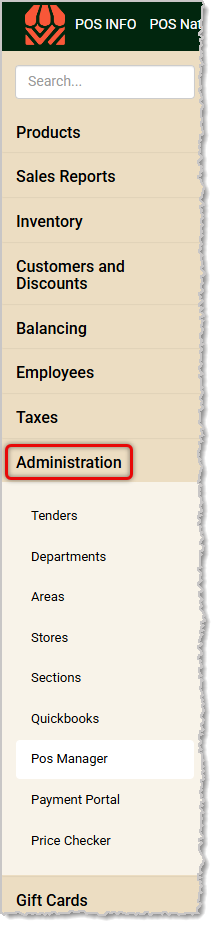
The Administration menu is where you can configure system settings, set up tenders, create and manage organizational elements such as Departments and Sections, and handle key admin functions in your store. You have options for the following areas (links open topic-specific articles in a new browser tab):
- Tenders — Create and configure the Tender Types you will use in the Front End in this area. You can set how the tender will work, whether it will open the drawer or not, any limits it might need, whether it requires a signature or not, and other behaviors.
- Departments — You can create and manage your Departments here. Give each a tax, discount, age requirement, EBT eligibility, item type designation (per unit or by weight), and eCommerce availability. You can assign a Reporting Group if needed. It is highly recommended you set up your Departments very early in your store setup process, as they are a core element that is needed for other data, such as your products.
- Areas — Set geographical Areas for different stores, if you have more than one.
- Stores — If you have multiple stores, our support team or your onboarding specialist can create them for you here. You are able to switch between stores at the top of the page in the Back End.
- Sections — You can use Sections to define different physical areas Departments in your store, such as the fruit, vegetable, and salad sections of the Produce Department. You can configure the Department for the Section's products, Taxes the Section will use, Age Verification needed, if any, and whether the items in the Section are EBT-eligible and/or available for eCommerce.
- Quickbooks — Integrate with your QuickBooks Online (U.S. only) account in this area so the system can share sales receipts by department daily.
- POS Manager — This area has sections for Security, Checkstand Screen, Checkstand Receipt, API Setup, and Printer Setup that let you configure options for the Front End and for hardware such as printers and scanners. You can also Search across all settings in the POS Manager to quickly find what you need.
- Payment Portal — Use this area to take In-Store Payments (for in-store charge account balances) or Open Department Payments from the Back End.
- Price Checker — This simple tool was developed to work with a mobile device to scan inventory remotely, but it is no longer in use. You can easily check prices from Products > Product Maintenance by scanning in or searching for the item.
16. Gift Cards
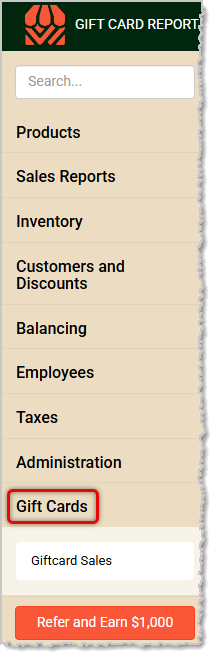
The Gift Cards area has a report that offers you useful details about Gift Card use in your store. You have options for the following area (the link will open the article in a new browser tab):
- Giftcard Sales — This on-screen report will show you the number of Gift Cards Loaded, the total dollar Amount Loaded, the number of Gift Cards Redeemed, the total dollar Amount Redeemed, and the remaining dollar amount of your outstanding Liability on Gift Cards you've issued for the entire history of the store in the IT Retail system. You can export the data as a CSV or PDF.
Related Topics
POS Front End Tour
Frequently Asked Questions
Q: I have a question, but I can't find my answer here, how do I get more assistance?
A: If you need immediate assistance, the IT Retail team is available 24/7. Feel free to contact our support team at: 877-752-0625. Or you can email us at support@marktpos.com and we will respond within 24-hours.








 April 16, 2026
Is this page helpful?
×Help us improve our articles